

If you’ve started to explore the possibilities of NetSuite, chances are you’ve come across the term API. More so, for those looking to integrate external systems with NetSuite, building or maintaining integrations can get complex. Though NetSuite API allows businesses to customize their functions extensively, navigating to its various configuration processes can sometimes get complicated and time-consuming. If you’re the one who is experiencing this, then we’re sure this post will help you.
Throughout this blog, we will explain the different types of NetSuite APIs and the ways to set and configure them. Apart from that, we’ll break down its basics, working procedure, and tips for managing the API. By the end of this article, you’ll have a solid foundation for using this tool to improve your business operations.
As you know, NetSuite is an ERP software that offers unique solutions to handle various aspects of your company. From resource planning and inventory management to financial tracking and customer relationship management, it can oversee everything. One of the software’s prominent features is its ability to link applications like CRM. This is when the NetSuite API comes in.
Businesses should harness the power of API to automate processes such as data retrieval, manipulation, and transaction management. In fact, you can use APIs in numerous ways to grow effective business intelligence. Let’s grasp its meaning in brief
Understanding NetSuite API and Its Importance
Think of API or Application Programming Interface as a set of protocols. They allow multiple software to seamlessly interact with each other. This simple idea has led to enormous economic advantages for businesses of all sizes. APIs enable a user to:
- Integrate different applications
- Share data securely
- Get information and services from another system
- Automate manual tasks
- Improve business efficiency
- Enable innovation within the operations
Similarly, NetSuite APIs are effective software toolkits or routines. They act as a bridge between various systems and let them exchange data with one another that is based on service requests. Which, in turn, can help software developers leverage APIs to create, secure, and maintain powerful functions and operations.
Imagine you want to build an online marketplace on NetSuite. You can use NetSuite API to connect your platform to a reliable payment gateway service. This means, no more worrying about complex security and compliance issues that come along with processing credit card payments. Instead, your main focus would be on enhancing the user experience to attract customers and retain them. Read more about the importance of NetSuite for ecommerce platforms.
Want to know more about NetSuite integrations and their relevance for your business?
Talk to our accountants!
Different types of NetSuite APIs
Before we move forward, it’s important you know the various forms of API NetSuite has to offer. APIs differ due to their distinct integration methods and functions they serve. Take a look at the three types of NetSuite APIs:
1. NetSuite REST API
It uses simple HTTP requests and follows a stateless model for communication. Thus, making NetSuite API integration easy to use and scalable. It commonly returns data in JSON or XML formats.
Features:
- a) Allows developers to custom integrations between NetSuite and other third-party applications or databases
- b)Automates data entry and validation processes easier
Usage: Thanks to its simplicity and flexibility, NetSuite REST API is ideal for web and mobile applications.
2. NetSuite SOAP API
This type of API uses XML messages for communication between the two systems while adhering to strict integration standards.
Features:
- a) Utilizes XML-based messaging protocol
- b) Follows more rigid standards for message structure and security
- c) Is developed in a more formalized and structured way
Usage: This API is preferred in those enterprise environments where strict Netsuite API integration standards are encouraged.
3. NetSuite SuiteTalk API
SuiteTalk is a NetSuite developer API that allows developers to integrate external systems with the software’s cloud-based ERP system. It is basically a part of NetSuite’s SOAP Web Services.
Features:
- a) Is tailored specifically for NetSuite
- b) Provides access to NetSuite’s ERP functionalities like CRM, ERP, and e-commerce
- c) Allows changing of data within NetSuite, including vendor and customer records, financial transactions, and sales orders
- d) Offers scalability to meet the requirements of large organizations and their complex processes
Usage: This NetSuite developer API is a powerful tool for automating various facets of business procedures.
6 Steps to Set Up NetSuite API
Till now we have understood the types of NetSuite APIs and how they are beneficial for a business. Now, let’s begin with the steps to set it up.
Step 1: Prerequisites
a) To begin, you need an active NetSuite account. If you don’t have one, sign up for the same to access their services and APIs.
b) After that, you’ve to ensure that your NetSuite account has the necessary access privileges to configure API settings.
If in case, you need to generate a role other than administrative, create one by following these steps:
a) Navigate to “Setup” on NetSuite Dashboard

b) From the drop-down menu, click on “Users/Roles”, then “Manage Roles”
c) After that, Select “New”
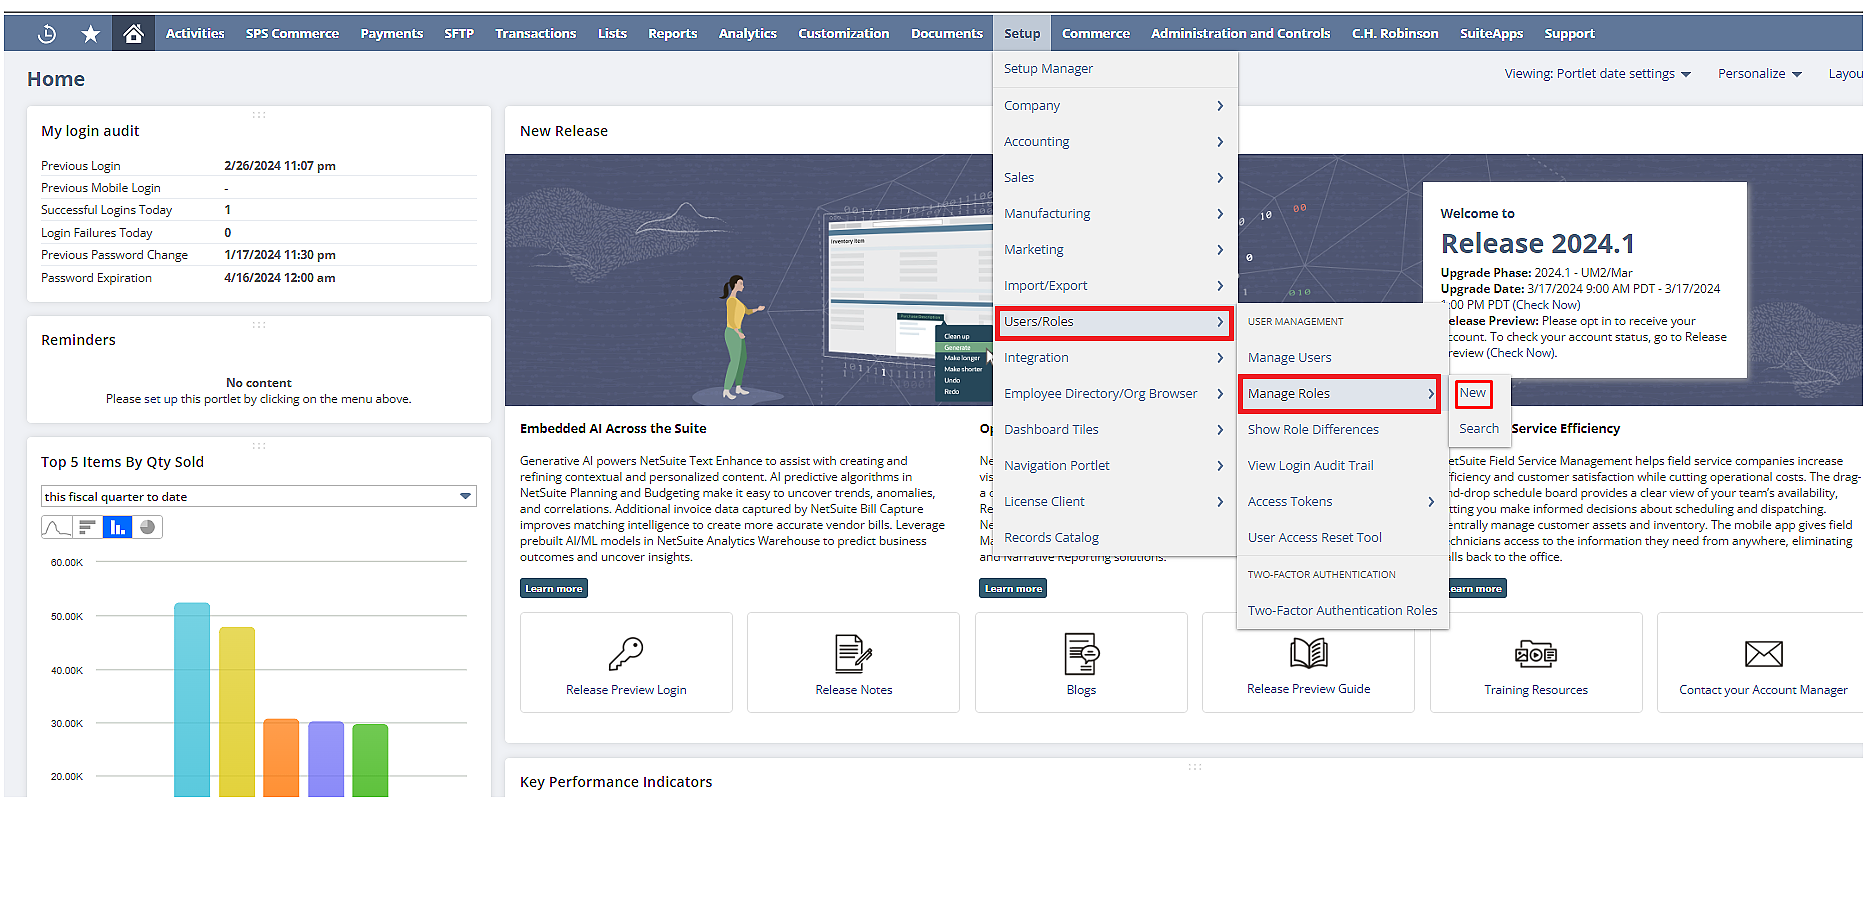
d) Assign the created role to the user intended for integration purposes
e) Generate an access token
f) Remember to save the Token ID and Token Secret
Step 2: Choosing the appropriate NetSuite API integration method
Before proceeding forward, you need to ensure which API integration technique you’re going to go with. As stated earlier in this blog, different APIs have distinct functionalities and varied methods to set up. Hence, you need to work out the best one as per your requirements.
Need help deciding the right NetSuite API for your business?
Connect with our NetSuite Support team now for customized guidance.
a) If you prefer RESTlet integration, configure NetSuite REST API within the setup (the steps are explained below).
b) If your business will benefit from SOAP-based integration, then, configure the NetSuite SOAP API. Do remember SOAP Web Services has a standardized protocol for exchanging structured information in a decentralized environment.
c) Another commonly integrated API is SuiteTalk API, which basically comes under NetSuite’s SOAP-based Web Services platform.
Step 3:Configuring NetSuite account for API access
Once the prerequisites are done and the API is selected, you have to enable NetSuite REST API or SuiteTalk SOAP Web Services. For this:
a) Go to “Setup” on the NetSuite environment. Then, “Company” > Enable features
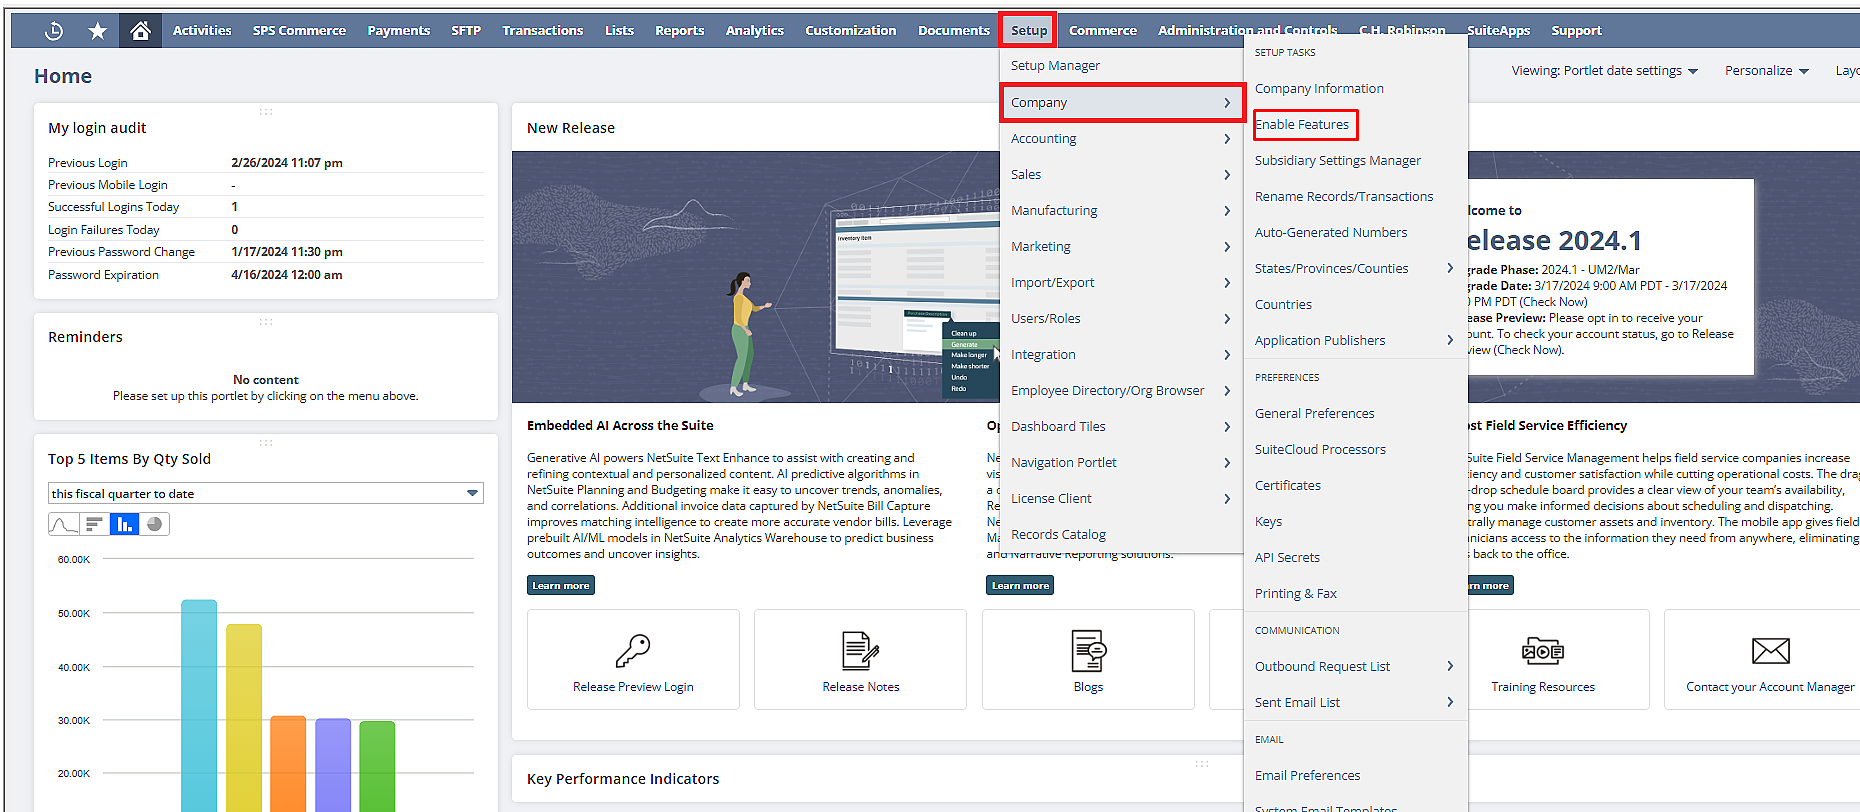
b) Click on the “SuiteCloud” tab on the “Enable Features” window

c) Scroll down and find “SuiteTalk (Web Services)”
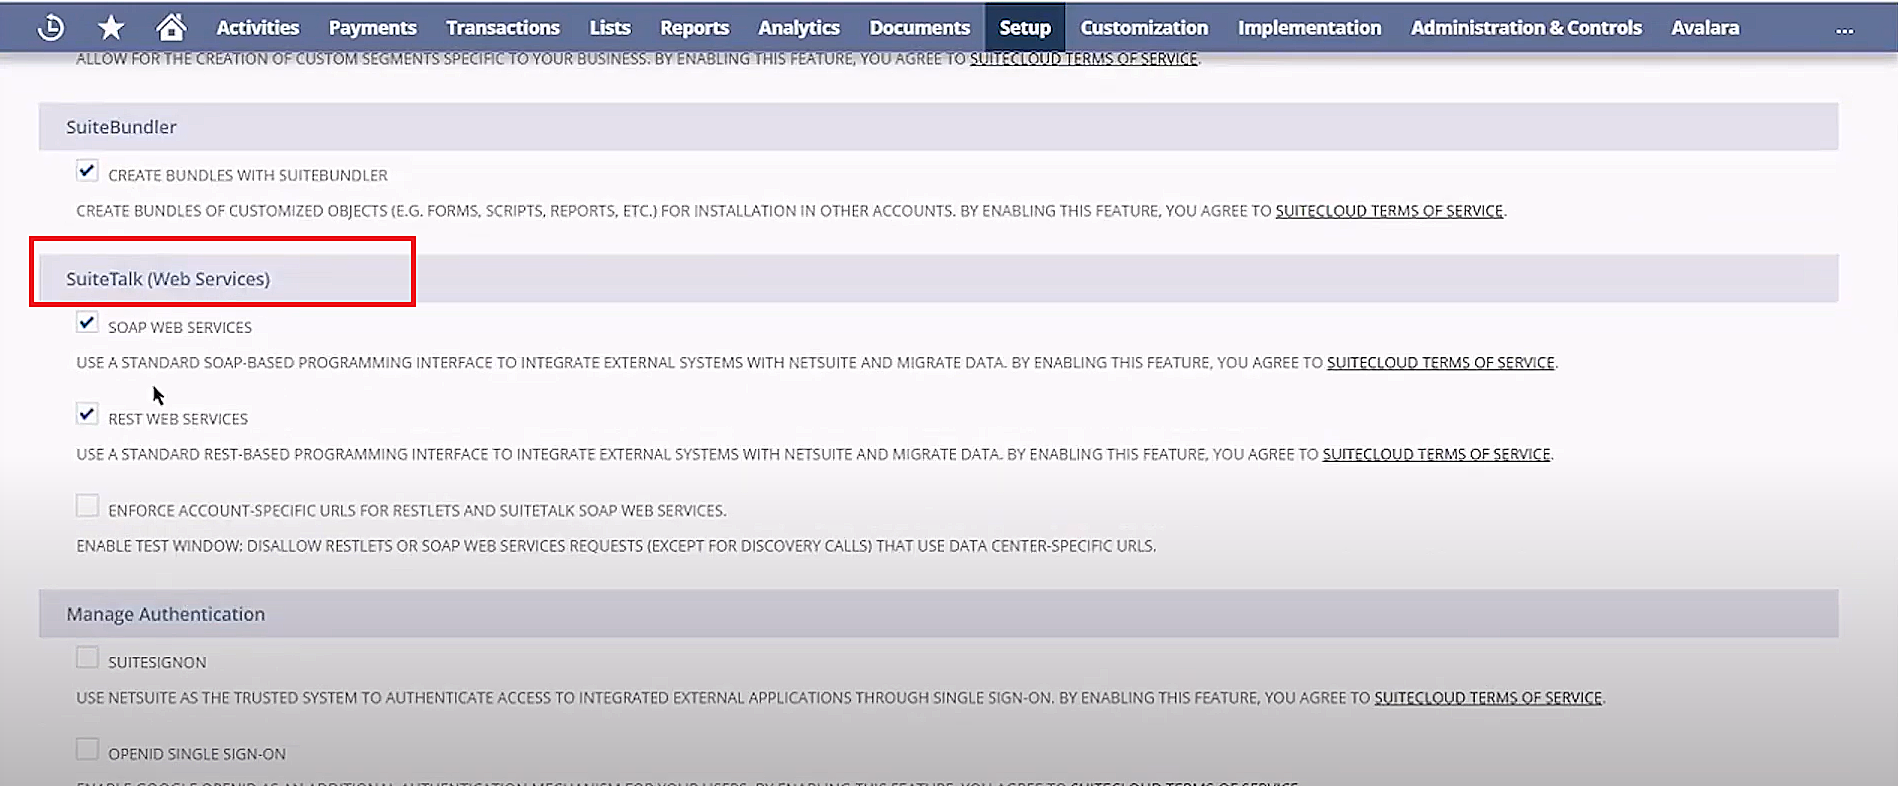
d) Then “tick mark” the small box next to “SOAP Web Services” or “REST Web Services”
Step 4: Creating a record and generating API Credentials
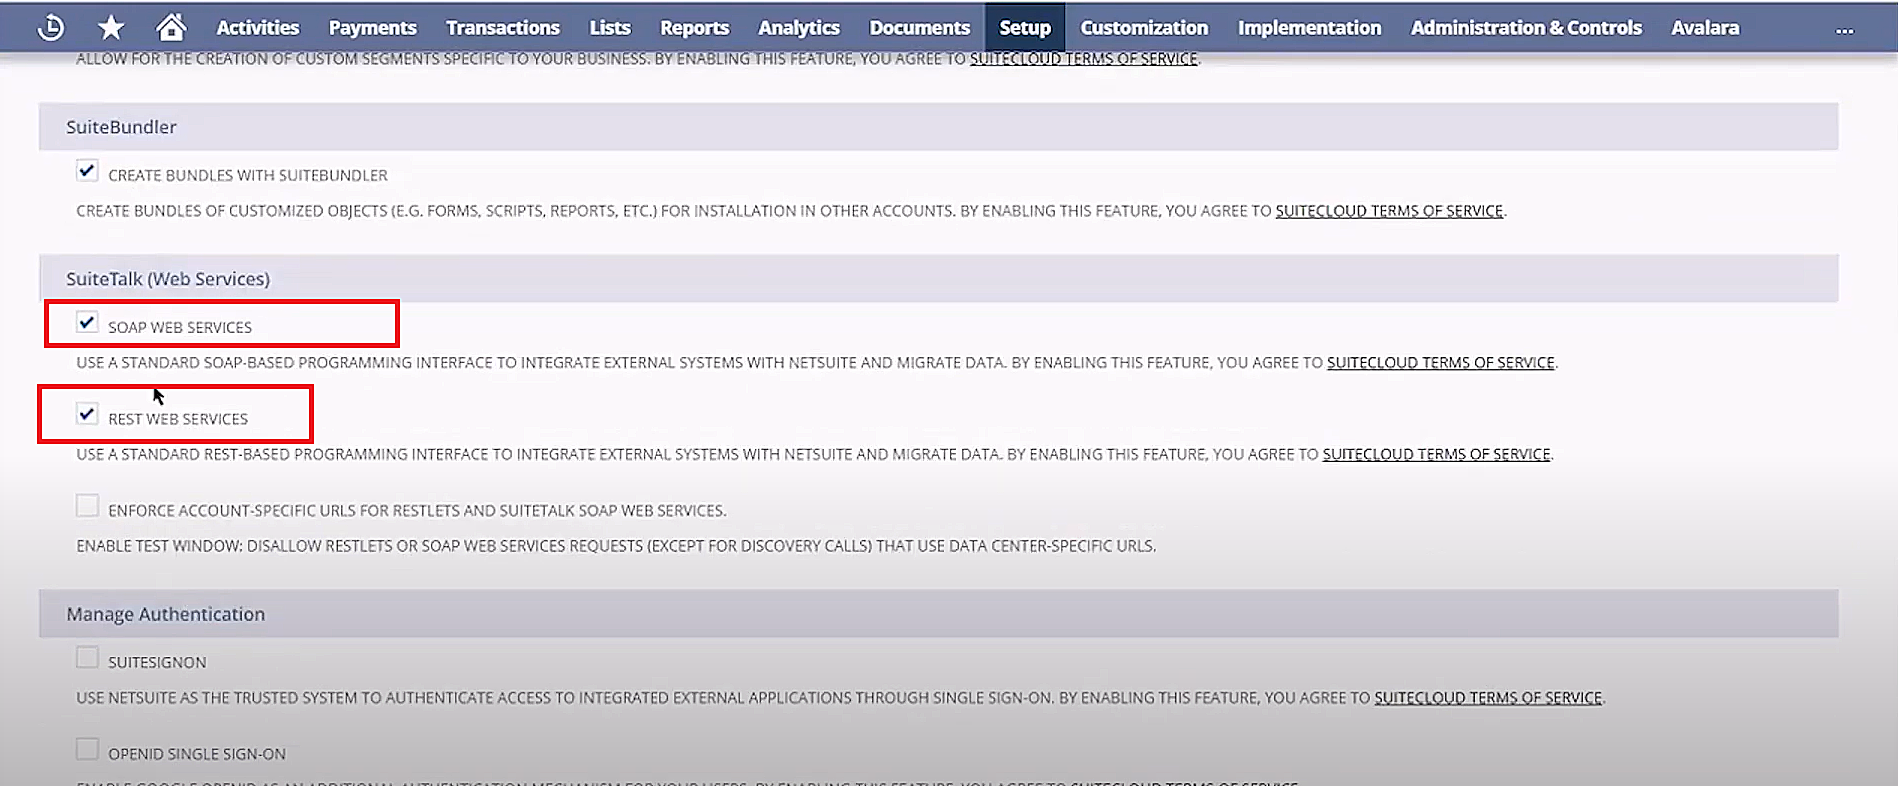
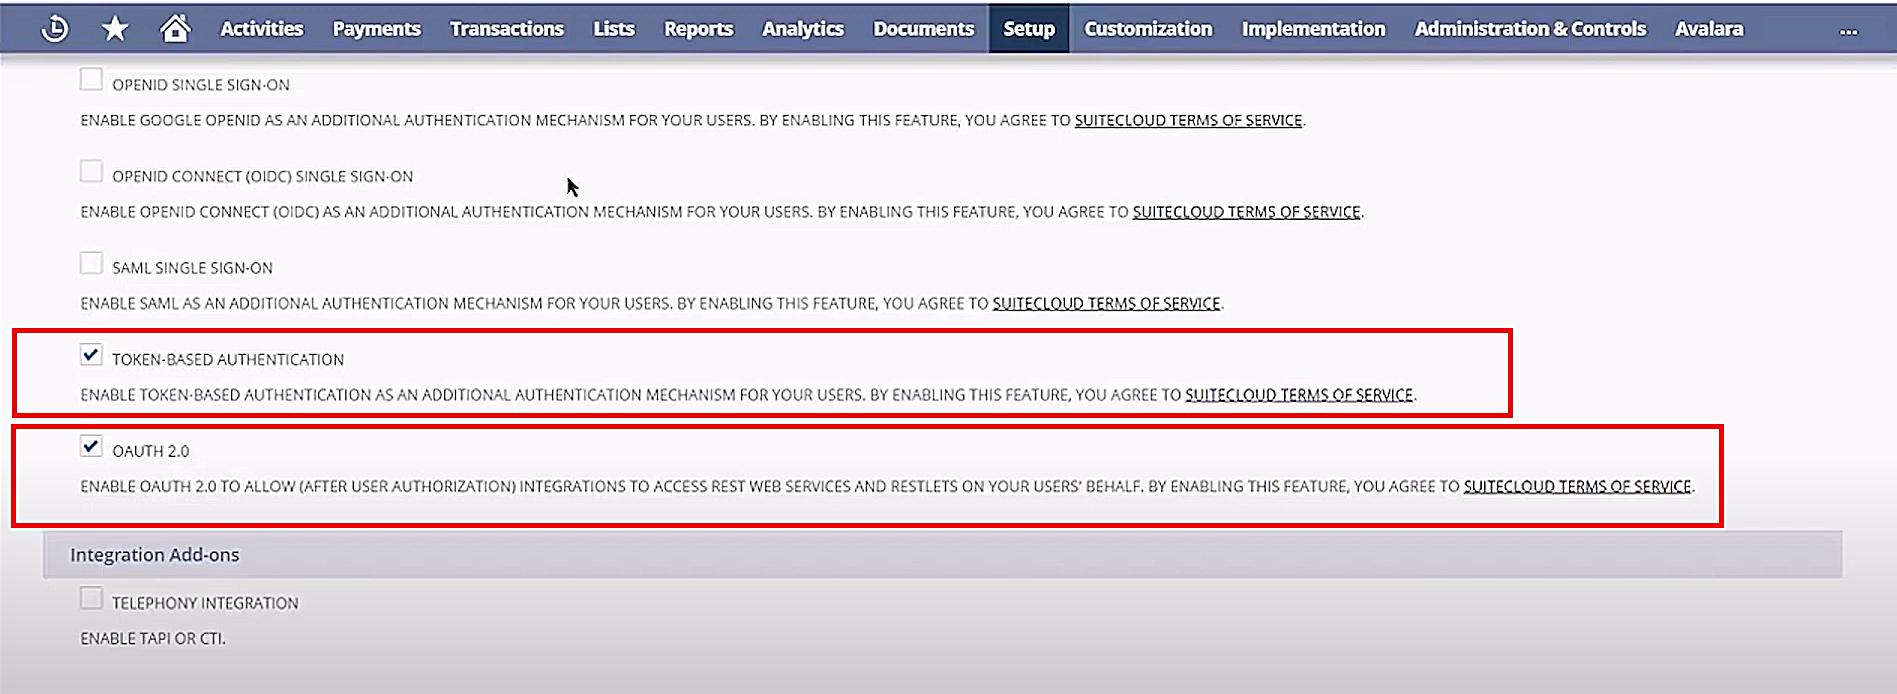
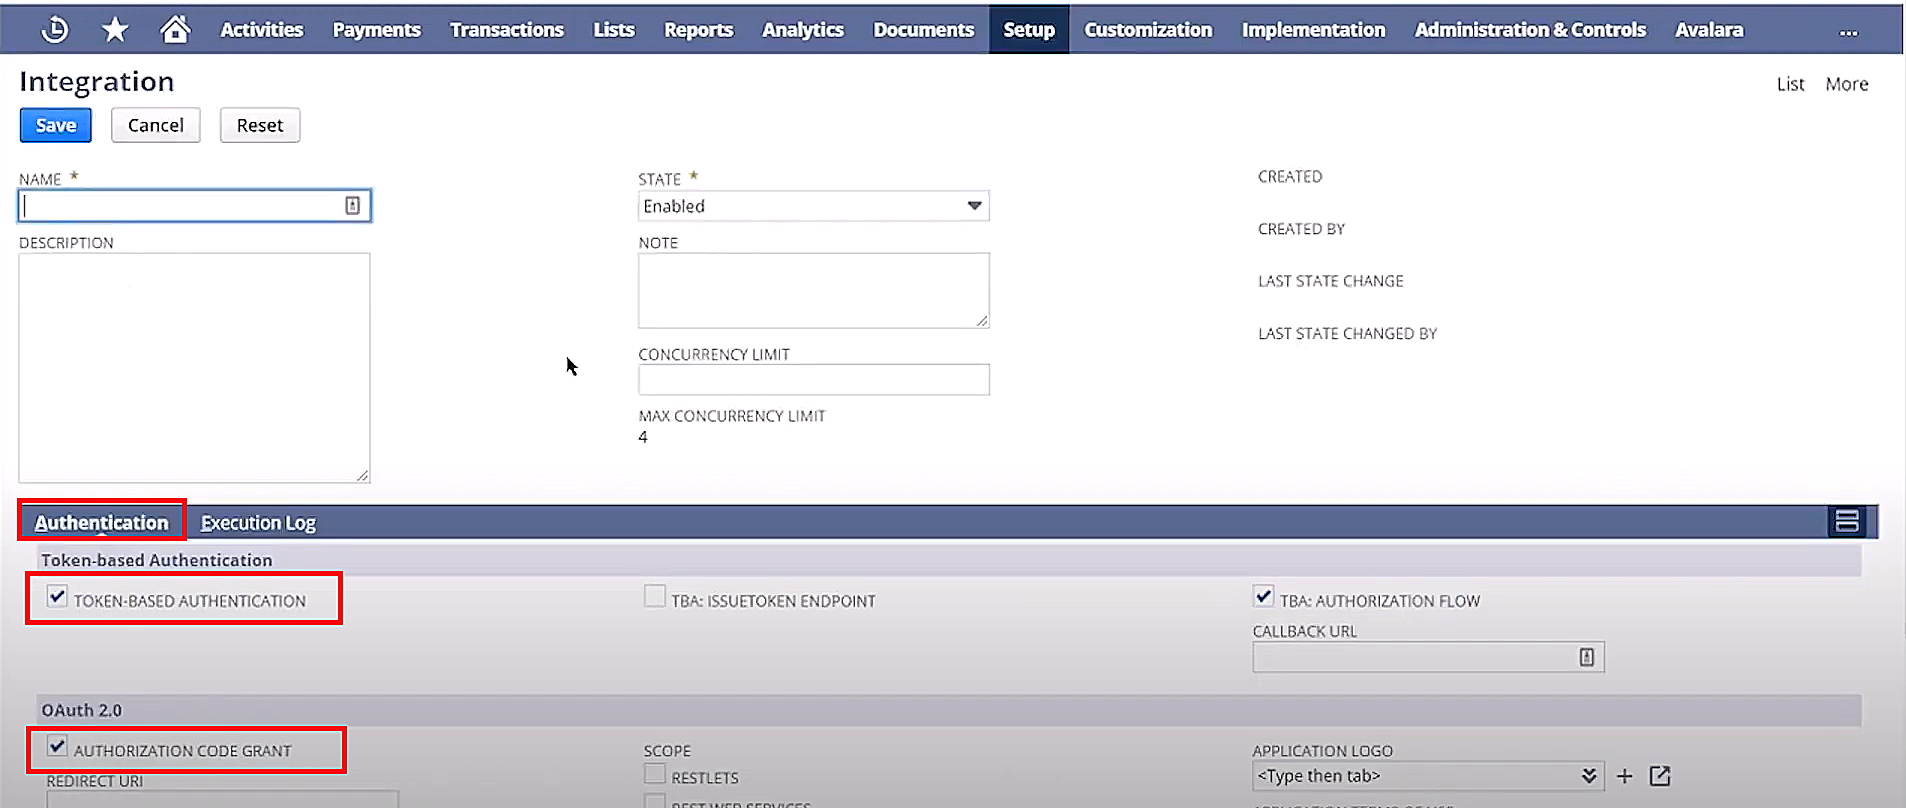
To have secure access to NetSuite API, you need to first enable one of the following two authentications.
1. Token-based Authentication: This involves generating access tokens that are included in API requests to authenticate the NetSuite application.
2. OAuth 2.0 Authentication: It allows users to grant third-party applications limited access to NetSuite’s resources without sharing API credentials.
To set up any of the above authentications, follow these steps:
a) Navigate to “Enable Features” in NetSuite (as mentioned above)
b) Scroll down and find “SuiteTalk (Web Services)” on the next page
c) Under Manage Authentication, enable “Token-based” or “OAuth 2.0” Authentication
The next step involves creating a NetSuite Record for generating API credentials. Follow the below-mentioned instructions to do so:
a) Go to “Setup” > Integration > Manage Integrations > New
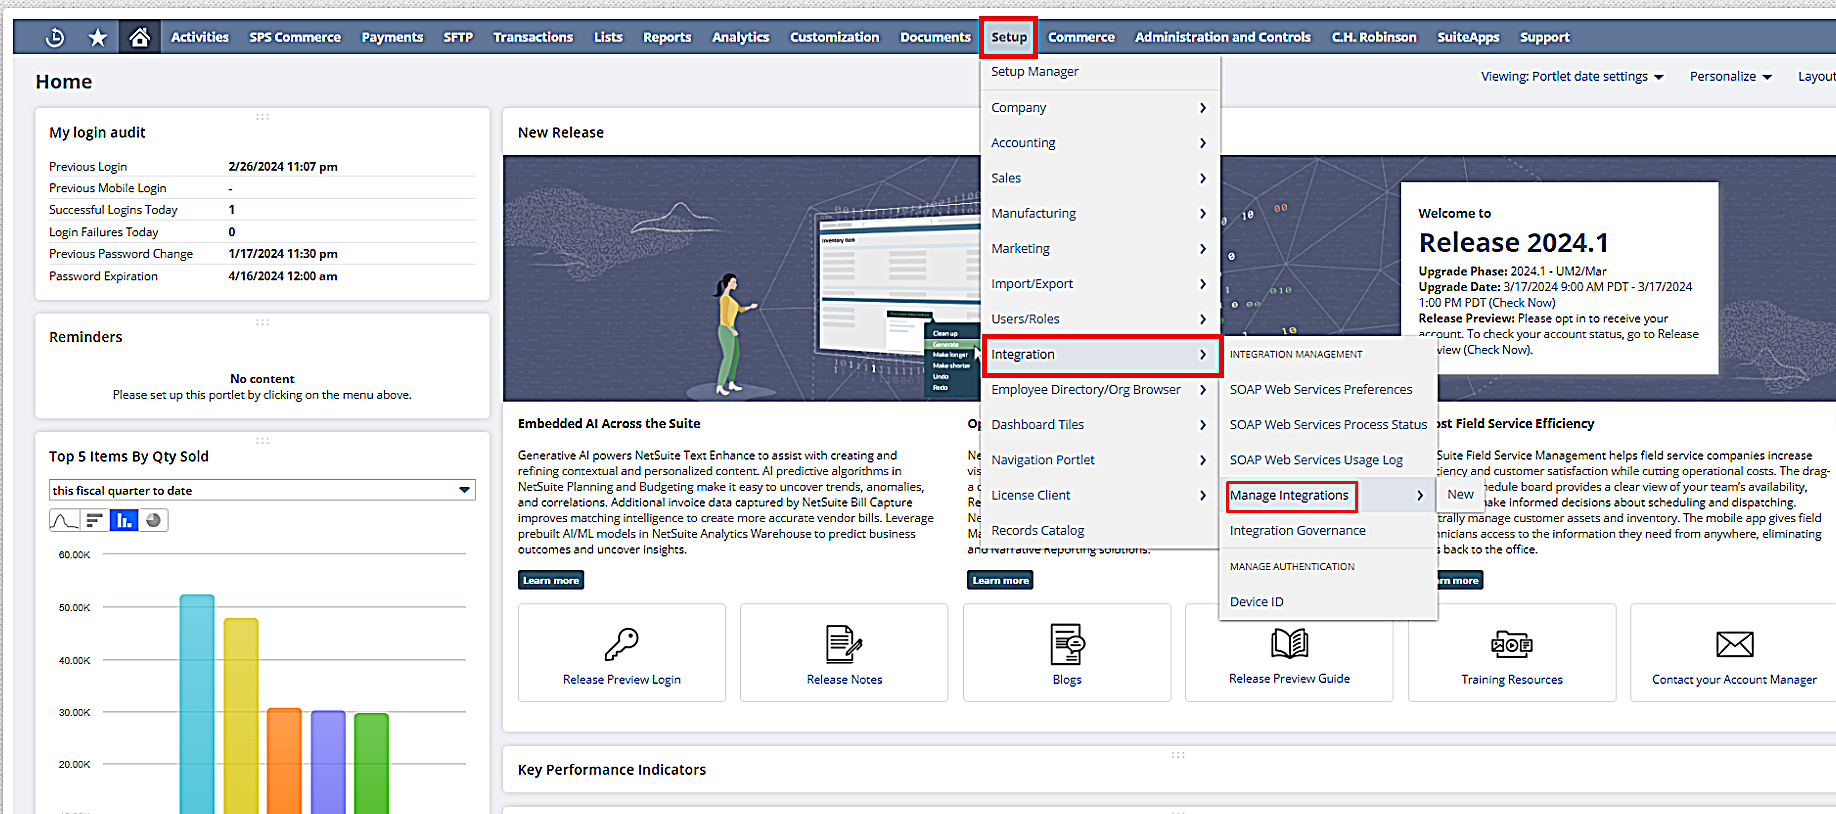
b) On the next page, the form for creating an integration record will be displayed on the screen
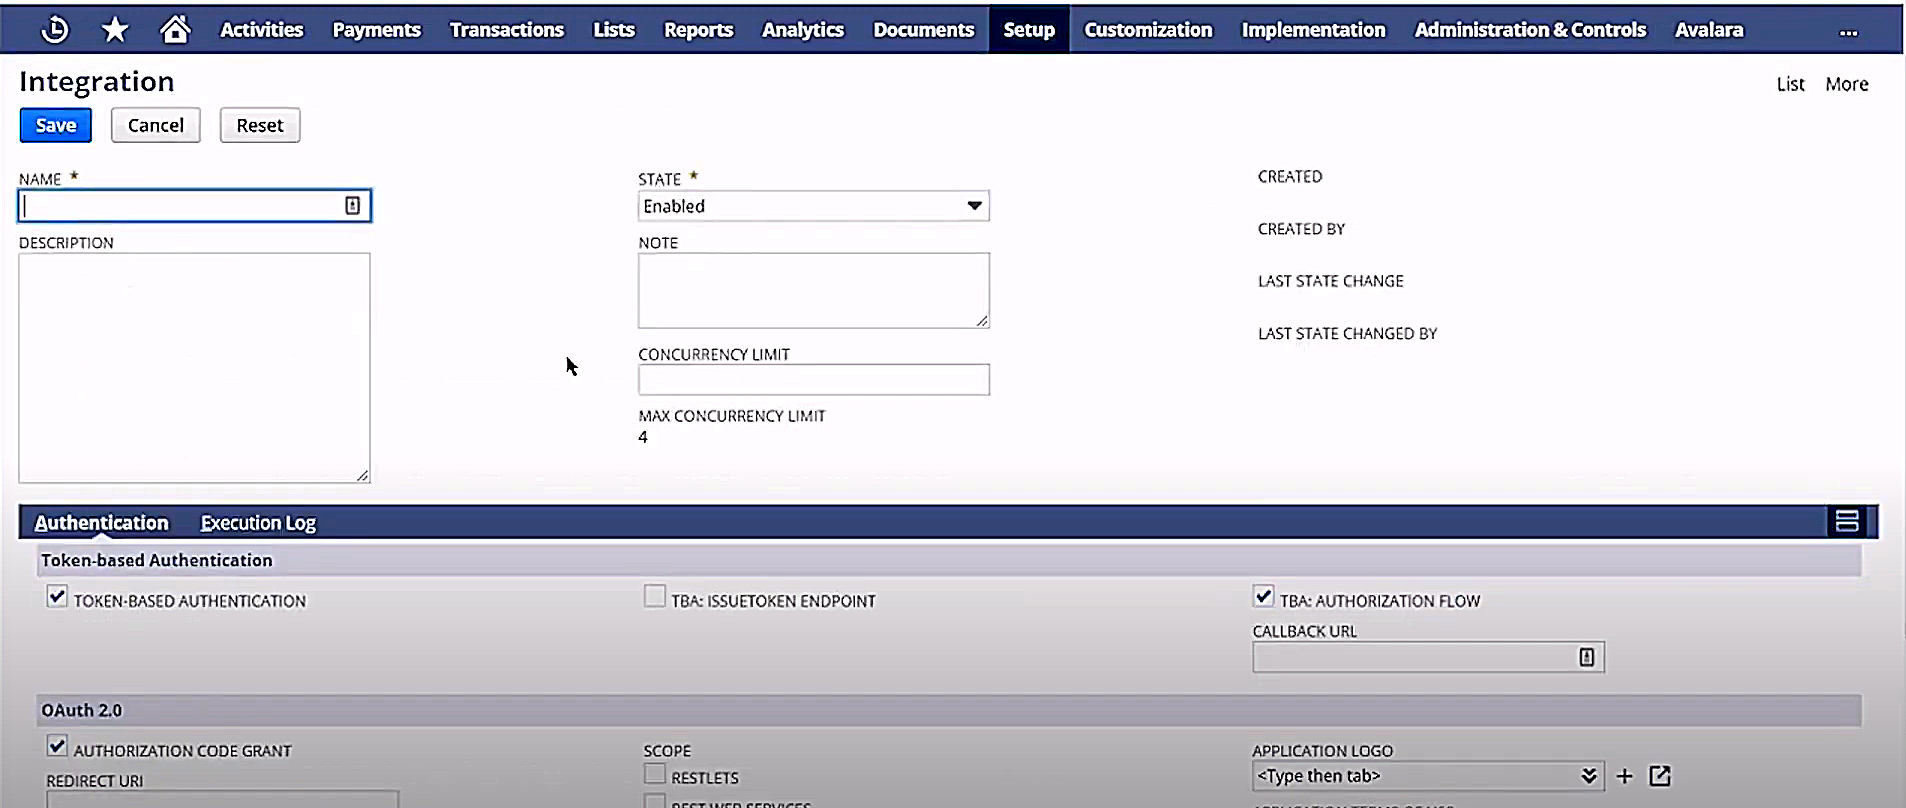
c) Add essential information as required
d) Disable Token-based authentication if choosing OAuth for integration, or vice-versa
e) Enable “REST WEB Services” or “SOAP Web Services” on the record form
f) Add a Redirect URL, like https://locallhost.com/ to run your site locally with HTTPS
g) Click on “Save”
h) “Client ID and Client Secret” (API credentials) to create your access token will appear on the screen
i) Leaving the page open, go back to “Home Dashboard”
j) Then, go to NetSuite’s “Settings” to navigate to “Manage Access tokens”
k) Create a new token
l) Select the record created above
m) Click on “Save”
Note: If you don’t have administrator access, you’ve to set permissions for your role to access the token
n) Copy the API credentials and secure it in a safe place
Step 5: Building an API URL and authorizing your application
Once you’ve generated API credentials, you will need a tool to build the API URL and authorize the NetSuite application. We recommend using the free online software called Postman API platform.
Make use of API credentials in Postman to generate the URL. Do follow the steps as directed in the software to complete the process of link creation. Once done,
a) Copy the API URL and paste it into the search bar of a web browser
b) In the next window, NetSuite will send a message saying, “Your session has timed out. Please log in again”
c) Add the email address and password that you generated previously
d) A window asking for permission whether you want to authorize the REST or SOAP Web Services will appear on the screen
e) You can either click “Continue” or “Go Back” (Stop option)
f) Copy the code from the URL and paste it on Postman to say, “Yes, I am authorized to get the token.”
g) Then, follow the steps on the Postman tool to complete the authorization
Step 6: Handling API limits and permissions
The last step in setting NetSuite APIs is to manage API limits effectively. This is to avoid exceeding usage quotas and potential service disruptions. To see and manage your available concurrency limit in NetSuite:
a) Navigate to Setup. Then, select “Integration” from the drop-down menu. Next, choose “Integration Management” to find the “Integration Governance” tab.
So, these were the steps for effectively setting up NetSuite API. Let’s proceed to understand its various applications.
Use cases for NetSuite API
Here are some different scenarios where organizations can leverage NetSuite APIs to achieve their certain business goals.
- Automated Data Synchronization: Businesses often use the API to automate the synchronization of data between NetSuite and other systems. This ensures that information remains consistent across all platforms in real-time. As a consequence, it helps in reducing manual data entry errors.
- Customized Reporting and Analytics: API allows businesses to extract raw data from their NetSuite account and manipulate it according to their needs. You can generate reports and analytics fully customized to your specific requirements. This means you can gain deeper insights into various key business metrics like financial performance, customer behavior, inventory management, etc.
- E-commerce Integration: Another important usage of NetSuite API is for e-commerce companies. They can leverage its power to integrate their online storefronts with the back-office functionalities of NetSuite. With API, you can process your order or manage inventory easily.
- Workflow Automation: If you are looking to automate repetitive tasks, for example, invoice generation or approvals, then NetSuite API integration can be very useful. It features some business tools for automating business workflows that can considerably free up employees’ time while improving their productivity.
- Third-Party Application Integration: As explained previously, NetSuite API lets developer integrate third-party applications and services with their account. Imagine how much your business can expand with the help of the platform’s functionality and interoperability. You can take advantage of this by integrating NetSuite with specialized industry-specific software, such as
- a) Marketing tools
- b) Payment gateways
- c) Shipping services
- Mobile Application Design: Developers can use the NetSuite REST API to build custom mobile applications. These apps can be made to interact with NetSuite data and features with ease. It offers the flexibility for businesses to perform tasks and make decisions on the go.
Developing with NetSuite API
Only setting up NetSuite APIs is not enough. You also need to comprehend its various aspects so that your business can grow. Take a look at how your business can develop with NetSuite.
Understanding API endpoints and operations
First of all, get to know the basics of API endpoints and operations. An API endpoint is a point that allows two systems to connect and communicate with each other. It is a specific URL where the API can receive requests related to available resources on its server.
Each endpoint has a discrete functionality within the application. APIs work by sending requests from a web server or web application and in return, receiving a response. In NetSuite, API works similarly to how they perform in any other web development. Let’s understand with examples:
API Endpoint: /record/v1/account
- a) This endpoint will let developers interact with account records within NetSuite. You can retrieve, create, update, or delete account information using this resource.
API Endpoint: /record/v1/customer
- a) This endpoint provides access to customer records in NetSuite. You, as a developer, can manage customer data, including creating new customer records, retrieving data, or updating existing records.
On the other hand, NetSuite API operations define the actions one can perform on API endpoints. You can either manipulate or retrieve data, depending upon the requirement. The most common operations are:
GET: Retrieves data from a specified API endpoint without altering it
POST: Sends data to a defined API endpoint to create a new resource
PUT: Updates data at a specified endpoint with new information
DELETE: Removes data from a specified endpoint
Sample API requests and responses
As mentioned above, endpoints work in cooperation with API methods, which are the permit requests that you can make. Such as GET, PATCH, DELETE, or POST. The verbs used in communications syntax are usually called “Methods” in integration language. They are often placed right before the specified API endpoint in the URL.
Now, we’ll be understanding this process using sample API requests and responses. Suppose, a developer wants to retrieve sales order information from a NetSuite account using the SuiteTalk SOAP Web Services. Then, they will put in the following request:
{
POST /services/NetSuitePort_2019_2 HTTP/1.1
Host: webservices.netsuite.com
Content-Type: text/xml;charset=UTF-8
SOAPAction: “urn:messages_2019_2.platform.webservices.netsuite.com:get”
<soapenv:Envelope xmlns:soapenv=”http://schemas.xmlsoap.org/soap/envelope/” xmlns:platform=”urn:platform_2019_2.webservices.netsuite.com”>
<soapenv:Header>
<platform:passport>
<platform:email>your_email@example.com</platform:email>
<platform:password>your_password</platform:password>
<platform:account>your_account_id</platform:account>
<platform:role>your_role_id</platform:role>
</platform:passport>
</soapenv:Header>
<soapenv:Body>
<platform:get>
<platform:record>
<platform:type>salesOrder</platform:type>
<platform:id>12345</platform:id>
</platform:record>
</platform:get>
</soapenv:Body>
</soapenv:Envelope>
};
In this example:
- a) The method used is POST
- b) The endpoint is /services/NetSuitePort_2019_2
- c) The request body specifies the operation (get) and the record type (Sales Order) with the ID of the sales order to retrieve (12345)
- d) The SOAPAction header defines the action to be performed
- e) Response: This request would retrieve information about a specific sales order from a NetSuite account using the SuiteTalk API.
Pro-Tip!
You can find NetSuite API documentation on the software’s “Developer Portal”. It includes libraries, developer resources, and more to better understand endpoints and operations.
Error handling and troubleshooting
After successful NetSuite API integration, the possibility is you might face certain challenges. Mentioned below are some common difficulties that you need to look out for while setting and managing NetSuite API.
Problem: Not able to access API
Solution: Ensure you have the right Account ID, API key, and permissions for accessing the NetSuite API.
Problem: Unable to find SOAP library for SuiteTalk
Solution: Install the necessary software for a SOAP library to access SuiteTalk.
Problem: No API response
Solution: Use the correct API endpoint for your NetSuite edition and location. You can also check for any error messages from the API that might explain the issue.
Problem: Not able to understand what to request to get the specific response
Solution: Check the NetSuite API documentation in the software’s help center.
Problem: Restrictions on the requests
Solution: Some NetSuite APIs have limits on requests, so adjust your frequency accordingly.
Problem: Security vulnerabilities
Solution: When utilizing HTTPS, validate the SSL/TLS configuration to maintain secure connections.
Problems: Address timeouts
Solution: Adjust timeout settings or retry to handle requests.
Looking for more troubleshooting tips for NetSuite API?
Connect with our NetSuite Support group.
Best practices for API development
Here are the 5 tips to start NetSuite API right:
1. Refer to the NetSuite API documentation:
Most importantly, always keep NetSuite API documentation in hand. This document contains detailed guidance on API usage. For correct API implementation, you should adhere to this documentation.
2. Use robust error handling:
Make sure to include error handling in your code to identify any errors that may occur when using the API. With this, you can prevent issues from happening and make it easier to debug problems.
3. Validate data effectively:
Another important factor you need to ensure is that the request you’re sending for receiving the API is properly validated. It is necessary to maintain data accuracy and efficiency.
4. Prioritize security measures:
You must adhere to security best practices outlined by NetSuite. Such as
- a) Utilizing secure connections (HTTPS)
- b) Properly encoding and decoding data, and
- c) Following recommended security protocols.
5. Optimize performance:
One more important strategy that is mandatory for you to employ – is to optimize the performance of your API calls. It may include:
- a) Minimizing redundant calls
- b) Utilizing caching techniques
- c) Adhering to NetSuite’s performance guidelines.
The major benefit of this strategy is that it ensures the efficient performance of NetSuite API. It can prevent system slowdowns while enhancing overall system efficiency
Integrating NetSuite API with External Systems
As we’ve mentioned above NetSuite API integration can make further business operations easier. It can ensure data consistency across different platforms. By connecting NetSuite with CRM systems, e-commerce platforms, and other business applications, you can simplify various procedures. Let’s explore them in brief.
Integrating API Netsuite with CRM systems
When you use API to connect NetSuite with CRM systems, it enables seamless communication and data synchronization between various aspects. With this, you can sync customer data, sales orders, and communication history. In a nutshell, a business owner can gain a 360-degree view of their operations.
For example, NetSuite Salesforce integration can synchronize data between the two systems. The data can be customer contact details, opportunities, support cases, etc.
Integrating NetSuite APIs with e-commerce platforms
Another interesting integration that is used by many SMEs is merging NetSuite with e-commerce platforms. It can significantly simplify the processes of managing inventory, orders, sales order management, and customer information. Some of the common e-commerce platforms that NetSuite supports:
- a) Amazon
- b) Shopify
- c) Magneto
- d) WooCommerce
Integrating NetSuite API with other business applications
What’s more, a business can integrate the software with various other business applications, like
- a) Accounting software
- b) Marketing automation tools
- c) Project management systems.
It further enhances cross-functional workflows and data consistency. Some of the key parameters you need to consider for successful integration are data mapping, API compatibility, and security protocols
For instance, if a marketing agency integrates NetSuite with HubSpot, they can automate several operations. Like lead generation, nurturing, and conversion
Automating Various Business Operations with NetSuite API
Previously, we’ve explained in brief how NetSuite API can automate numerous business procedures that are repetitive and time-consuming. Let’s summarize the main points that we’ve learned:
Automating data imports and exports
NetSuite API can set up automatic processes to transfer data between the software and external systems. This feature ensures that the information is accurate as it doesn’t involve manual intervention.
Creating “Custom Workflows” with API
Another advantage of NetSuite API integrations is businesses can create tailored workflows according to their unique requirements. For example, a manufacturing company can create a workflow for inventory restocking. When stock levels for a particular item come below a certain threshold, the automatic setting will generate purchase orders for timely replenishment. The organization can also automate sending notifications to suppliers for order placement.
Scheduling API calls for automation
Businesses can also schedule API calls to run at specified intervals. This allows for the execution of routine tasks without manual intervention. Consecutively, their employees will have free space to focus on more strategic activities.
To understand this case, let’s take an example of a subscription-based software company. It may schedule monthly API calls to generate recurring invoices for its customers. By automating this process, the organization makes sure that invoices are sent out promptly every month. As a result, it significantly reduces the risk of billing errors and obviously decreases manual labor. Read more about NetSuite Billing here.
NetSuite API Security Considerations
At last, let’s explore the ins and outs of securing NetSuite API processes.
- Best practices for securing API credentials: One of the tips for securing API credentials is to store them in a safe location like a password manager. Also, you may try to hardcode them directly into application code, which should be avoided.
- Data encryption and transmission security: The recommended secure protocol for data encryption is HTTPS. It will help prevent unauthorized access to your organization’s sensitive information.
- Managing access controls and permissions: Another important factor that comes into play is controlling access to NetSuite API resources. The best way to do this is to implement role-based access controls (RBAC) and permissions to restrict unauthorized access to your data.
- Compliance considerations: Ensure compliance with relevant regulations and standards. And you also need to audit the security measures to maintain compliance regularly.
Final Thought
In summary, the NetSuite API plays a crucial role in modern business. It offers a smooth way to connect different systems so that you can automate certain workflows. Overall, by combining multiple platforms with NetSuite, you can make better decisions for your business.
As we have witnessed in this guide, setting up the NetSuite API involves a series of simple steps. However, you need to take care of certain development and security parameters so that you can take full advantage of this feature. Nonetheless, you can always refer to NetSuite API documentation to understand the process even better.
Still, if you face any issues, the NetSuite experts at The Ledger Labs are here to help you. Get in touch with us and we’ll solve your queries immediately.


