

Are you tired of processing your invoices manually? Does getting accurate and error-free invoices seem impossible? We hear you. Just like yours, many businesses are facing issues in smoothly managing their invoices. They are looking for a solution that can streamline the invoicing process, saving them a lot of time. That’s where NetSuite Invoice Management comes in!
Simply put, NetSuite ERP invoice management offers a faster, easier, and more secure way to process invoices. So tracking, paying, and matching invoices isn’t a cumbersome task anymore. Thus, managing invoices via NetSuite AP Automation can act as a big time-saving tool.
But the question is how do you begin to streamline your invoice management system?
In this blog post, you will find an in-depth explanation of all your queries related to invoice management in NetSuite. We will also guide you step-by-step on processing customer invoices in the software.
So, let’s get started!
5 Key Features of NetSuite Invoice Management
As we hinted earlier, NetSuite features AP automation technology that streamlines the invoice management process to reduce cost and processing time. What this automation process does, among other things, is to eliminate the chances of errors when you try and manually retrieve data from past invoices.
Therefore, using time-saving NetSuite invoice management can speed up the process of paying your vendors on time and optimizing cash flow.
Take a look at the important features of NetSuite’s automated invoice management system below:
1. Automated NetSuite Invoice Processing: NetSuite’s automated invoice processing can handle invoice creation, approval, verification, and distribution without manual interference. As a result, you will get the optimum level of accuracy while ensuring that the data complies with the relevant company’s policies and regulations.
The primary advantage of this feature is that you can automate the entire invoicing workflow of your business. Furthermore, it can:
- Help a business to eliminate the efforts taken for repetitive tasks allowing it to direct resources towards profit and growth activities.
- Define workflows for generating invoices based on predefined criteria.
- Automatically generate invoices by using a script when a certain set of conditions are met.
2. Integration With Accounting Systems
The best part about NetSuite is that it can combine essential financial functions into one application. The software’s integration capability allows seamless communication between invoice management and other accounting systems. Additionally,
- Invoices generated in NetSuite are automatically reflected in the general ledger. Thus, helping you maintain accuracy and consistency across the financial records.
- The integration allows a two-way flow of data which provides for updates reflecting in both platforms.
3. Streamlined Approval Workflows
A business can create custom workflows for the invoice approval process through the NetSuite Workflow Manager. Some of the steps involved in this workflow include purchase, rejection, and approval order management.
This process ensures the invoices go through the necessary authorization steps before being sent to customers or vendors. So, this feature can help you maintain accountability in the invoicing process.
The key advantages of this feature are:
- You can define approval workflows, for example, specifying approval steps based on your business requirements.
- You can keep a track record of pending invoices and address bottlenecks with the help of the system.
- Moreover, your vendors and customers can get timely notifications regarding delays. Thus, helping your company maintain transparency.
4. Electronic Invoicing Capabilities
NetSuite Invoice Management features electronic invoicing (e-invoicing) capabilities to help businesses create, deliver, and process invoices digitally. This means you will not be relying on any paper-based processes. It can help you:
- Substantially accelerate payment cycles and work efficiency.
- Facilitate your customers who can get the invoices electronically which paves way for faster communication.
5. Real-time Visibility of Invoice Status
Another beneficial feature of NetSuite invoice management system is that it can provide you with up-to-the-minute information on the status of invoices. The system offers reporting tools that provide insights into the progress of all invoices. With the help of this, you can:
- Keep track of the invoices in real-time, from importing data to delivering invoices to customers.
- See any changes made to the invoice.
Step-by-Step Guide to NetSuite Invoice Processing
As you would have realized by now, NetSuite invoice processing can help your business automate order receipts, process invoices, and remit payments on time. Invoice management is one of the parts of the NetSuite AP Automation module. Also, the automation workflow in NetSuite is different for vendors and customers.
To summarize, the system processes customer invoices in the following steps:
- Customer sales order and data entry
- Fulfillment
- Creation of customer invoice
- Invoice approval (optional)
- Sending the invoice to customers
- Reviewing, recording, reporting, and analytics.
We will now explain the NetSuite invoice management steps in detail:
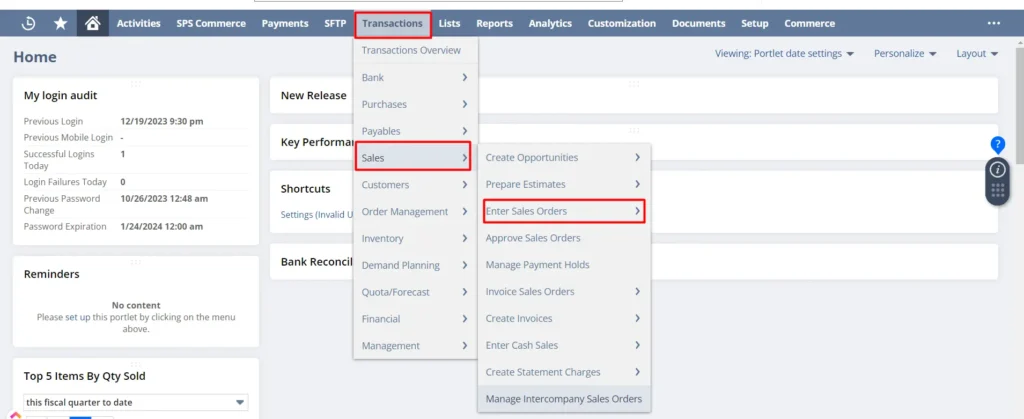
Step 1: Enter Sales Orders
The first step is to enter the sales order received from your customer in NetSuite.
- Navigate to Transactions: First, locate the “Transactions” icon on the NetSuite Dashboard menu bar.
- Access Sales Orders: Click on “Transactions” and select “Sales” from the dropdown menu. Now, choose “Enter Sales Orders.”
Step 2: Fill Sales Order Form
- a) Add Customer Details: In this form, add important details such as customer name, date, status, ordered items, etc.
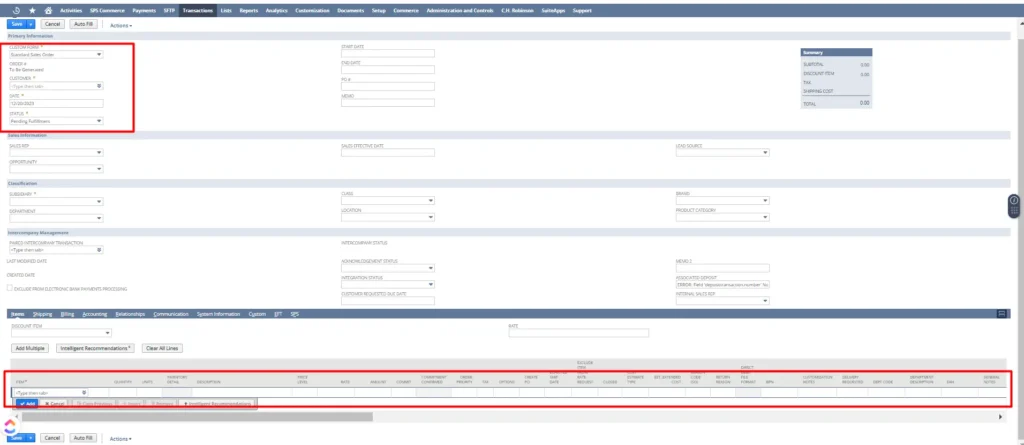
- b) Save the Sales Order: After filling up the details, click on “Save” to save the entered information.
Step 3: Fulfill the Sales Order
- a) Initiate Fulfillment: Now, click on “Fulfill” to process the sales order further and create an invoice for the customer.
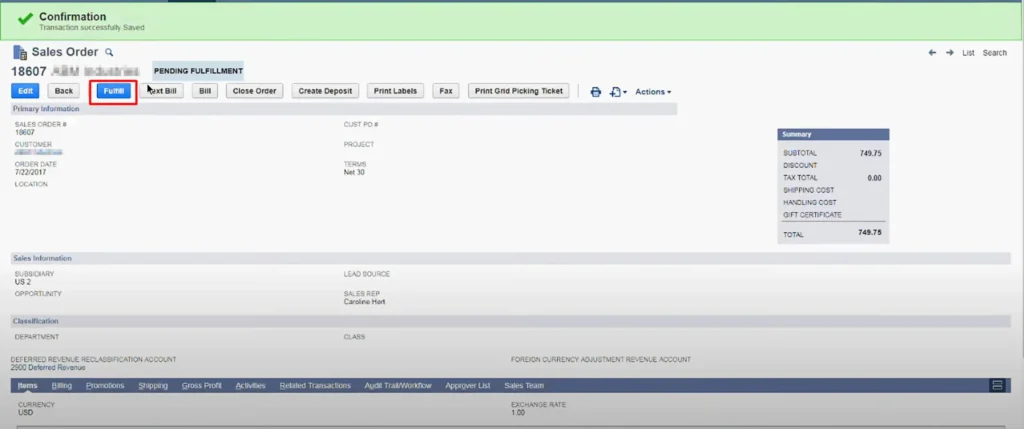
- b) Fill in the Fulfillment Form: Select only those items that you have shipped to your customers.
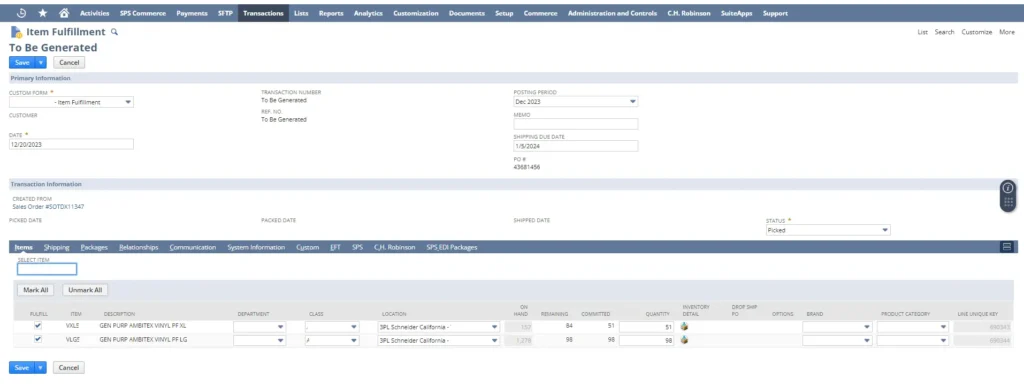
- c) Save the Fulfillment Form: Click on “Save” to confirm fulfillment. The system will indicate “Transaction Successfully Saved” and you will receive a unique number for the invoice.
Note
If you shipped only a portion of the sales order, NetSuite will create one consolidated invoice for all shipped items. As an outcome, you will save time by avoiding generating separate invoices for each product.
Want help with invoice processing in NetSuite?
Connect with our NetSuite experts!
Step 4: Generate Invoice
- a) Click on “Bill” to generate the invoice.
- b) You can also send the invoice directly to customers through NetSuite. Just click on “Save & Send” to initiate this process.
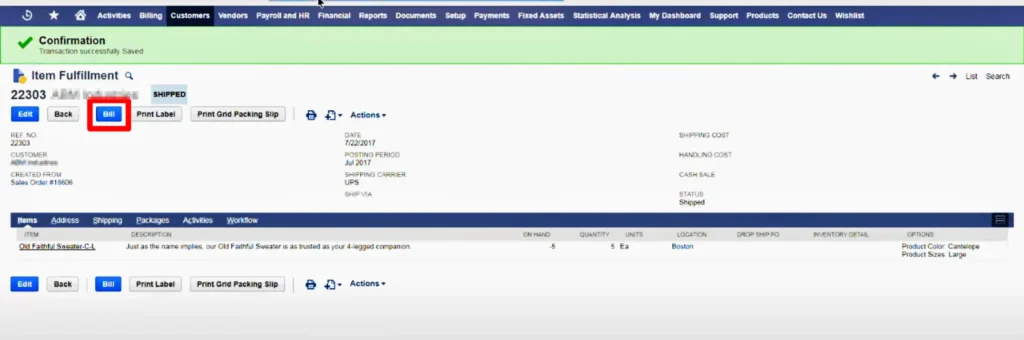
Step 5: Review Fulfillment Record
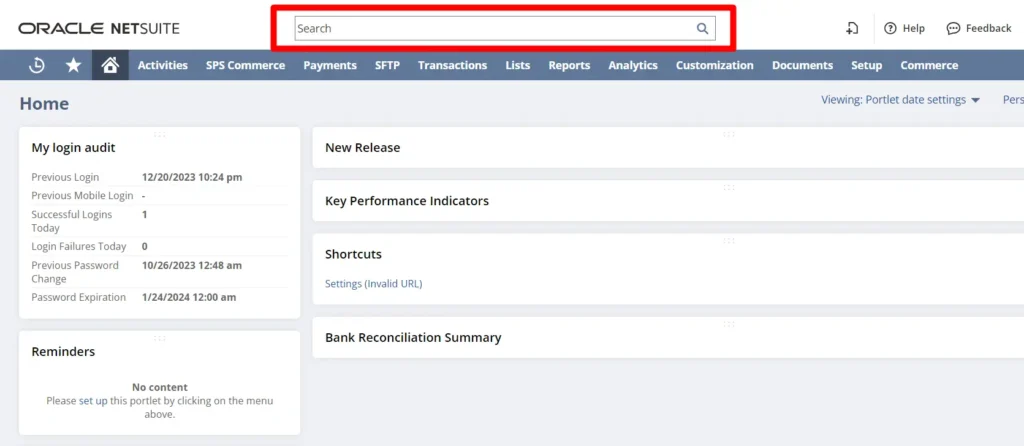
If you want to review the fulfillment record for any of your customers, then, you can do so by using the unique number. Enter the number in the search bar available on NetSuite’s dashboard. It will open the “Fulfillment Record” for that customer
Managing Large Sets of Invoices With NetSuite Invoice Management
The steps we have mentioned earlier are only effective when dealing with a small volume of invoices. But, what if there are thousands of invoices you need to send to your customers?
Well, in order to do that, NetSuite invoice management has a feature where you can import all the customer-related data from a CSV report in one go. Let’s see how you can do the same.
How to Import CSV Report in NetSuite
To successfully import CSV reports in NetSuite, you need to ensure that the data in the CSV file is as per the standards set by NetSuite, or else the software will show an error.
The steps for importing CSV report/(s) are as follows:
Step 1: Log in to your NetSuite account.
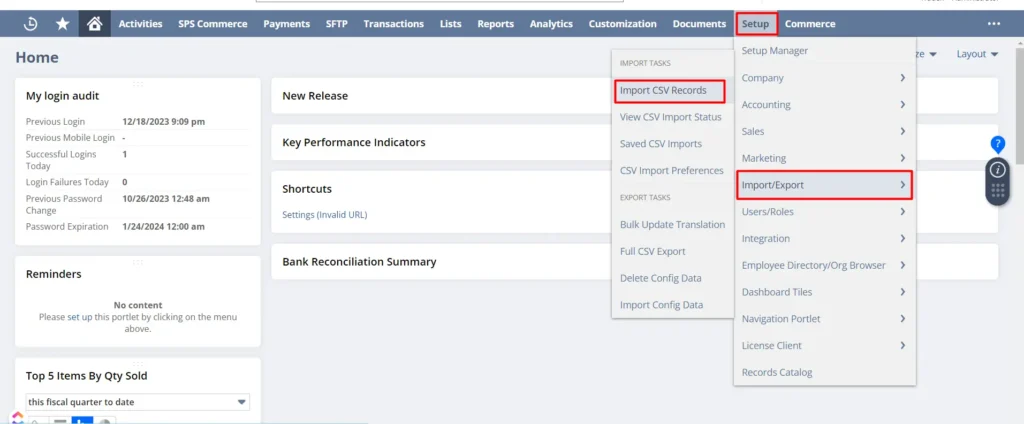
Step 2: Locate the “Setup” tab on the dashboard. It is on the top right corner of the menu.

Step 3: After clicking on the “Setup” icon, you have to select the Import/Export icon from the drop-down menu. Once you click on it, you have to choose “Import CSV Records”
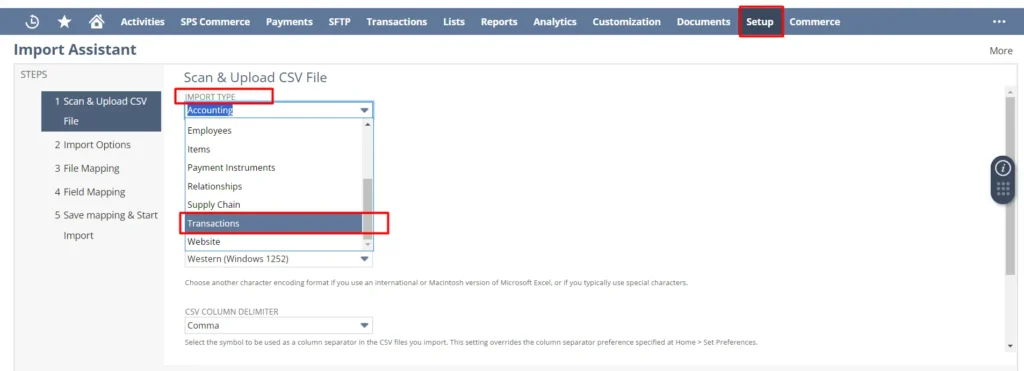
Step 4: Then, click on “Scan & Upload CSV File”.
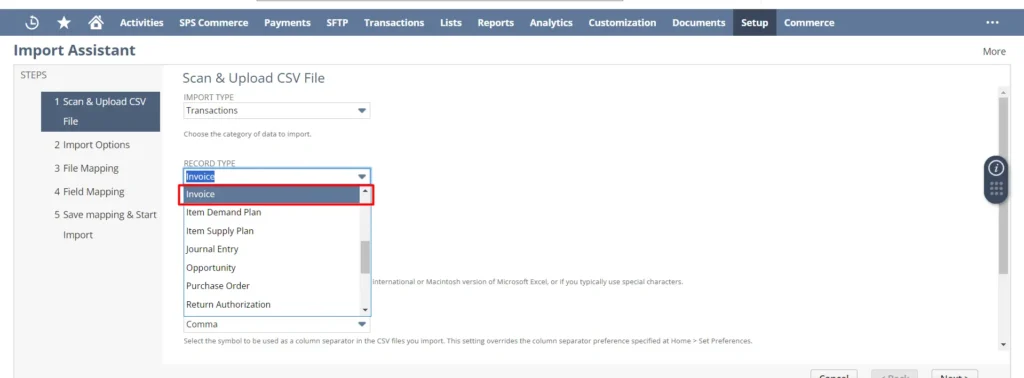
Step 5: Now, choose the “Import Type” from the drop-down menu. Here, you have to select “Transactions”.
Step 6: In the next step, choose the record type i.e. “Invoice”.
Step 7: Select “CSV Column Delimiter” as Comma. Also, add how many files you want to upload, whether it is a single file or multiple.
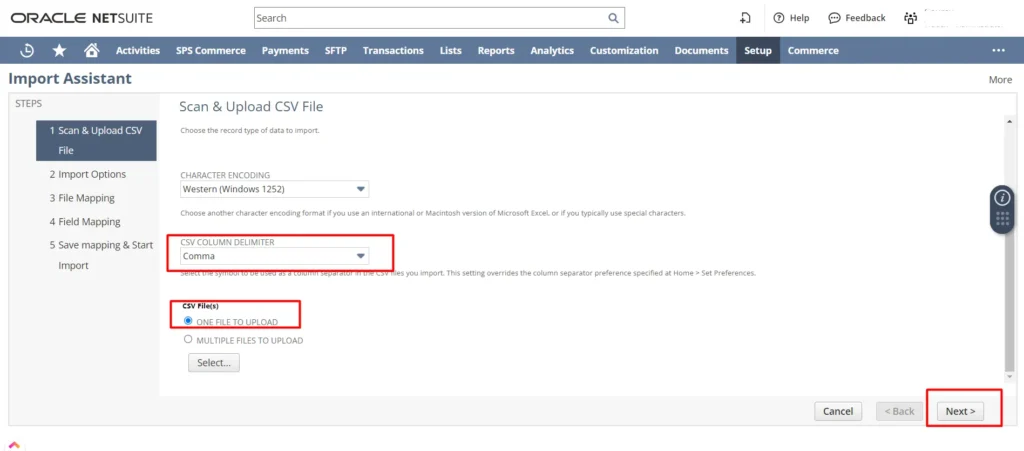
Step 8: Then, click on “Next” and select the CSV report from your computer.
Read The Business Owner’s Guide to NetSuite CSV Import Templates for more details.
How NetSuite Invoice Management Improves Efficiency?
So far we have seen that the automation, integration, and real-time visibility features of NetSuite invoice management improve the efficiency of a business’s invoicing process. As explained above, this system can reduce the reliance on manual processes.
Let’s discuss in detail how managing invoices in NetSuite ERP would be a smart decision for improving your businesses’ efficiency:
Reduction in Manual Data Entry and Paper Handling
Since you can digitize the entire invoicing workflow using the NetSuite AP Automation system, it can reduce the dependency on manual data entry. By integrating this process, you don’t have to handle paper-based documents.
Faster Invoice Processing and Approval Times
You can effortlessly streamline various tedious tasks with NetSuite invoice management. For example, reconciling payments, coding invoices, mailing checks, internal approvals, etc.
Improved Accuracy and Elimination of Errors
NetSuite ERP invoice management enhances accuracy by eliminating the dependency on manual processes. The software can automate calculations, reducing the risk of errors associated with manual calculations.
Enhanced Data Visibility And Reporting
The reporting and analytics tools of NetSuite display the complete invoicing process for you to stay up-to-date with your business operations. Moreover, the insights presented on the dashboard can help you make informed decisions and address potential issues faster.
Integration with Other NetSuite Modules
One of the best features of NetSuite invoice management is that you can further simplify the invoice generation process by integrating the software with various online selling platforms.
Some of the popular platforms that you can integrate the software with are Amazon, Shopify, eBay, WooCommerce, Magento, etc.
Please note, it is mandatory to consider the specific needs of your business and its complexities when integrating NetSuite ERP with online selling platforms.
Case Study of Successful NetSuite Invoice Management Implementation
In 2018, our consultants at The Ledger Labs took on a client who was facing significant challenges in their manual invoicing processes. The client, a leading e-commerce business, was dealing with errors in their invoice workflow that led to a time drain of about 30-40%.
Our team proposed the client implement a systematic NetSuite invoice management to address the challenges they were facing. We suggested the company automate their invoicing process to ensure real-time accuracy and reduce manual efforts.
After successfully implementing the invoice management system of NetSuite, the client witnessed a 40-50% reduction in manual efforts. Furthermore, the overall accuracy improved substantially exceeding the client’s expectations.
6 Best Practices for Implementing NetSuite Invoice Management
An organization needs to carefully consider various factors while implementing NetSuite invoice management for their business. They need to effectively plan, customize, and train the users as per their company’s expectations. By doing so, the company can ensure a smooth transition and generate better results using this system.
Some of the tips for implementing NetSuite invoice management are as follows:
1. Understanding Your Business Process: To make any process easier, it is vital to thoroughly understand your organization’s financial processes. You need to identify the pain points and locate the areas where your current invoice management process is lagging.
By carefully considering these factors, you can take the best advantage of NetSuite ERP invoice management.
2. Engaging the Key Stakeholder: It is always better to involve all the stakeholders while planning and implementing the invoice management process in NetSuite. We suggest you include team leaders from sales, finance, and IT teams and provoke them to share their pain points and needs.
In this way, you will be able to implement a unique automation system that caters to the needs of everyone.
3. Plan and Prioritize Implementation Steps: While discussing with the stakeholders, you will generate a set of features that are mandatory for your business to have a smooth invoice processing system. NetSuite ERP offers the flexibility of customization of the system to match the specific requirements of the organizations.
You can further simplify the process by customizing workflows, invoice templates, and approval processes that align with your business practices.
4. User Training: Training the users who will be working on this software is a crucial step to seamlessly implement invoice management in NetSuite. Hence, the company should organize thorough training that should include the following:
- a) Creating invoices
- b) Managing approvals
- c) Reporting
- d) Understanding the issues that may arise
- e) Troubleshooting
5. Implementing Approval Workflows: NetSuite allows users to customize approval processes ensuring invoices are reviewed properly before being sent to customers. Although it is optional it helps in the longer run. We recommend the company should define approval workflows for the invoices as per the requirements.
6. Integrating with Other Systems: An organization can also utilize NetSuite’s integration process with other relevant systems like CRM and payment gateways. This feature can help attain further data accuracy while simplifying the overall process.
Conclusion
NetSuite invoice management emerges as one of the powerful solutions to streamline invoicing processes. A company can explore a plethora of NetSuite ERP features that they can implement to ensure accuracy in their invoice processing.
With the NetSuite invoice processing system, you can eliminate labor-intensive, time-consuming, and error-prone processes. Simply put, you can take total charge of your P2P workflows.
Still wondering how you can successfully implement NetSuite ERP to run your business smoothly? Connect with our NetSuite specialists and they will guide you through the process instantly.


