

Have you ever tried to run an amortization schedule in NetSuite, only to find yourself more confused? Or do you keep getting stuck when crafting an amortization schedule that leads to financial problems? We get you. Running NetSuite amortization schedules can get complex if not understood properly.
But fear not, because we have created this NetSuite amortization schedules user guide to help you with this process. By the end of this blog, you will get a clear idea of the basics of a NetSuite amortization process along with the necessary steps needed to create it.
We will talk about the steps in a bit after we explain what an amortization schedule actually is.
What are Amortization Schedules?
Amortization is an accounting process that systematically lowers the book value of an intangible asset or a loan throughout a defined timeframe. The amortization schedule tracks repayments of loans and depreciation of the assets in a business. It impacts the balance sheet and income statement of a company.
It works differently for both situations, like, if we talk about:
- Loans: The amortization focuses on segregating the loan payments over time into principal amounts and interest included in each payment.
- Assets: Amortization is a process of expensing the intangible asset’s cost over the life cycle of the asset. In other words, it calculates the consumption of the value of the intangible asset every year.
Read about accumulated depreciation vs depreciation expense here.
Why Choose NetSuite for Setting Up Amortization Schedule in Your Business?
NetSuite ERP is a cloud-based software that enables small or big companies to manage their entire business operations in a single platform. Like how NetSuite has feasible solutions for streamlining accounting, asset management, inventory management, etc. In the same way, NetSuite can make the process of setting up and managing amortization schedules smoother.
Simply put, the amortization schedule NetSuite feature enables the users to record the general ledger impact of item purchases and expense charges across several periods.
Importance of Running an Amortization Schedule NetSuite Feature
As mentioned previously, NetSuite seamlessly automates the process of creating accurate amortization schedules for both loans and intangible assets. For a better understanding of NetSuite amortization schedules, take a look at the following example:
Let’s say your company paid an outside investor $50,000 for the development of software. Over that, you spent $5,000 to register the patent for 10 years. Further, you incurred some additional charges of $10,000.
The calculations will be as follows:
Capitalized Cost = $65,000 (50,000 + 5,000 + 10,000) and
Useful Life = 10 years
Amortization Expense = $65,000/10 = $6,500
So the amount $6,500 is required to be mentioned in the income statement that will be recorded as amortization expense each year.
Here, NetSuite first allows you to record all the expenses easily. As soon as you create the amortization template in the software for this particular asset, it will generate the amortization schedule based on the inputs provided.
After that, you can seamlessly create journal entries to ensure that each amortization schedule is recorded in every accounting period. Since this process is automated in NetSuite, there will be very low chances of any errors.
Furthermore, as you know NetSuite comprises interrelated modules. This feature will enable you to track the amortization of the intangible asset on financial reports. Your financial statements will accurately reflect the gradual consumption of the asset’s value over its useful life.
Key Components of an Amortization Schedule in NetSuite
To comprehend the steps of how to run amortization schedule in NetSuite in a better way, you need to familiarize yourself with its key components. As discussed above, we can set amortization schedules for both loan and intangible assets, hence, the two of them will have different basics.
Let’s discuss the key components of both systems one by one:
Key Components of Loan Amortization Schedule in NetSuite
- Initial Loan Amount: This is the initial amount of the loan that needs to be repaid.
- Interest Rate: The percentage charged on the remaining balance as interest
- Loan Term: The time over which the debt is to be repaid.
- Payment Frequency: How often payments are made, for example, monthly, or quarterly.
- Amortization Start and End Dates: The date when the amortization schedule begins and the date when the schedule closes respectively.
- Payment Amount: The total amount to be paid in each installment, including principal and interest.
- Remaining Balance: The loan balance due after each payment.
Key Components of Intangible Asset Amortization Schedule in NetSuite
- Asset Cost: The original cost of the intangible asset.
- Useful Life: The estimated duration the asset is expected to be useful.
- Amortization Start Date: The date when the amortization of the asset begins.
- Amortization Method: The approach you will use to distribute the asset’s cost over its useful life. For example, straight-line, declining balance, etc.
- Periodic Amortization Expense: The amount expensed in each accounting period. It also reflects the asset’s gradual consumption.
- Accumulated Amortization: The total amortization expense accumulated over time.
- Book Value: The remaining value of the asset on the balance sheet. It is calculated by deducting the accumulated amortization from the asset’s original cost.
Any questions, so far?
Our NetSuite Support team is ready to help
5 Steps to Running a NetSuite Amortization Schedule
Finally, it’s time to introduce the steps of running NetSuite amortization schedules. You can follow along to help you grasp the information better. So, let’s get started!
Step 1: Enabling the Amortization Feature in NetSuite
The first step is to check whether the amortization feature of the accounting period is enabled or not in NetSuite application. If it is disabled, you will not be able to create amortization schedules.
To enable this feature in the application,
1. Go to Setup > Setup Manager > Enable Features
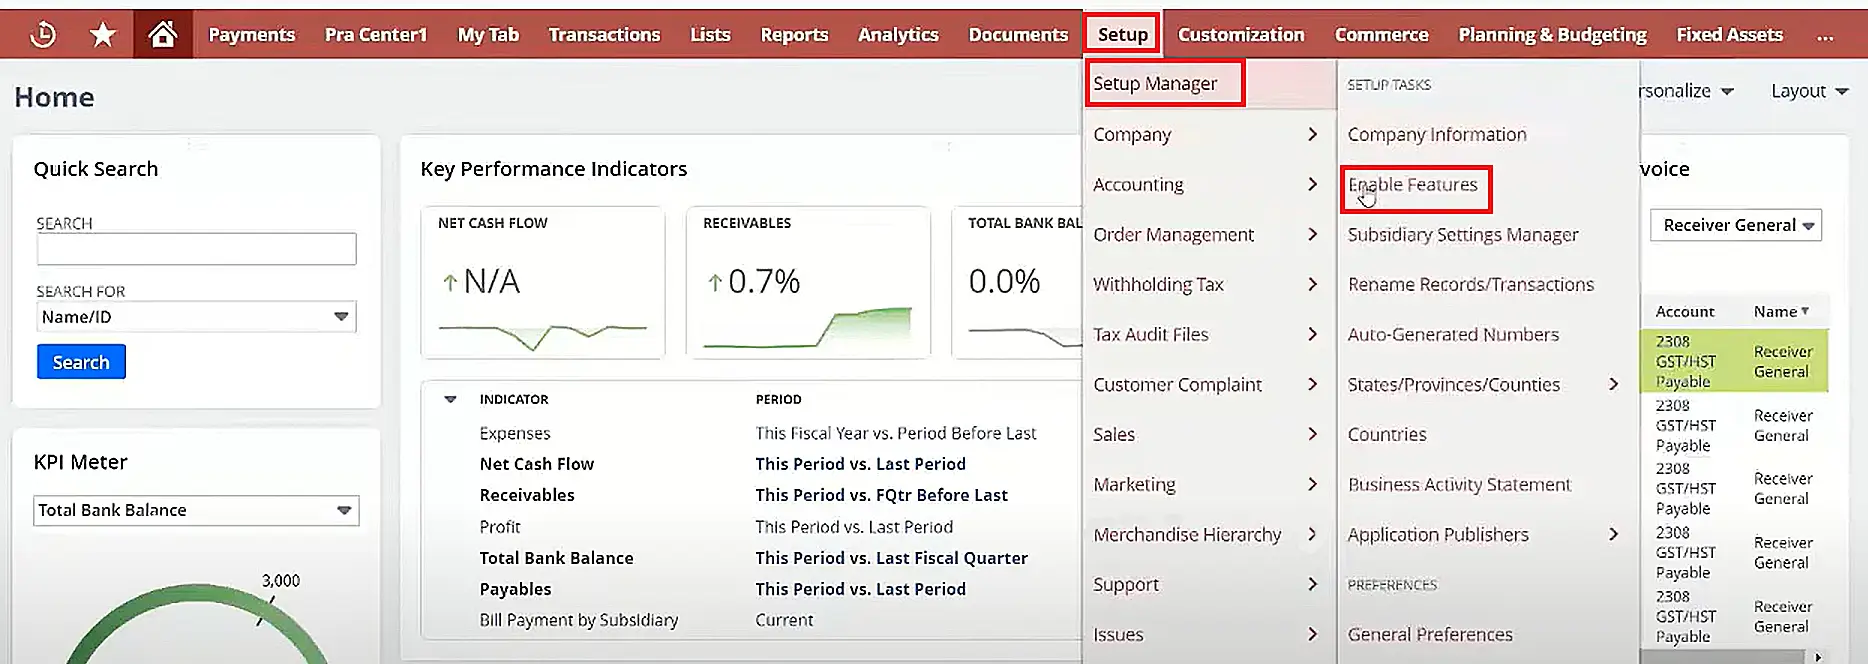
2. Click on the “Accounting” subtab on the “Enable Features” page.

3. Scroll down at the bottom and under the “Advanced Features” section you will see “Amortization”. Verify if the feature is enabled or not. Check the small box if the function is disabled.

4. Once enabled, click on “Save” to save the changes done.

Step 2: Setting Up Accounting Preferences for Customizing Amortization Schedules in NetSuite
The next step is to set up certain accounting preferences that will allow you to make changes to amortization schedules. The reason to set this preference is that there can be certain scenarios when you have to create different templates and schedules as per the requirement.
To do this, you have to:
- Go to Setup > Accounting > Accounting Preferences
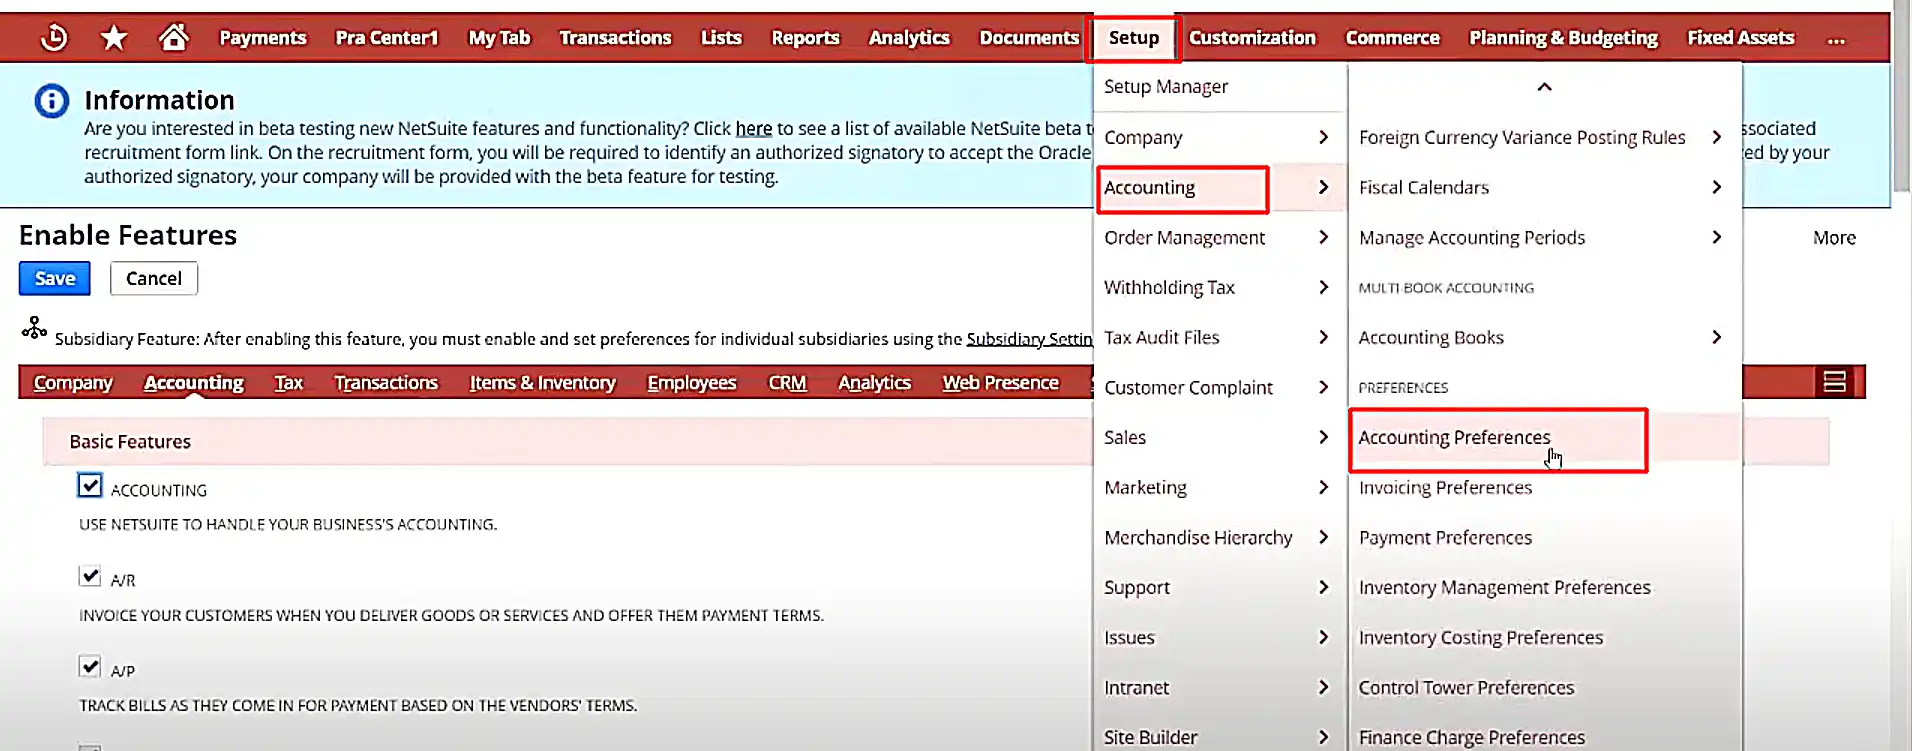
2 .Scroll down on the “Accounting Preferences” page till you see the “Amortization” subtab.

3. Under the “Amortization” tab, check the box saying, “Allow users to modify amortization schedule”.
4. Set “Default Amortization Journal Date” as “Last Day of the Period”
5. Set the “Default Amortization Journal Entry Form” as “FF EM – Amortization Journal Entry”.
6. Put the number of short-term expense periods to 12.
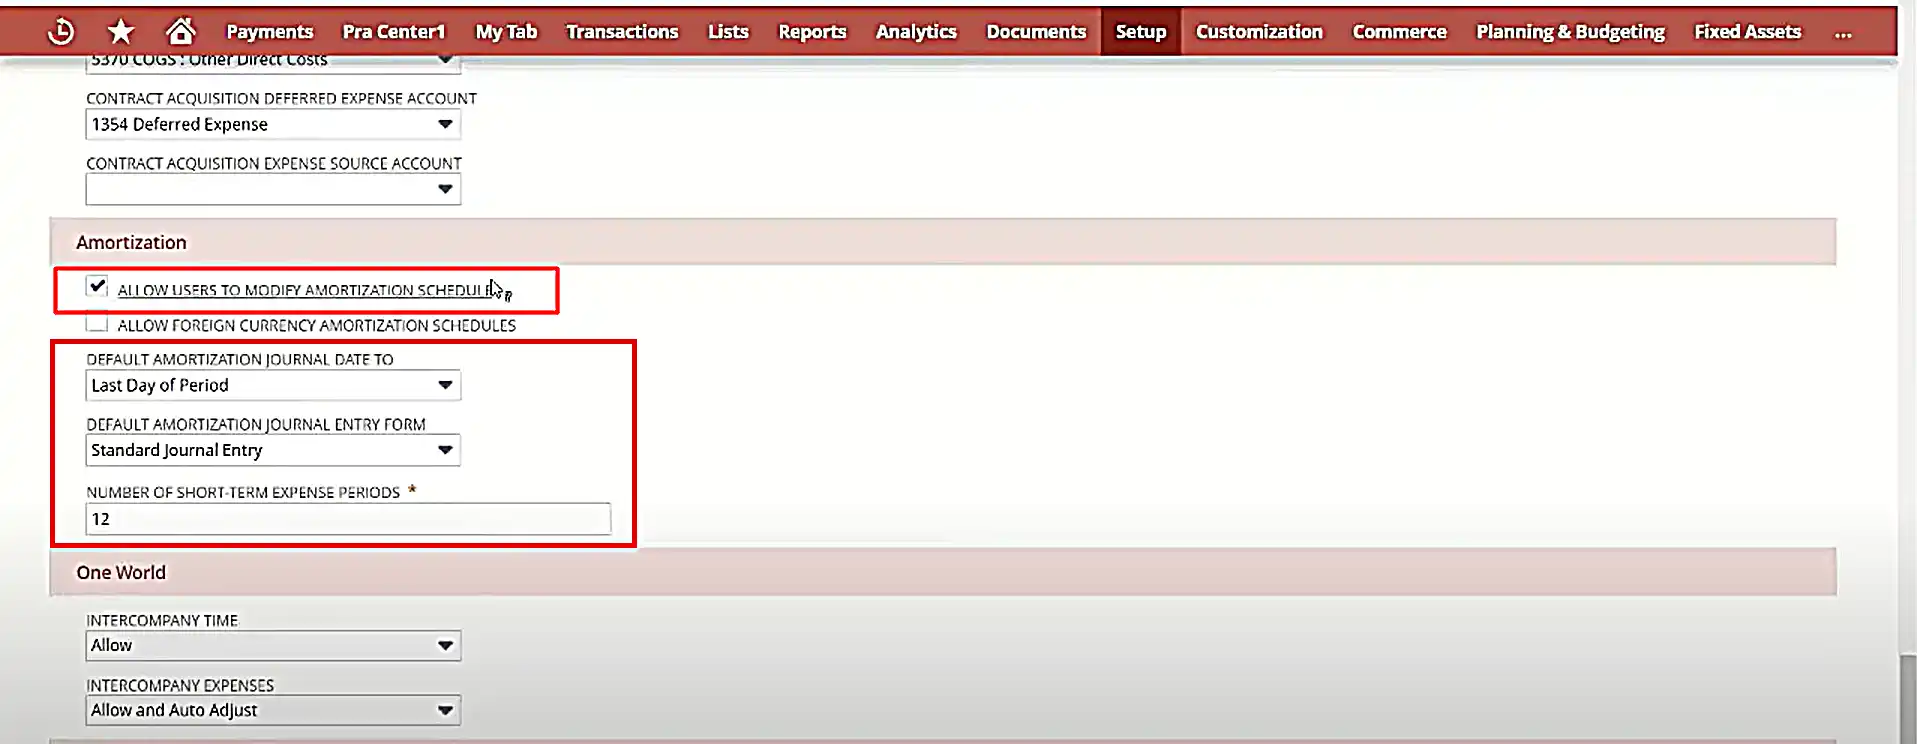
7. Once you make these changes, click on the “Save” button available at the top of the “Accounting Preferences” page.
Step 3: Specifying the Deferral Account for Amortization
Now, to create NetSuite amortization schedules, you have to specify a deferral account. For this:
1. Go to “Setup” tab on NetSuite’s dashboard. Click on “Accounting” and then select Chart of Accounts from the drop-down menu.

2. Then, click on “New” to create a separate account in “Chart of Accounts” to track deferring expenses.
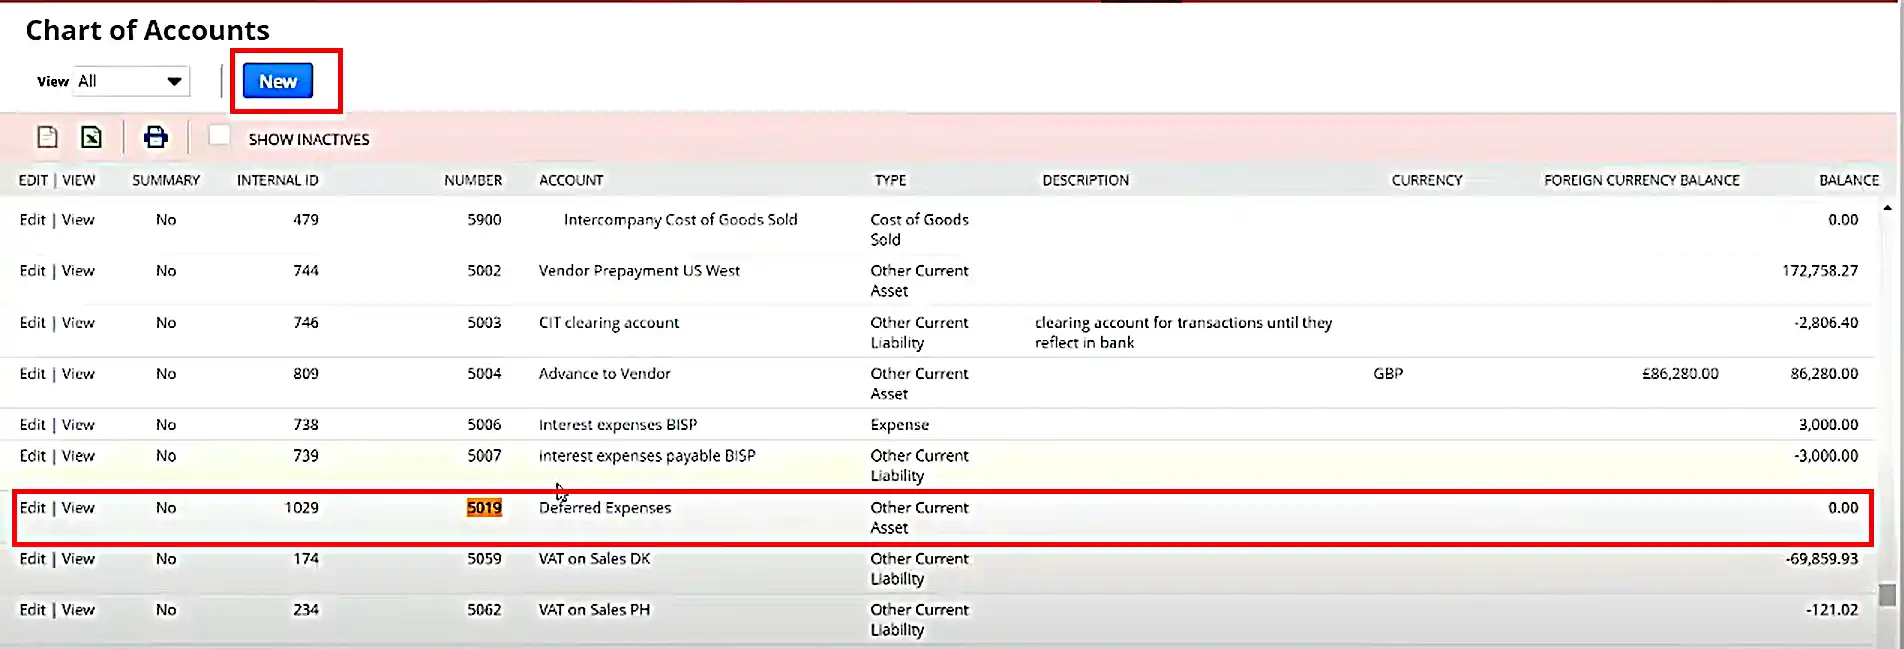
Why Create a New Deferred Expenses Account?
Whenever you prepare an amortization template or amortization schedule in NetSuite, this deferred expenses account is required to be taken. Furthermore, we can specify this account on the item record that will be used on the vendor bills and vendor credits.
Step 4: Creating Amortization Templates
Now that the amortization feature and other necessary preferences are enabled in the NetSuite application, we can create multiple amortization templates. These templates will define the expense deferral terms of the intangible asset or loan.
First, we have to make the amortization templates, then we can associate these templates with the amortization schedules.
The steps to create amortization templates include:
1. Go to “List” on the NetSuite dashboard. Click on “Accounting” and then “New Amortization Templates”.

2. A form to create a new amortization template will open.

3. Fill in the required details for setting up the amortization schedule for a loan or asset.
a) Select the “Type” as “Standard” if you are initiating a normal amortization schedule.
b) Select the “Method” from the list of options. Generally, “Straight-line, by even periods” method is used for an amortization schedule.
c) Now select the “Deferral Account” that we have created in the earlier step.
d) Enter the number of periods over which the amount should be recognized on the “Amortization Period”.
e) Fill in the “Residual” details which will be the amount that you don’t want to amortize.
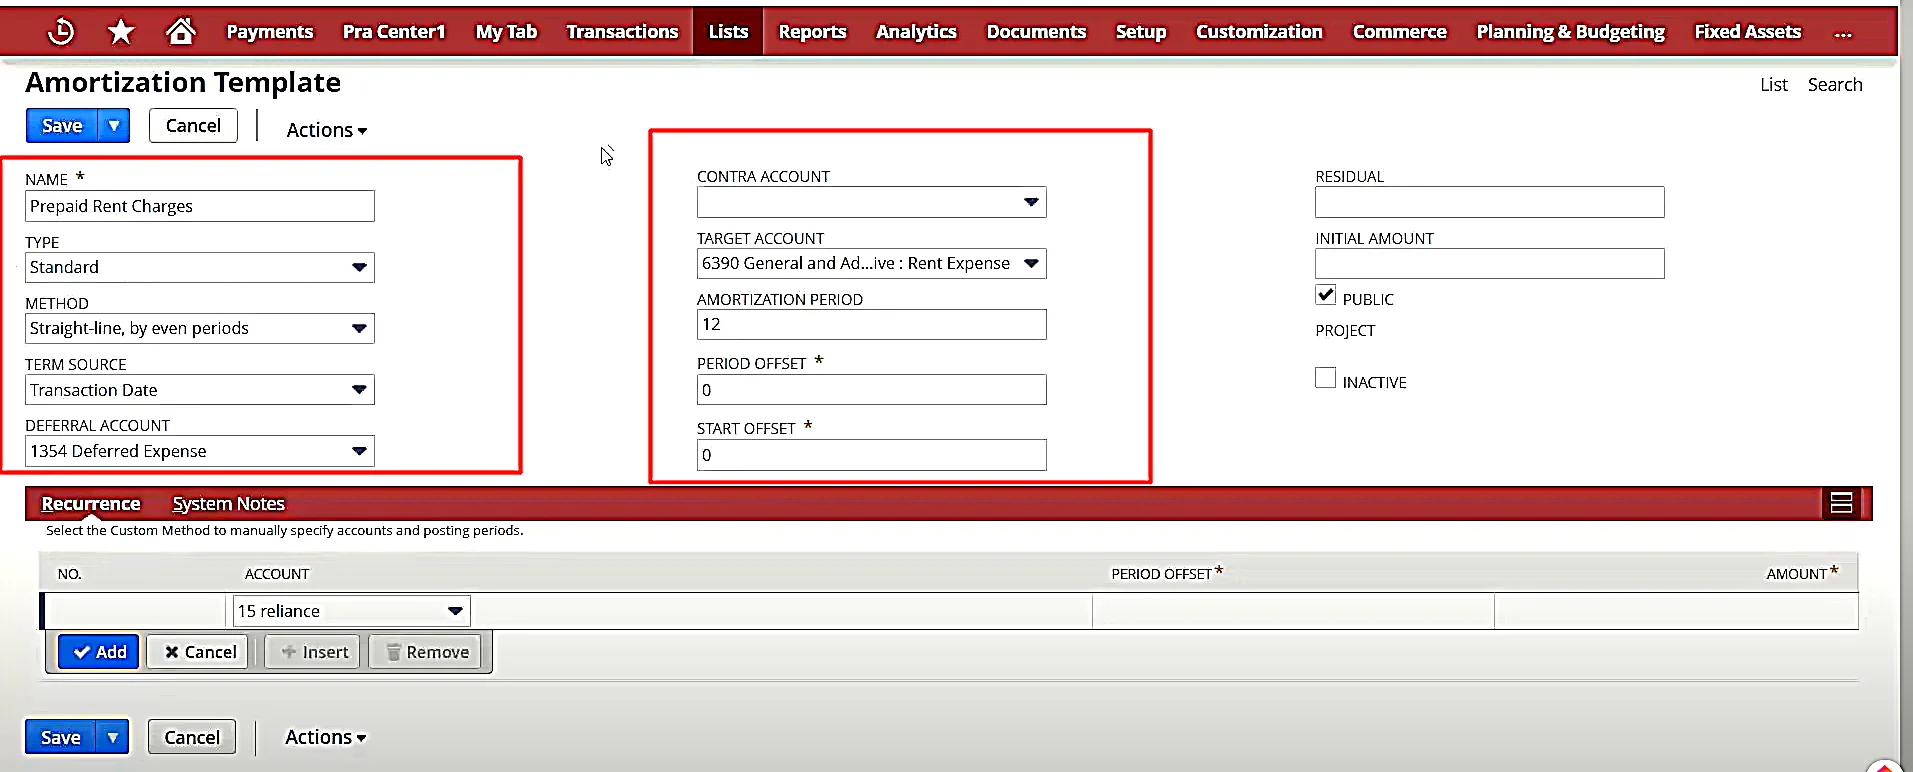
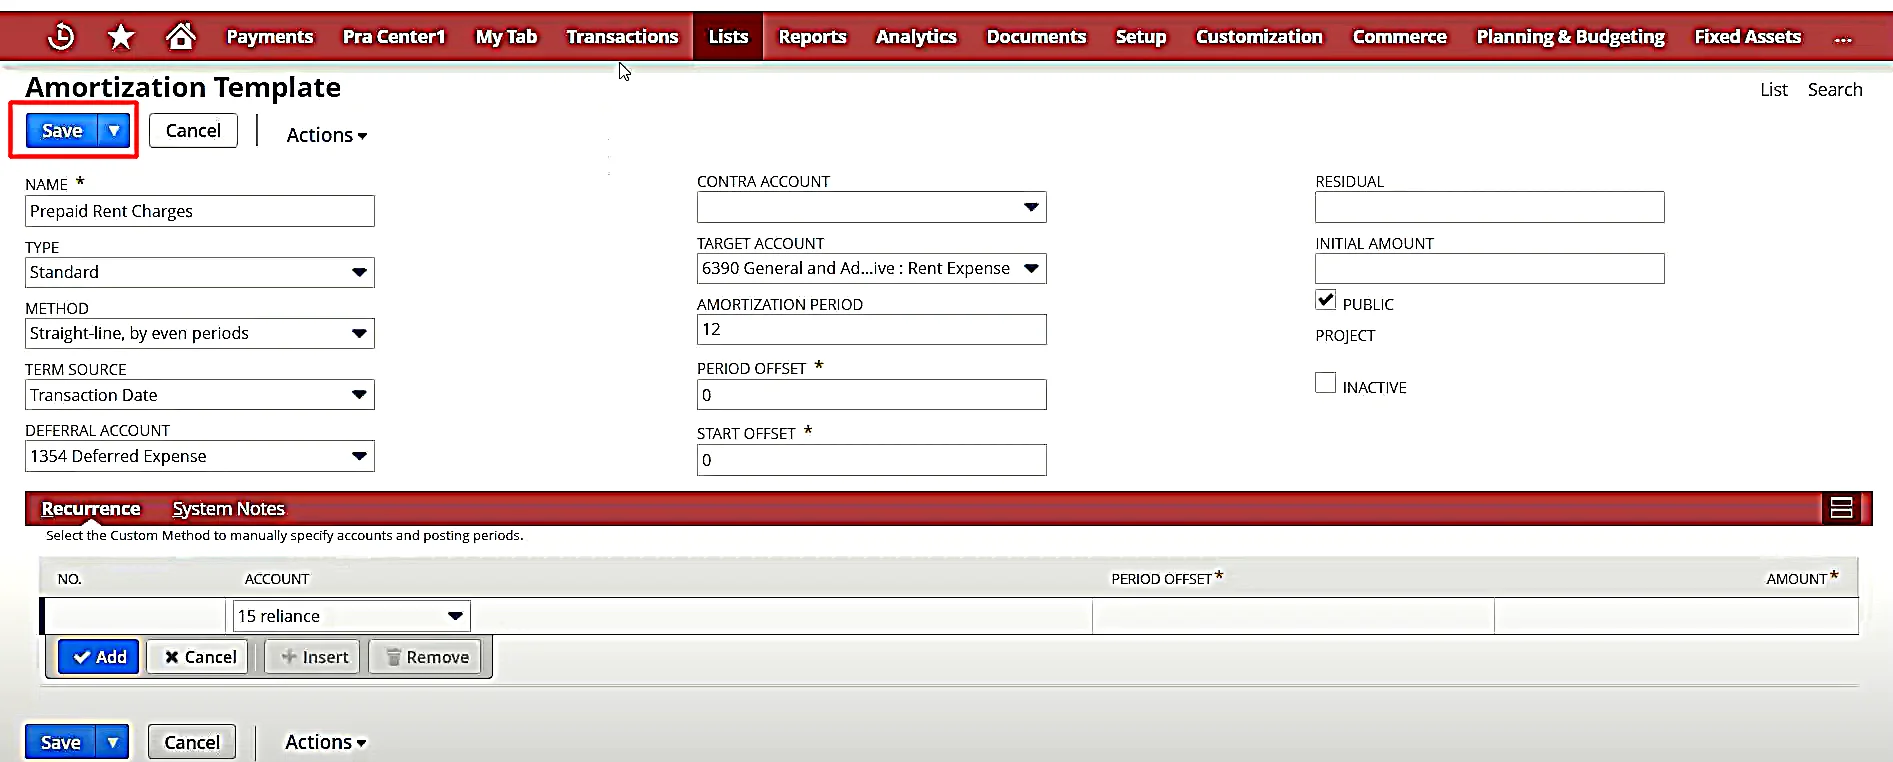
4. Click on “Save” and the template will be saved for use.
Step 5: Applying the Amortization Template to a Vendor Bill or Vendor Credits.
Stuck with any of the above steps?
Our NetSuite support specialists can help!
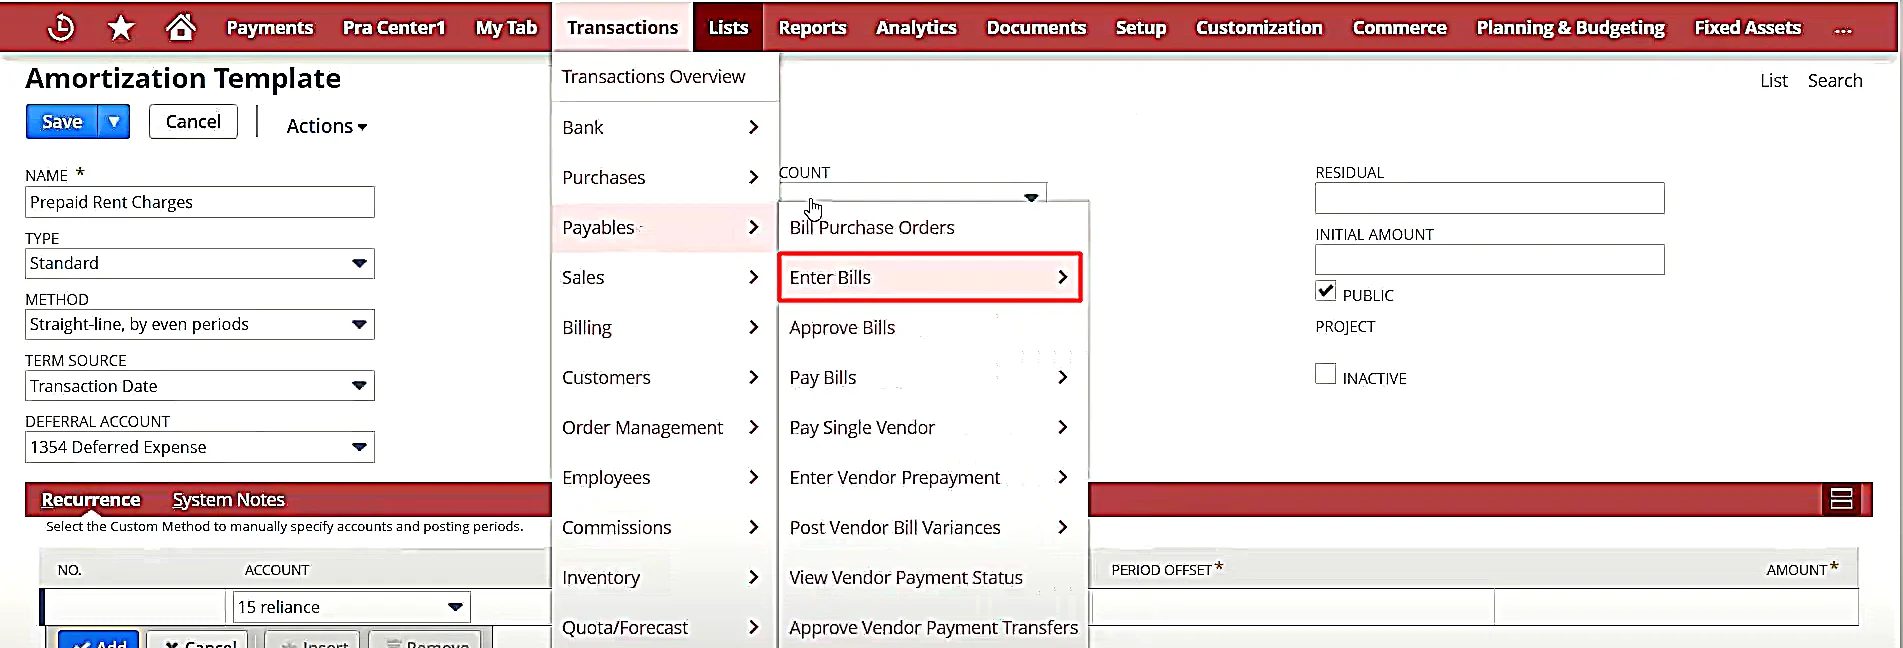
As specified earlier, the source documents on which we can apply the amortization schedules are the vendor bills and vendor credits. To apply the amortization template to either of the two, follow the below instructions:
1. Go to “Transactions” tab on NetSuite. Select “Payables” and then click on “Enter Bills”.
2. The “Bill” form will open on the dashboard.

3. Fill in the primary information to set up the NetSuite amortization schedule.
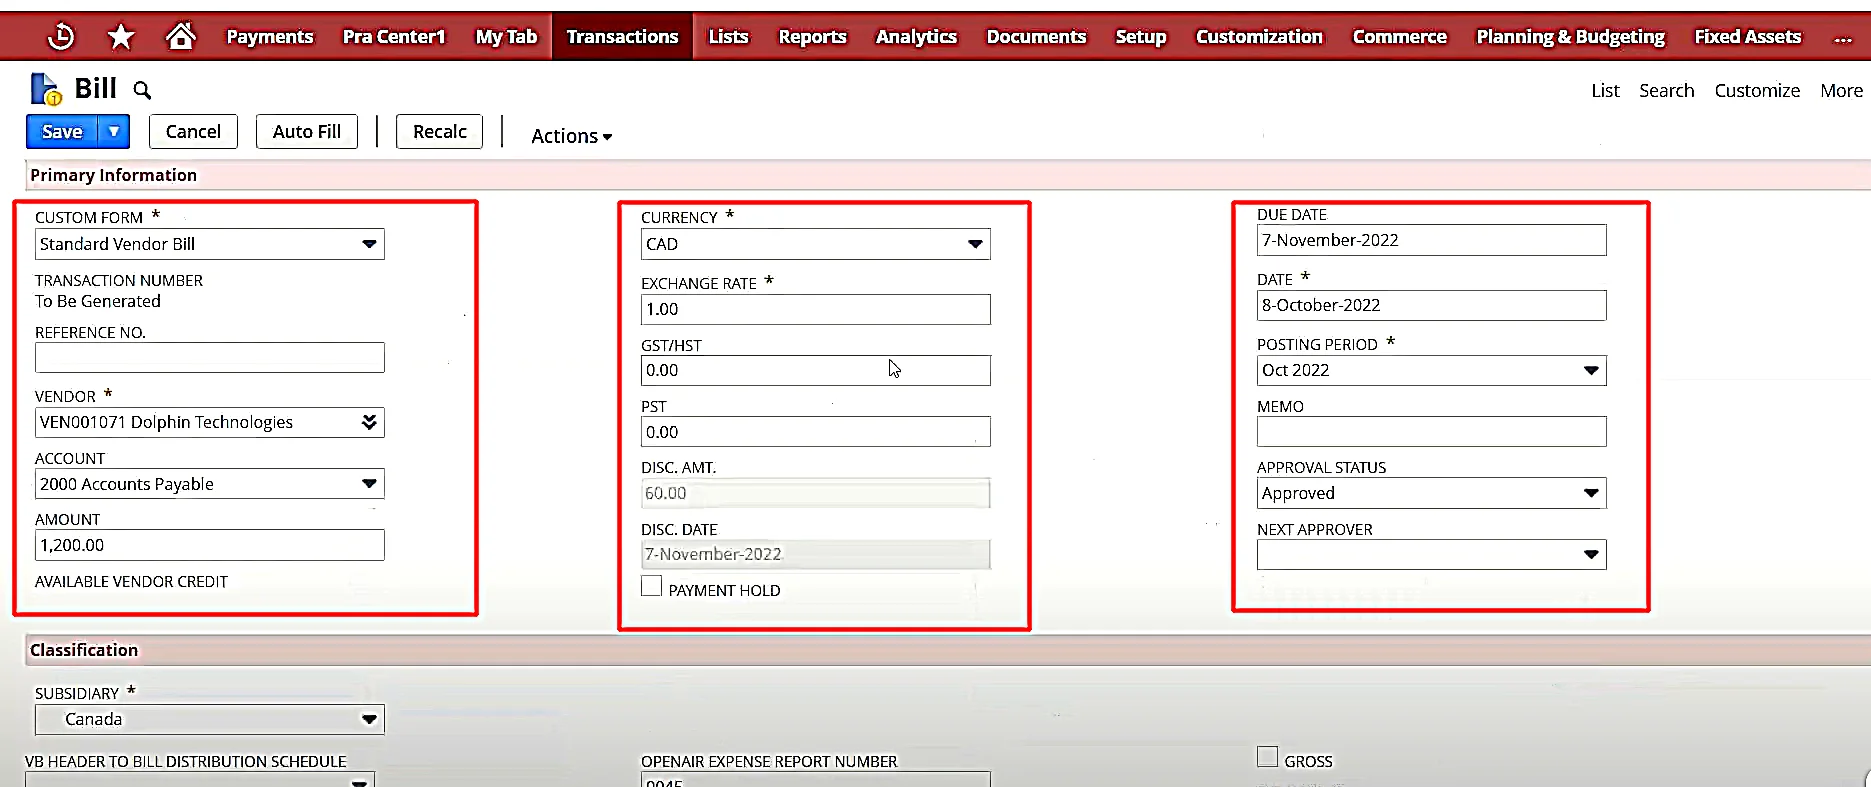
4. Once filled, click on “Save”.
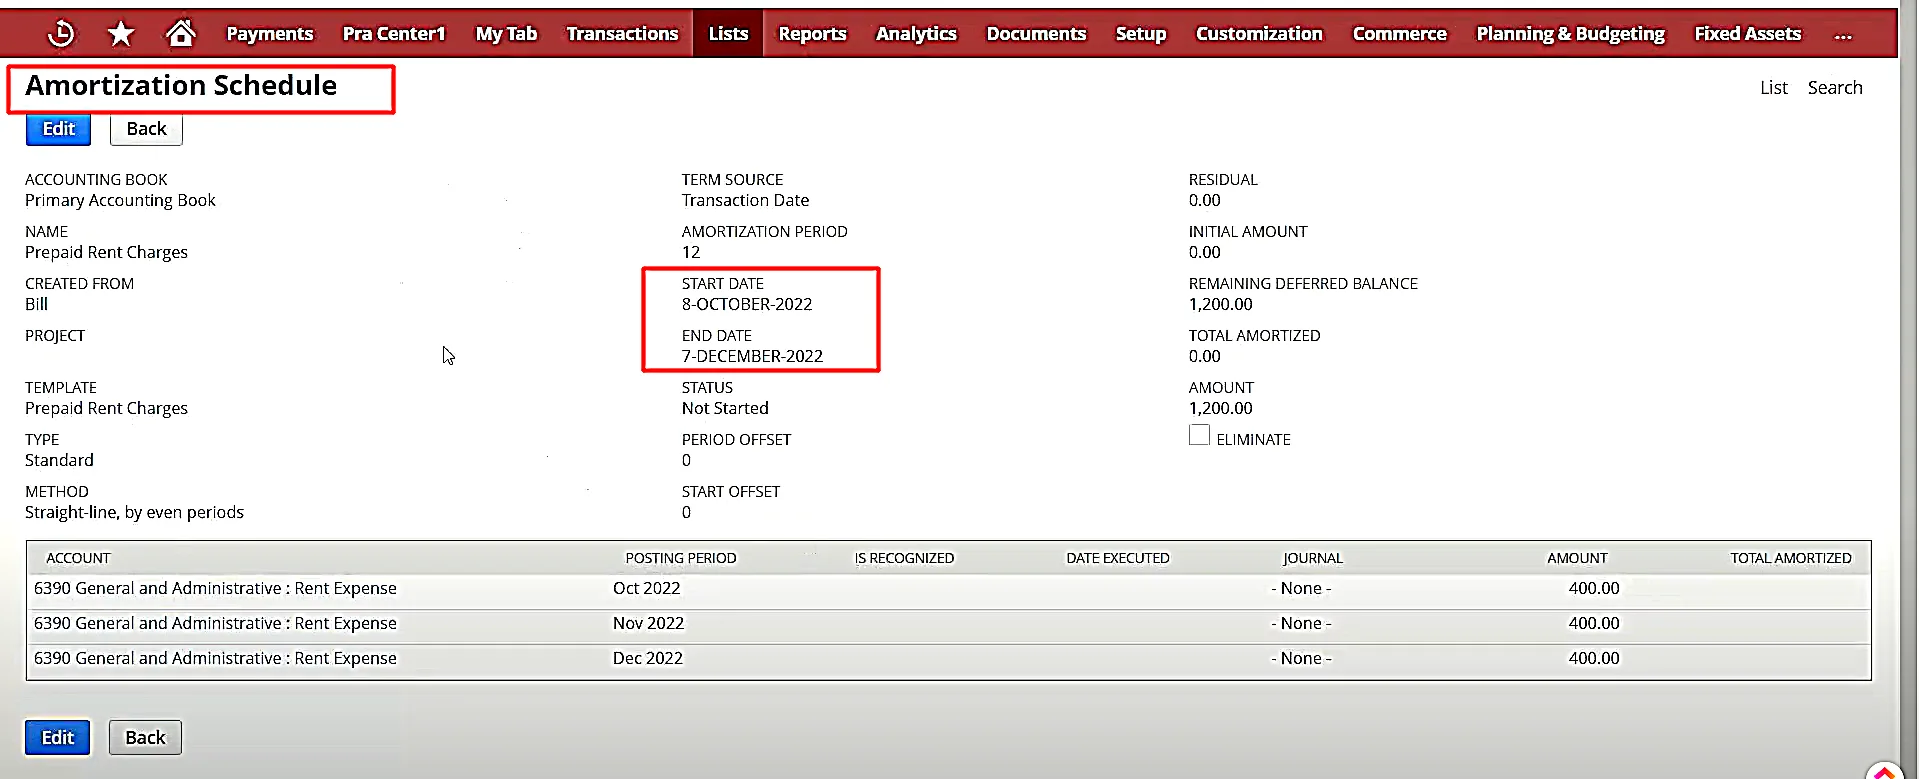
5. Now, click “View” available on the “Bill” form to review the created “Amortization Schedule”.
6 Benefits of Using NetSuite Amortization Schedules
Thus, by thoroughly following the steps mentioned above, you can successfully create NetSuite amortization schedules. Moving on to know the different ways in which Netsuite amortization schedule can benefit your business. The advantages of using this NetSuite feature are:

1. Automation and Accuracy
NetSuite makes the process of creating as well as managing amortization schedules easier. Moreover, the application provides accuracy in financial records as it minimizes human errors. Thanks to its ability to perform calculations automatically.
2. Clarity in Planning Loan Repayment
An amortization schedule outlines a clear plan for debt repayments. It specifies how much of each payment goes towards the principal amount and how much covers the interest.
3. Accurate Understanding of Expense
NetSuite amortization schedules allocate the cost of intangible assets like copyrights or patents over their useful life. It reflects the asset’s gradual consumption and is systematically included in the business’s expenses over the projected life of the asset.
Furthermore, if in case you want to eliminate the asset in the books and enter it as a loss, you can use NetSuite write off amortization schedule feature.
4. Budgeting and Financial Planning
You can easily check the NetSuite amortization schedule report containing the exact amounts and time of loan payments. It can allow you to manage your cash flow effectively. Read more about NetSuite Planning and Budgeting in this blogpost.
5. Tax Planning
Amortization is often used for tax planning. This process spreads the cost of an intangible asset over its useful life. It can help your business reduce its taxable income in each accounting period. So, an amortization financial strategy helps you save money on taxes while accounting for the gradual use of valuable assets over time.
6. Integration with Other Financial Modules
NetSuite makes financial management a lot smoother because of its ability to interrelate all financial modules. Rest assured the amortization schedule you create for a loan or intangible asset is connected with other essential financial processes.
Common Challenges with NetSuite Amortization Schedules and Tips for Troubleshooting
Although running amortization schedules in NetSuite is a seemingly easy process, chances are that you might face some challenges while running them. No worries, we will tell you some of the common problems you might encounter and how to troubleshoot them.
Reconciling Differences
Problem: There may arise some discrepancies between expected and actual amortization figures.
Tip: To solve this issue, you have to regularly reconcile amortization figures with financial statements. And if in case you witness any discrepancies, you must correct them promptly using NetSuite edit amortization schedule option.
Unexpected Costs or Charges
Problem: Your overall amortization calculation may be impacted due to some unexpected charges.
Tip: You need to regularly perform NetSuite edit amortization schedule and update the additional costs.
Errors Messages
Problem: Inadequate documentation can cause errors in the amortization schedule.
Tip: To troubleshoot this issue, you must maintain a detailed record of all terms and transactions of the loan or intangible asset.
3 Best Practices for Managing and Utilizing NetSuite Amortization Schedules
Many businesses manage to set NetSuite amortization schedules, however, they find it very difficult to run this process in the long run. This is due to the fact they don’t implement best practices for utilizing amortization schedules in NetSuite.
You can avoid making this mistake by executing the following three essential parameters in your amortization managing process:
1. Regularly Reviewing and Updating Amortization Schedules
Regularly review amortization schedules to ensure they align with the latest financial data and business transactions. This will allow you to identify discrepancies timely to correct them as soon as possible.
You can also schedule audits of amortization schedules at regular intervals as it will help you catch any errors fast.
2. Utilizing Reports and Analytics for Financial Planning
Leverage NetSuite amortization schedule report feature to customize financial reports that specifically contain amortization data. Customization of the reports will aid in making strategic decisions for your business.
You can also take advantage of the analytics tools of NetSuite to forecast future amortization expenses. This will allow your business proactive budgeting and resource allocation.
3. Collaborating with Finance Teams to Ensure Accuracy
The most important practice you must implement while managing NetSuite amortization schedules is encouraging collaborations with finance teams. Since finance teams are responsible for accounting, data entry, and so on, the collaboration will reduce the risk of data entry errors.
In addition, conduct monthly or weekly NetSuite training sessions for your finance teams to understand the basics of amortization processes.
Final Thoughts
NetSuite amortization schedules are a powerful tool to help businesses stay on track with their intangible asset value and loan repayment schedule. However, to get the most out of it, you should thoroughly understand the steps of creating them and follow the best practices to manage them.
We assure you by following the detailed instructions that we have mentioned in this NetSuite amortization schedules user guide, you can run this process seamlessly.
Still, if you get stuck somewhere or you want to upgrade your amortization schedule NetSuite knowledge, you can get in touch with us. Our NetSuite experts with 12+ years of experience will provide you with assistance instantly.


