

Are you struggling with paying multiple suppliers or vendors regularly? Or maybe you find it difficult to follow up on customers’ payment due dates? Like you, many businesses go through a similar situation. Don’t worry, there is an easy solution to deal with this – that is QuickBooks recurring invoice. Setting up recurring bills can be a significant game changer if you have a customer you need to invoice almost every week or month. Not only does it increase business efficiency but prevents manual labor.
Moreover, you can also set up QuickBooks autopay for recurring invoices so that you don’t have to worry about paying your vendors manually every time. Along the same lines, your customers can do the same for your bills and you can get paid timely each time. Let’s go over how to set up this option in QuickBooks Online and enable autopay for your customers to pay the bill automatically. But before moving on to the instructions, let’s understand why recurring invoices are essential.
Understanding the Importance of Recurring Invoices in QuickBooks Online
As we all know QuickBooks Online is an accounting software that can help simplify many business functions. It helps track your financial income, expenses, employee payroll, inventory, and many other things in real-time. When you log in to QuickBooks Online, its dashboard contains so many powerful tools that you can utilize to make your business processes easier. Among these is the invoice tab, where you can form QuickBooks online invoicing for both your customers and vendors. You could also set up a recurring feature in one of the invoices.
If you’re running a business, it’s highly likely you’ll be generating invoices regularly. However, wouldn’t it be frustrating if you had to create the same invoice every month? Over that, the process is lengthy as it includes
- Preparing the invoice manually
- Sending them in the email, and
- After that remind your customers of the payment
It all gets time-consuming and difficult to manage the process properly. This is where the aid of recurring invoices in QuickBooks Online comes in. It simply automates the process, eliminating the need to repeat these sluggish tasks.
By using QuickBooks Online recurring invoices, you can save a lot of time and focus on important tasks that matter. Apart from this, other benefits of using this feature are:
- Automates the process of billing customers for your services or products
- Eliminates the headache of paying your suppliers manually every period
- Generates automatically based on the specified schedule
- Saves time
- Minimizes the risk of errors
- Monitors the payment and any concerns
- Reduces administrative overheads
- Provides a predictable income stream
Wondering how to set up QuickBooks Recurring Invoice for your business?
Our QuickBooks experts can help!
Many organizations use recurring QuickBooks invoice features in their business models, all thanks to its benefits. Some scenarios where recurring invoices are particularly beneficial are:
- Subscription-Based Services: Many SaaS companies and streaming platforms use this option to bill customers who have taken their subscriptions.
- Membership Fees: Recurring invoices simplify the billing process for gym, club, or association memberships.
- Monthly Retainers: Service-based businesses like consulting firms, attorneys, and marketing agencies often work with clients on agreements. Recurring invoice automates the billing process for monthly retainers.
- Rental Properties: Landlords and property managers can use recurring invoices to bill tenants for rent. They can also set it up for expenses like maintenance fees.
Why Enable the QuickBooks Autopay Option?
One of the prominent aspects of using recurring invoices in QuickBooks Online is Autopay. As it removes the need for manual payments, your customers can save a lot of their time. Plus, your organization can track income and expenses efficiently. Not to mention you can monitor any concerning problems related to the payments.
QuickBooks autopay method also helps in managing the payment system as it deducts money directly from the bank account based on your set instructions. Other advantages involve:
- Convenience
- Timely Payments
- Reduced Administrative Burden
- Improved Cash Flow Management
- Lower Risk of Payment Delays or Defaults
- Enhanced Customer Experience
Key Features of Recurring Invoices in QuickBooks
In the recurring QuickBooks invoicing form, you’ll come across certain terminologies. Let’s understand them first before we proceed to learn the steps.
1. Types of Schedules in Recurring Invoices: You can set up these invoices in the following three ways:
- a) Scheduled: In this, invoices are generated automatically on a predetermined schedule (e.g., weekly, monthly, annually). They are ideal for businesses with expected billing cycles.
- b) Reminder: These invoices send notifications to customers reminding them of their upcoming payments.
- c) Unscheduled: Created manually, these invoices can be saved as recurring templates for future use.
2. Options in QuickBooks Recurring Invoices Templates:
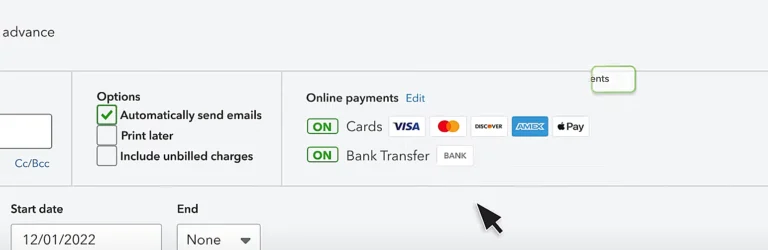
- a) Payment Methods: QuickBooks Online supports various payment methods, including credit/debit cards, bank transfers, and online payment platforms. You can offer your customers multiple payment options to accommodate their preferences
- b) Recurring Schedule: It is used to define the recurrence schedule for invoices, where users can specify the frequency, start date, end date, and any exceptions for the payments.
- c) Autopay: As discussed earlier, when enabled, it allows your customers to pay the bills automatically.
Steps for Setting Up QuickBooks Recurring Invoices With Autopay
Now that you’ve understood the options available in QuickBooks invoicing for setting up recurring payments, it’s time to go through the steps.
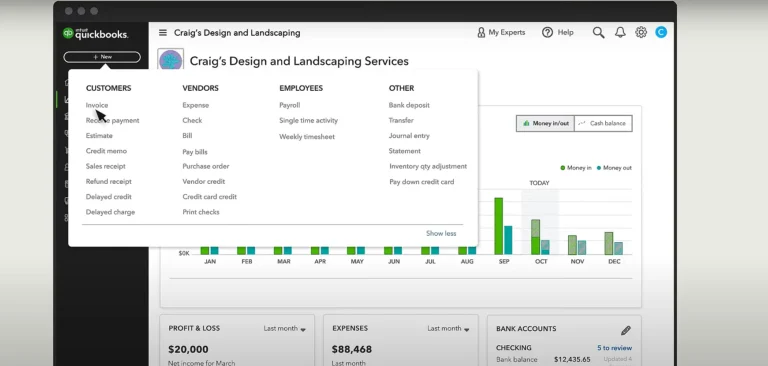
1. Go to “New” in QuickBooks dashboard and then, click on “Invoice”.
2. If using the old QuickBooks invoices layout, then click the “Make recurring” button in the toolbar that is available at the bottom of the window.
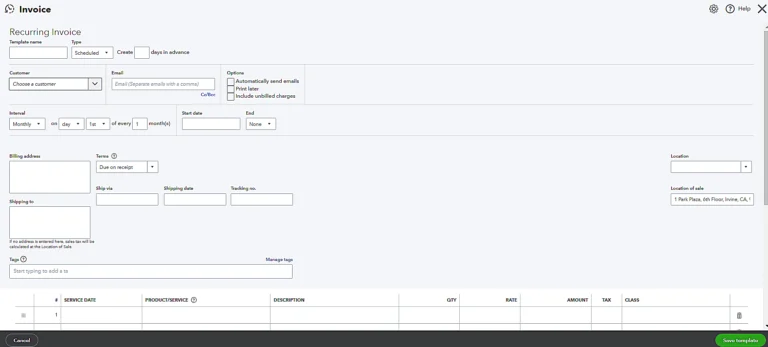
3. Once clicked, the “Recurring Invoice” window will open.
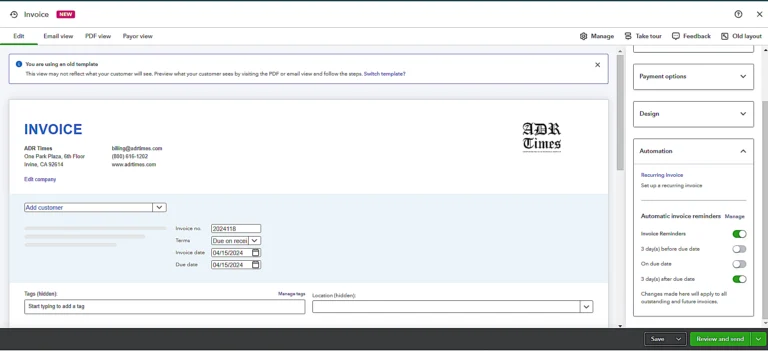
4. Alternatively, if using the “new layout” for QuickBooks Online invoicing, click the “Manage/Gear Icon” button in the toolbar above the invoice. A pane at the right side of the window will open.

5. Then click the button that says “Automation” in the pane.
6. Select the “Recurring invoice” tab to open the same window.
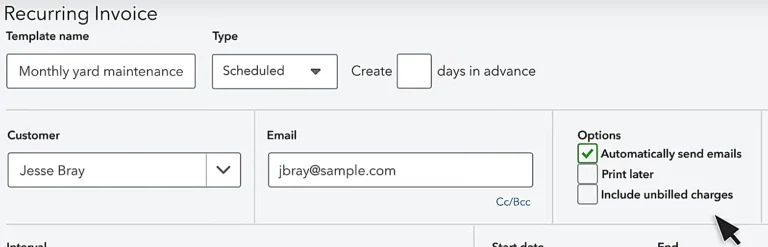
7. Then, fill in the essential details like template name, customer name, schedule type, interval, options, product details, service date, etc.
8. To enable autopay, you would need a QuickBooks Payment account. You can set that up using the “Activate Online Payments” option displayed there.
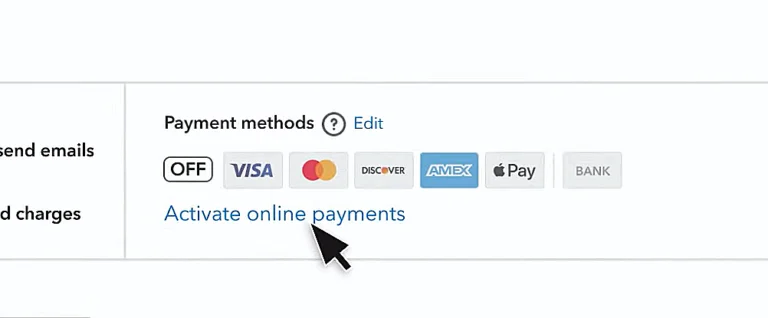
9. If you have a QuickBooks Payment Account, then you can easily enable autopay. For that, you’ve to just choose the payment methods you want to accept on these invoices. Autopay works both for cards and ACH transactions
10. Once everything looks good, select “Save Template”.
Helping Your Customers Enable QuickBooks Autopay for Recurring Invoices
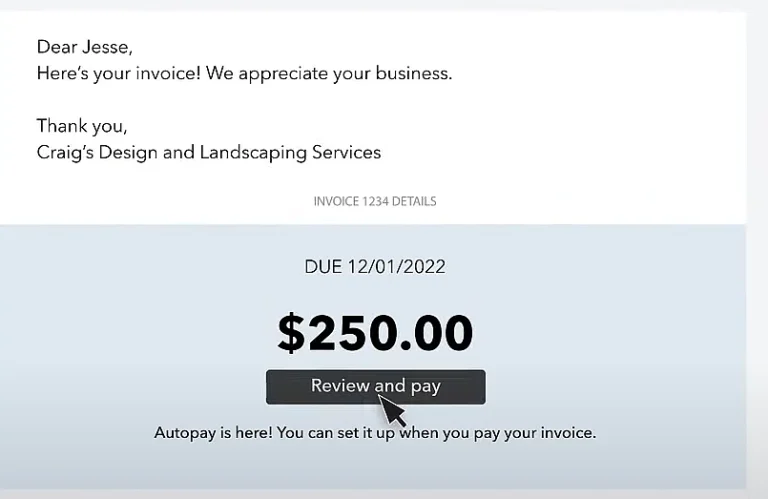
1. When you’re customers receive your invoices via email, they can set up autopay. For that, they need to select the “Review and Pay” option.
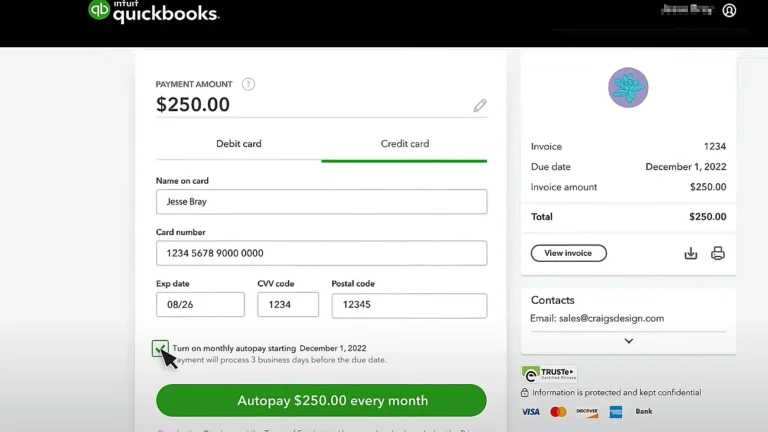
2. On the next window, enable “Turn on monthly autopay starting the date mentioned by the company”.
3. After that, click on “AutoPay $xxx.xx every month”.
4. Your customers can cancel this anytime they like.
How to Edit QuickBooks Online Recurring Invoices?
Once you’ve created QuickBooks recurring invoices, you can easily access them if some edits are required. Follow these steps to do so:
1. Managing Individual QuickBooks Invoices:
- a) Go to the Invoices Page by clicking on “Invoicing” > “Invoice”.
- b) All your recurring invoices will have a unique symbol next to them.
- d) Select any invoice to see the details on the invoice activity or to edit the invoice.
- c) You can see the autopay schedule or status for those invoices set to be paid automatically. (Detailed Steps Below).
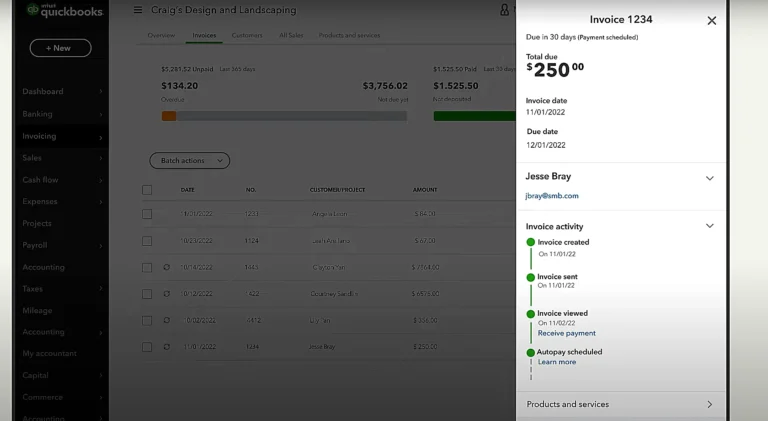
2. Checking the Autopay Status of Your Customer:
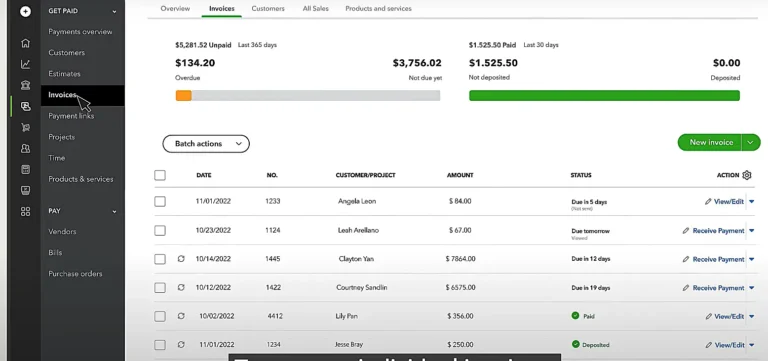
- a) Go to Sales, then click on “Invoices”.
- b) Locate the invoice for which you wish to check the payment status.
- c) Click “Status” of that invoice to open the activity tracker panel.
- d) Verify the status under the invoice activity session (This option is only available if your customer has set up autopay).
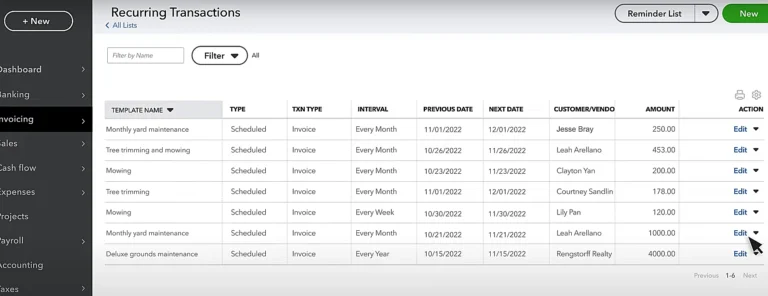
3. Managing Your QuickBooks Recurring Payments Series:
- a) Select “Settings” and then “Recurring Transactions”.

- b) Choose the invoice series you want to change.
- c) Then select “Edit”.
How to Automatically CC QuickBooks Online Recurring Invoice to Yourself?
As a safeguard, you can enable the settings to automatically email you a copy of all sent invoices in QuickBooks Online. This process can help you keep track of all invoices. Additionally, it is an easy way to verify that invoices are being sent correctly to your customers or vendors. To set up this option:
- Select the “Gear” icon on the QuickBooks dashboard.
- Click on “Account & Settings”.
- Select “Sales”.
- Click “Messages” on the template and enable “Email me a copy”.
How to Turn an Existing QuickBooks Invoice into a Recurring Invoice?
If you already have a QuickBooks invoice for one of your customers, you can turn it into a recurring invoice. This is beneficial when they wish to take your services/products longer. Take a look at the procedure for the same:
- Navigate to the “Sales” or “Invoice” tab on the dashboard.
- Find the existing invoice that you want to change into a recurring invoice.
- Look for an option labeled “Make Recurring” (in old templates).
- After clicking on the “Make Recurring” button, you’ll be prompted to fill in the necessary details for QuickBooks recurring payments. They include payment frequency, schedule, start date, end date, etc.
- Save the template once filled.
- Go back to the list of invoices to verify the changes made. Now, the edited invoice will have a recurring sign adjacent to the invoice number.
Can’t understand how to enable QuickBooks Autopay?
Connect with our experts to get guidance.
Ways to Confirm QuickBooks Recurring Invoices Were Created
There are many ways through which you can confirm if a QuickBooks online recurring invoice has been created or not. Here are a few ways you can ensure the invoices were generated.
1.Check your inbox
The first method is applicable if you’ve enabled the option to CC the invoices to yourself automatically. You will receive a copy of the invoice once sent to your customers.
2.View your list of recurring transactions
- Navigate to the “Reports” section from the left navigation bar in QuickBooks Online.
- Click on the “Find Report by Name” drop-down menu.
- Select the “Recurring Template List” report.
- This report provides a comprehensive list of all recurring templates, including invoices.
- Review this list to confirm the recurring invoices were set up and scheduled correctly.
3.View the customer page and invoice
- Access the “Customers” section in QuickBooks Online.
- Locate the customer associated with the recurring invoice you want to confirm.
- In the “Status” column, you should see “Open (Sent)” for invoices that have been generated and sent to the customer.
- Click on the invoice to view its details, including the last delivery timestamp, which indicates when the invoice was sent.
Common Issues You May Face While Setting Up QuickBooks Recurring Invoices
You might encounter certain difficulties while setting up a recurring payment option in QuickBooks online invoicing. Here is the list of common issues you may face and steps for troubleshooting:
Issue: Forgetting to specify the correct recurrence frequency or start/end dates
Solution: Review the recurring invoice settings and update the recurrence frequency or dates as needed.
Issue: Accidentally omitting important details in the invoice such as customer information
Solution: Edit the QuickBooks recurring invoice template (steps mentioned above) to include any missing details.
Issue: Not configuring QuickBooks autopay settings properly
Solution: Access the autopay settings to ensure the correct payment methods.
Issue: Overlooking email delivery settings that may hinder the process of invoices being sent to customers
Solution: Check the email delivery settings in QuickBooks online invoicing and verify if you have enabled the “automatically send emails” option.
Issue: Missing notifications for failed autopay transactions
Solution: Make sure you’ve enabled notifications for QuickBooks autopay transactions to receive alerts promptly.
Best Practices for Making the Most Out of QuickBooks Recurring Invoices and Autopay
Some of the proven techniques that can help you make full use of QuickBooks online recurring invoices are:
- Double-check the details in the invoice before activating recurring invoices, including customer information and billing terms.
- Regularly review the templates to reflect any changes in pricing, services, or terms.
- Test QuickBooks autopay functionality with a sample invoice to ensure it’s set up correctly so that the payments are processed smoothly.
- Monitor autopay transactions to address any payment failures.
- Educate customers about the benefits of QuickBooks autopay to encourage them to enroll in this process.
- Incorporate strong security measures to prevent data breaches.
Limitations of Recurring Invoices in QuickBooks
Before we end this blog, let’s discuss a few of the drawbacks of recurring invoices in QuickBooks:
- Payment Processing: Recurring invoices are recorded as sales receipts only. As a result, this feature limits the flexibility to process payments manually, if needed.
- Limited Functionality: While the setup is easy, they lack advanced editing features such as proration, adding one-time fees, etc.
- Managing Invoices: As paid and unpaid invoices are split between distinct locations, it becomes difficult to manage them.
- Mixed Transactions: Recurring invoices are mixed with unrelated transactions like bills, checks, and general journal entries in QuickBooks. This makes it challenging to view solely recurring invoices.
Final Thought
QuickBooks recurring invoices make it easy for all, be it customers, vendors, or businesses. Hence, including this feature can simplify your business operations. We hope the steps mentioned in this blog will help you successfully create a recurring invoice and set up automatic payment. Moreover, we assure you if you follow the best practices, you can make this process sustainable.
Still, if you face any difficulty while setting up recurring invoices in QuickBooks, get in touch with us. Our QuickBooks experts will guide you every step of the way. We can also begin with the basics of how to create an invoice in QuickBooks.


