

Are you tired of the complexities that come with managing your company’s fixed assets? The questions like manual tracking, tax compliance, and depreciation methods keep you up all night? Well, you are not alone. Many established business owners face difficulties while managing their fixed assets. Hence, we have created this NetSuite Fixed Assets Management Made Easy guide to help you with the complex process of managing your business assets.
In this blog, we will provide you with 7 steps to perform NetSuite fixed asset management with ease. Alongside this, we will also explain the best practices you need to follow to further boost this process.
But before beginning with the steps, let’s understand what fixed assets are and how NetSuite FAM can act as a beneficial tool for you.
What are fixed assets?
Fixed assets are basically long-term tangible pieces of property and equipment that your organization owns. These assets help your operations generate income. They provide financial gain for the long term and generally have a useful life of more than a year.
Your company can own computer equipment, land, buildings, furniture, vehicles, software, machinery, etc. as fixed assets.
For example, you have a well-established custom T-shirt printing business. Then, a screen printing machine, laser printer, dryer, and heat press are some of the equipment that you would need. So, such machinery comes under fixed assets. Furthermore, the graphic design software you are using for creating designs is also a fixed asset.
What is the importance of managing fixed assets efficiently?
Fundamentally, you shouldn’t expect to either consume or convert your fixed assets into cash within a year. In fact, you should manage your fixed assets on the balance sheet and calculate the net balance by deducting the accumulated depreciation from the asset value. Here, depreciation refers to the wear and tear of using the fixed asset for business purposes.
Hence, it is clear that businesses focus on fixed asset management to improve an asset’s quality and useful life. As a result, they can ensure the greatest return on investment.
Apart from being used to help generate revenue for a business, fixed assets are followed closely by investors. This helps them decide whether they want to invest in your company or not. Also, you can mortgage these fixed assets to take loans from various financial institutions.
How NetSuite Offers a Comprehensive Fixed Asset Management Solution?
NetSuite fixed asset management can help your business manage the fixed assets throughout their lifecycle. It enables you to specify key details and fields to a particular asset along with default in asset types when creating a fixed asset.
Simply put, cloud-based NetSuite software can make asset creation, management, tracking, and reporting easier. Read more about NetSuite ERP implementation here.
Now, we will dive deep into the benefits that NetSuite fixed asset management has to offer.
4 Benefits of using NetSuite for fixed asset management
So, if you are thinking of using NetSuite for fixed asset management, then you have made the right choice. Take a look at how NetSuite fixed asset management can beneficial for your organization:
1. Centralized asset tracking and recording
Firstly, NetSuite can help you organize all your fixed asset details into one place. This means you no longer have to juggle between multiple spreadsheets and systems. It can help:
- a) Add new assets with details like name, category, location, and purchase information.
- b) Classify assets by assigning categories and classes.
- c) Track changes, transfers, and disposals easily
2. Streamlined asset depreciation calculations
Another advantage of using NetSuite fixed asset management is that the tool can handle depreciation calculations automatically. Managing assets in NetSuite can take the headache out of depreciation as you have to perform less manual labor. Well, this software can help you:
- a) Set a new depreciation schedule, specifying method, fixed asset start date, etc.
- b) Associate the depreciation schedule with the relevant fixed asset.
- c) Automate the depreciation entries for accurate financial reporting.
3. Integration with financial management and reporting
Furthermore, NetSuite is a comprehensive business management solution, which means you can seamlessly integrate fixed asset management with other financial modules. With this feature, you can:
- a) Generate detailed reports on asset value, depreciation, and the fixed asset’s financial impact.
- b) Access financial data directly from asset records
Master financial reporting with NetSuite!
Download our free e-book here.
4. Automation of asset maintenance and repair processes
Lastly, you can schedule regular maintenance tasks and track repairs with the help of NetSuite’s fixed asset maintenance workflows. Isn’t that amazing? This automated workflow can help you:
- a) Define asset maintenance types whether it is preventive, corrective, or inspections.
- b) Develop work order templates with task details and requirements.
- c) Assign maintenance schedules to specific assets and get alerts for the same.
Step-By-Step Guide for Implementing Netsuite Fixed Asset Management
So far we have learned the importance of fixed assets and how we can benefit by using the various helpful NetSuite fixed asset management features. Now, we will take a deep dive into the steps for implementing NetSuite fixed asset management:
Step 1: Enabling SuiteCloud Features in NetSuite
The first step includes installing the Fixed Assets Management SuiteApp in NetSuite. But before that, you have to enable Suite Cloud features in the software. The steps include:
- a) Go to the “Setup” option on the NetSuite dashboard. Choose “Company” from the drop-down menu and then select “Enable Features”.

- b) On the Enable Features page, click on the “SuiteCloud” tab.

- c) Then, enable “Custom Records” and “Custom Transactions”.

- d) Once enabled, click on “Save” to save the changes.
Note: After enabling this feature, you also have to enable the subsidiary feature and set preferences for individual subsidiaries. For this, use NetSuite’s Subsidiary Settings Manager.
Step 2: Installing Fixed Assets Management SuiteApp
To install the Fixed Assets Management SuiteApp in NetSuite, you can perform the following steps:
- a) Click on the “Customization” tab on the dashboard. Select “SiteBundler” from the drop-down menu and then click on “Search & Install Bundles”.

- b) Type “Fixed Assets Management” in Keywords and click on “Search”.

- c) Select and download the Fixed Assets Management Bundle in NetSuite.

Step 3: Creating a New Fixed Asset
Once you have installed NetSuite fixed assets management SuiteApp, you will find the “Fixed Assets” section displayed on the dashboard. Now, to create a new fixed asset record in the NetSuite application, follow the given instructions:
- a) Click on Fixed Assets > Lists > Assets > New
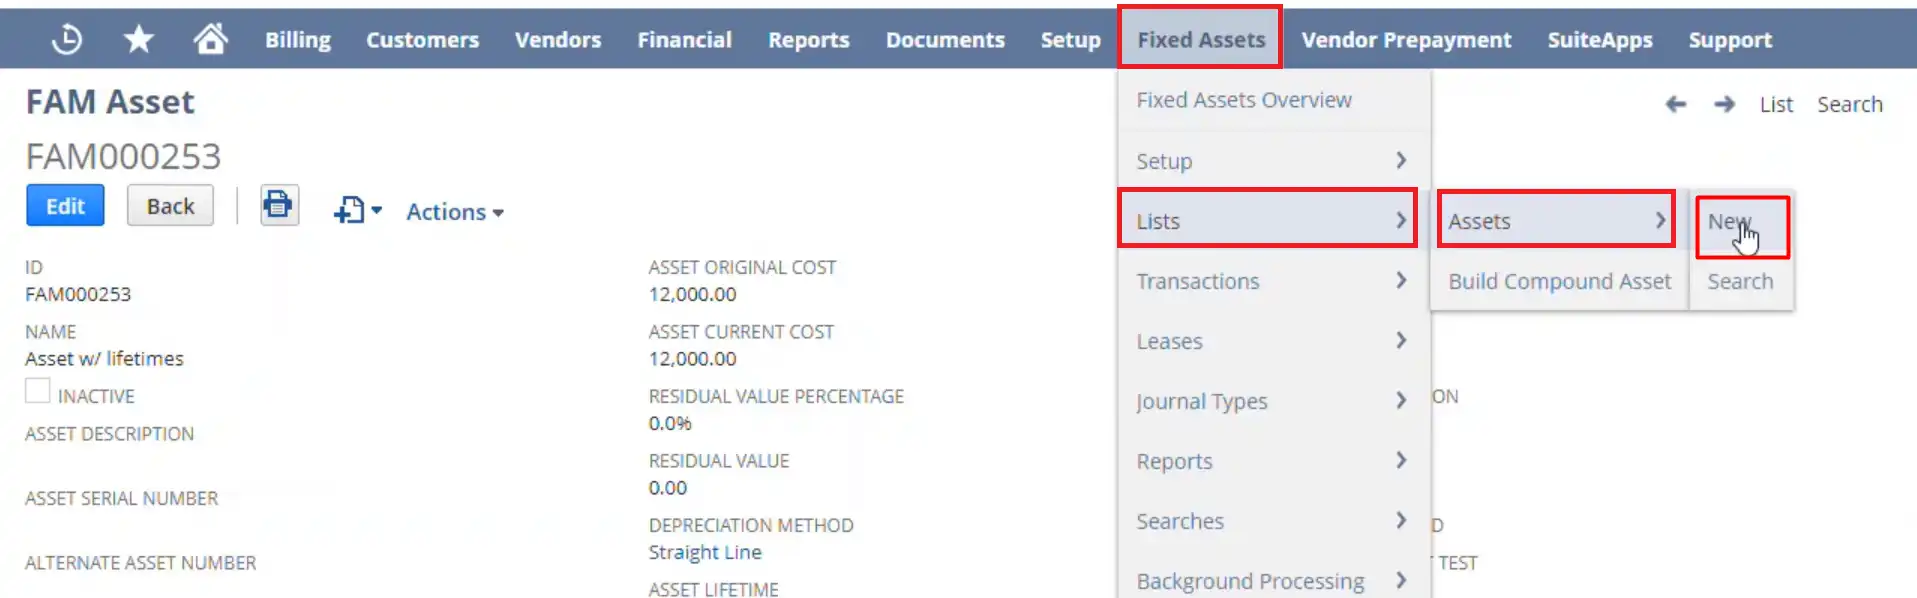
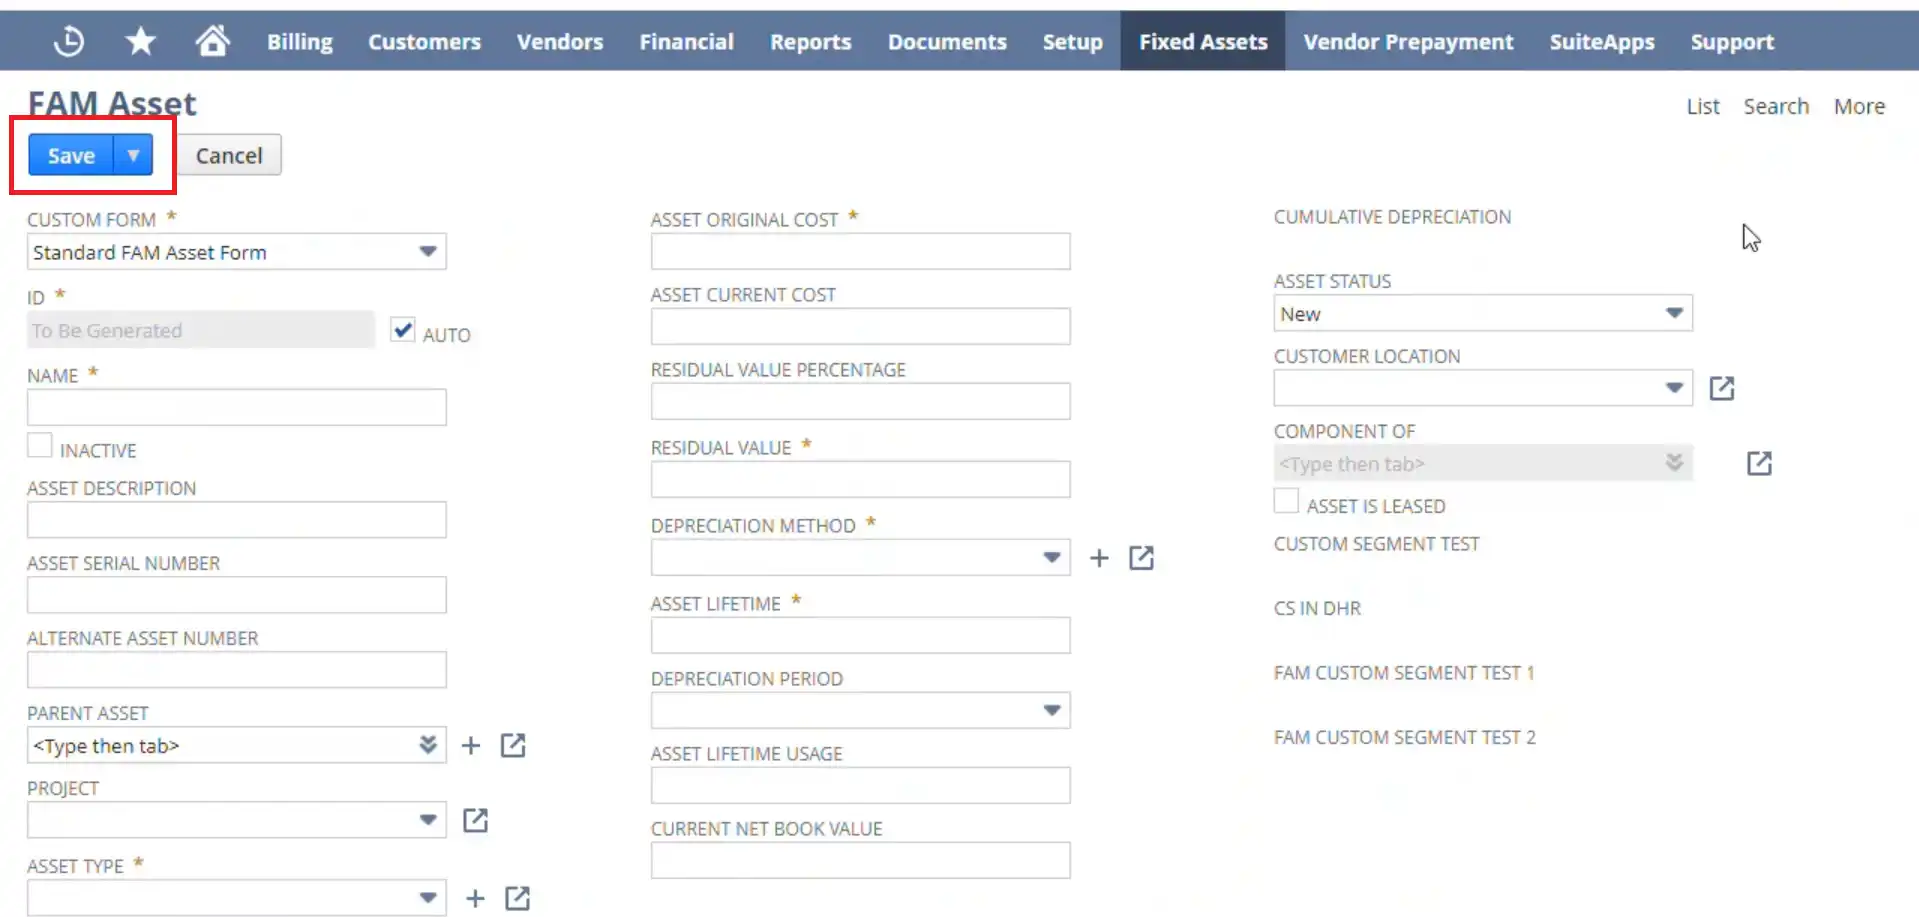
- b) Now, fill in the important details in the “FAM Asset” form. Some of the important fields include asset name, asset type, asset original cost, residual value, depreciation method, asset lifetime, etc.

- c) Besides, the NetSuite FAM Asset form also contains other subtabs such as General, Accounts, Maintenance, Insurance, Lease, Asset Sales Disposal, etc. You can also fill in the information as per the fixed asset requirement.
- d) After filling out the form click on “Save”.
- e) Now, click again on “Fixed Assets” to see the asset list and check whether the created asset has been saved or not.
Step 4: Importing Existing Asset Data into NetSuite
The above-mentioned process is easy when you are adding only one asset manually to your existing list of fixed assets. However, what to do when there is a long list of existing assets?
In such cases, instead of manually recording each asset into NetSuite, it is easier to import the asset records through a spreadsheet (basically a CSV file). The steps to import existing asset data into NetSuite are as follows:
Before importing the CSV record into NetSuite, there are certain setups that you will be doing on the application.
- a) The first one is under the System Setup. For which navigate to Fixed Assets on the dashboard. Then click on Setup > System Setup.
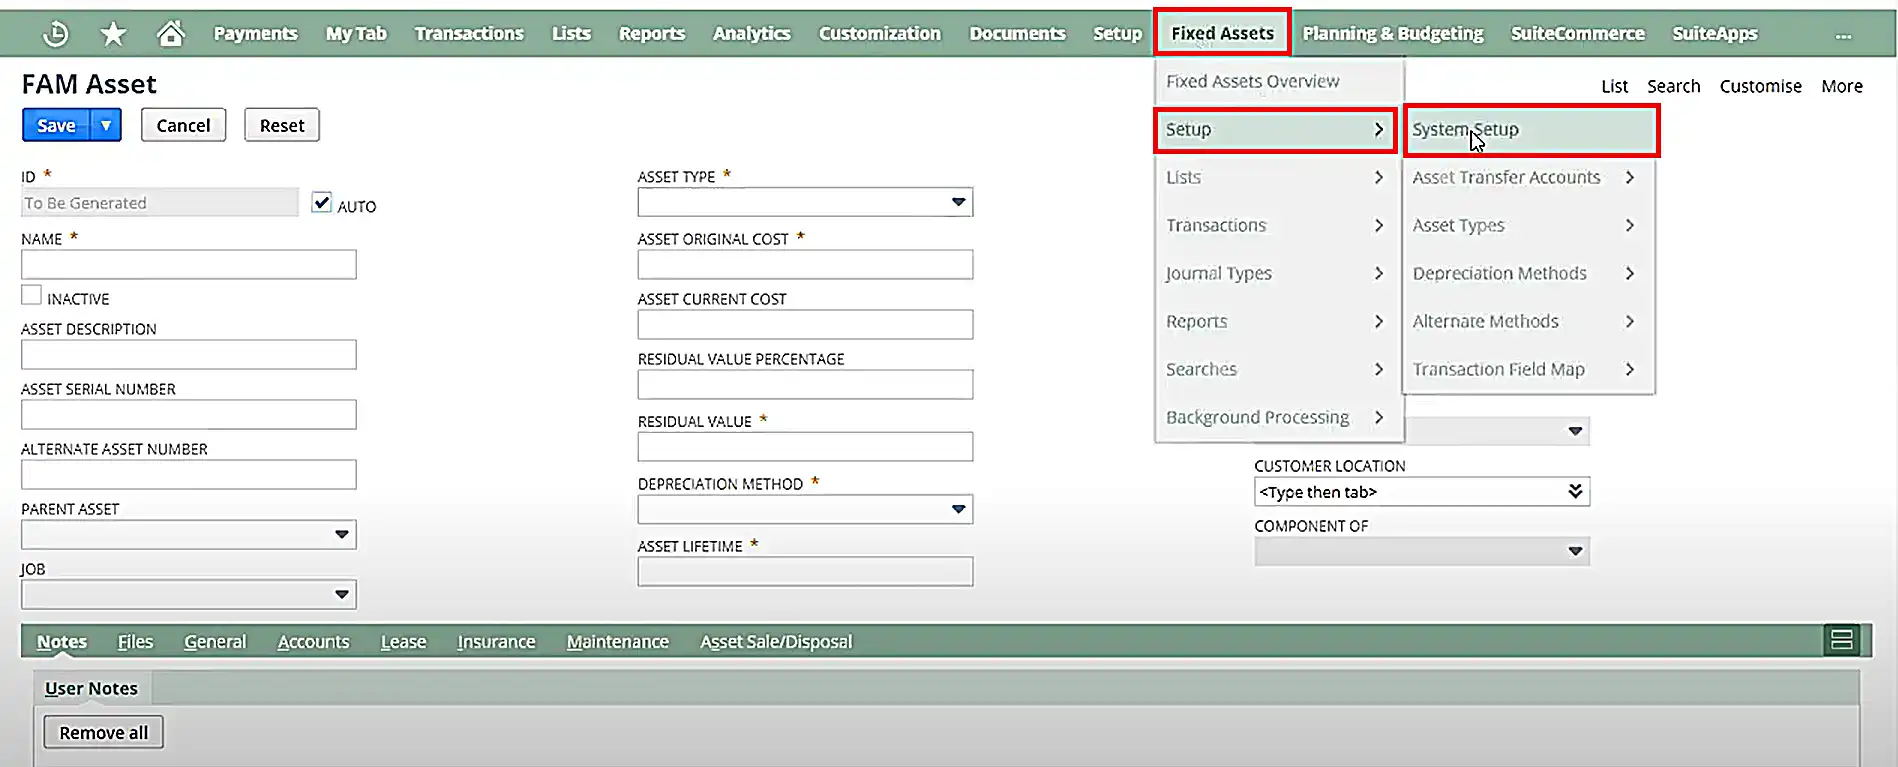
- b) Uncheck the “Run Server Scrips on CSV Imports” under the general settings. If it is checked then the values of the CSV file will be overwritten with the default values of zeroes.

- c) For the second prerequisite, go to Setup > Import/ Export > CSV Imports preferences
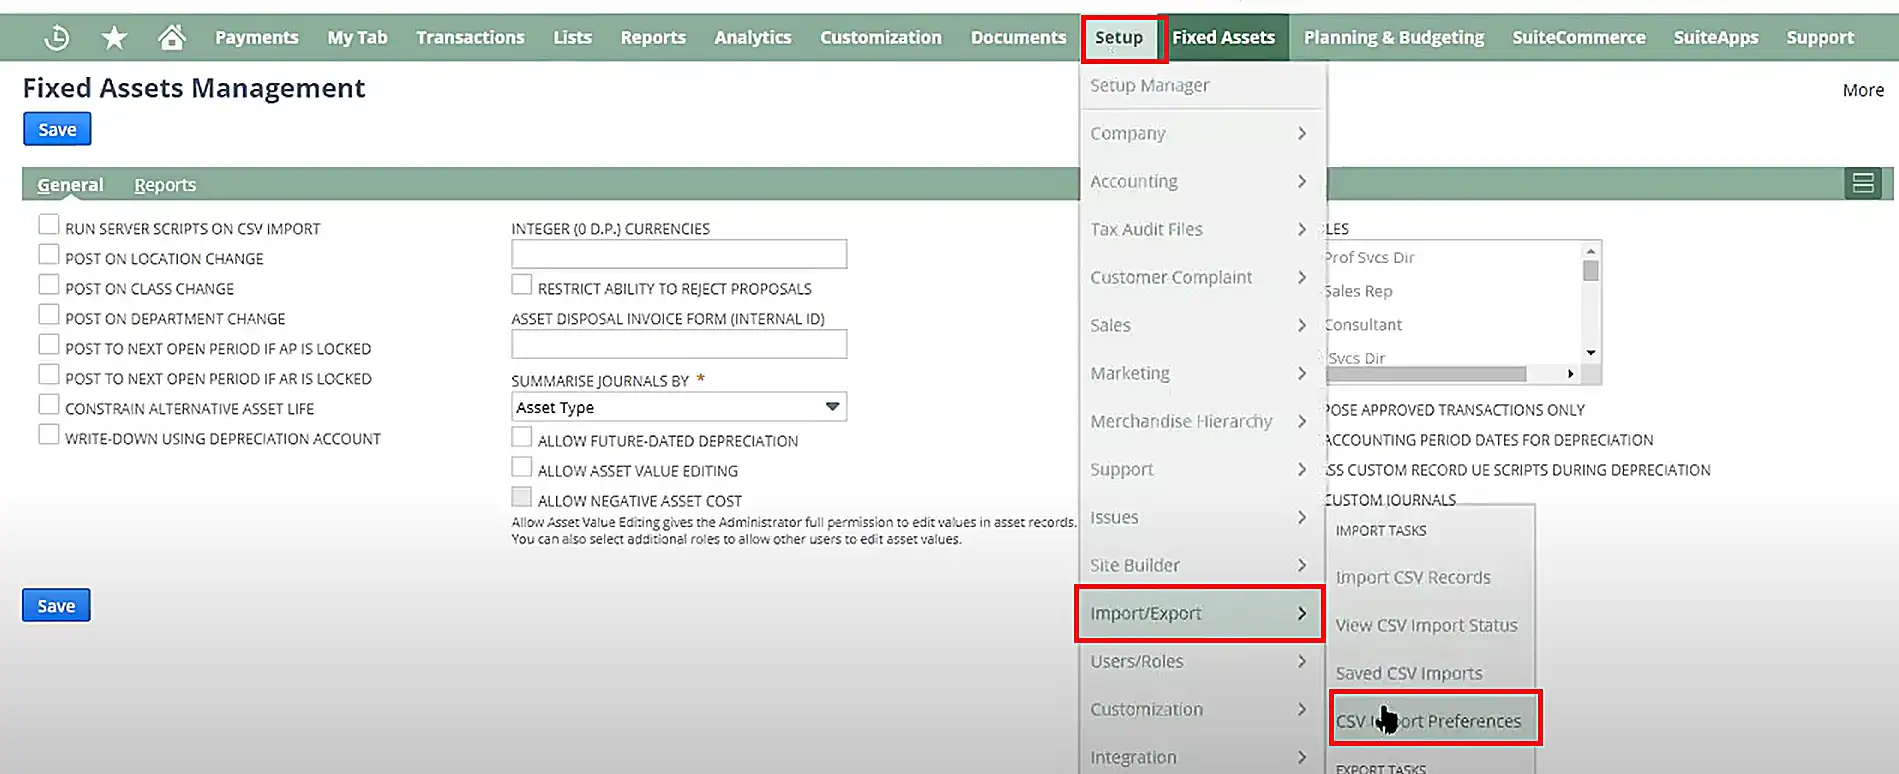
- d) Verify if “Run System server script and trigger workflows” is checked. If it is not checked, then the asset value will not be automatically created.

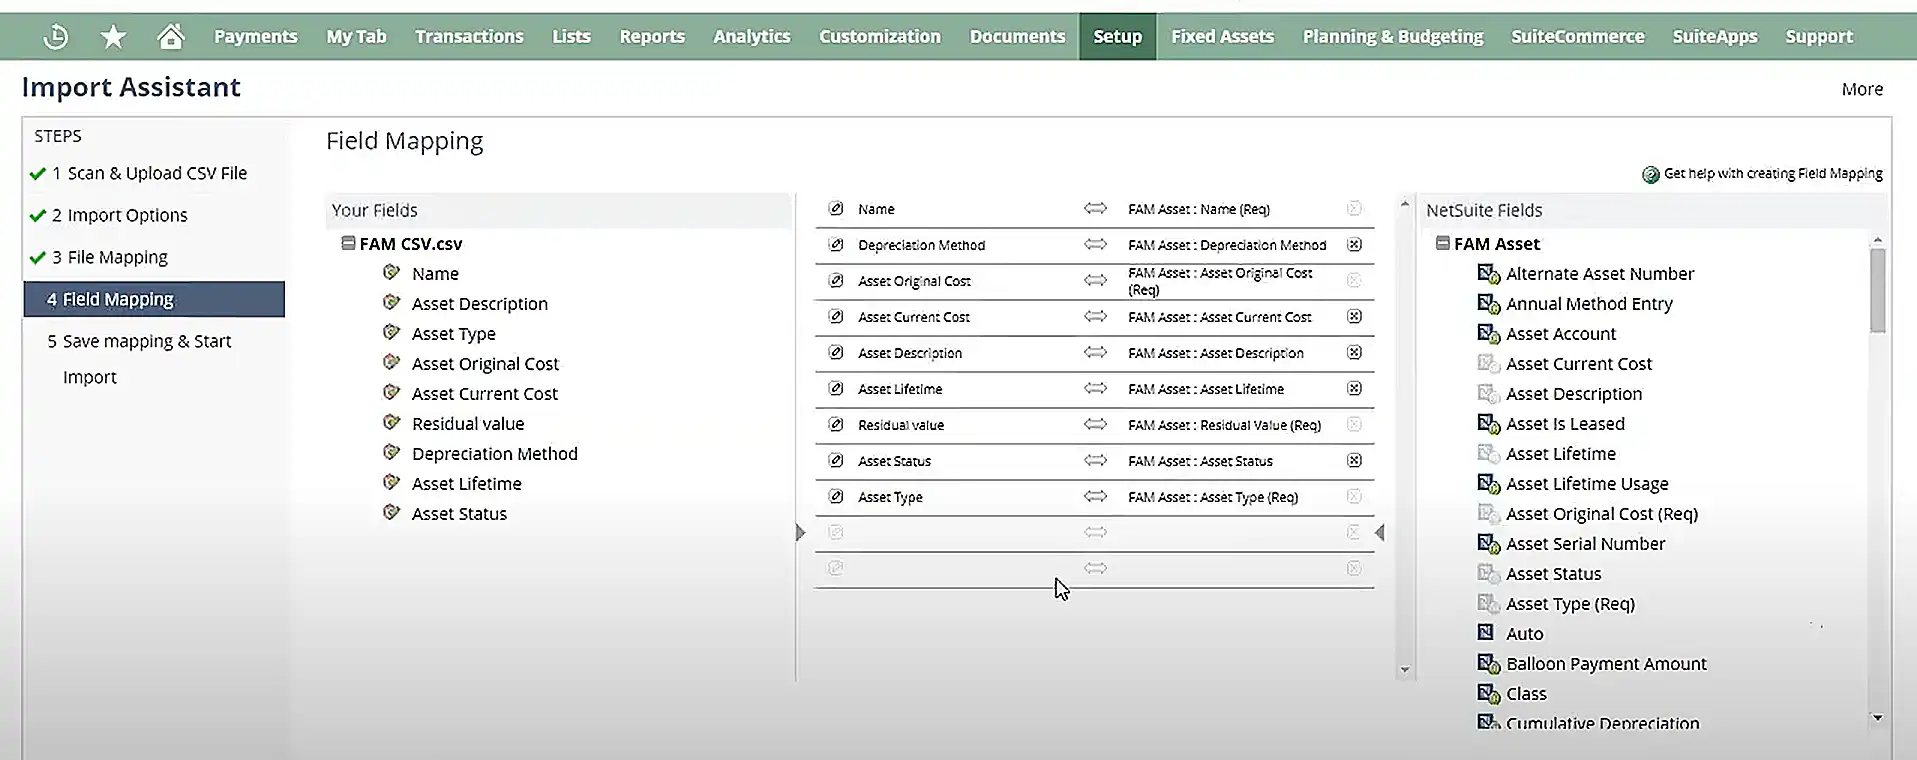
Now, the procedure for importing a file to NetSuite is as follows:
- a) Create a spreadsheet that contains all asset records of your organization. Some fields are mandatory to make the import error-free including asset name, type, original cost, and residual value. The rest you can edit once each asset is uploaded in NetSuite.
- b) Now go to Setup > Import/ Export > Import CSV Records in NetSuite.
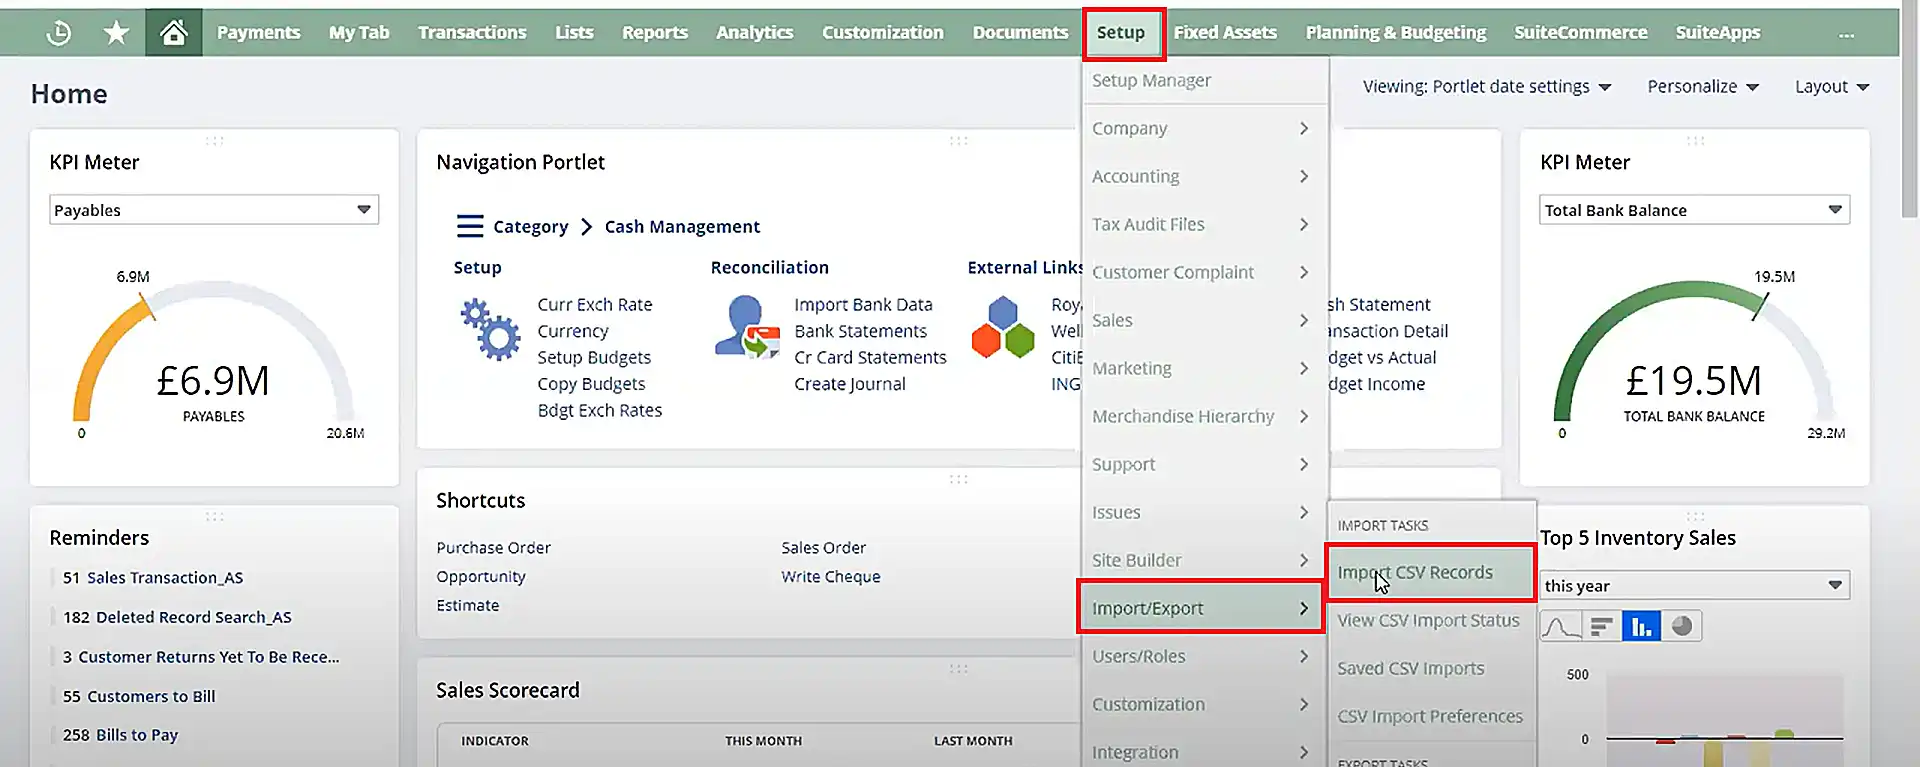
- c) From the drop-down menu, choose the import type as “Custom Records”.

- d) From the drop-down menu, choose the record type as “FAM Asset”.

- e) After selecting the file from your computer, click on “Next”.

- f) In the following step, map the fields and continue the importing process by clicking on the “Next” button.
- g) You can also choose to save the mapping for future imports. Now, click on “Save and Run” to start the import.

- h) Once the file is imported, check whether all the assets are imported from the CSV file or not. To do so, click on Fixed Assets > Lists > Assets on the NetSuite dashboard
Step 5: Configuring Depreciation Methods
The next process in seamlessly executing the NetSuite fixed asset management module is to configure depreciation methods. After creating a depreciation method, you can use it while adding a new fixed asset into NetSuite.
The steps to create a new depreciation method involve:
- a) Click on Fixed Assets > Setup > Depreciation Methods > New.
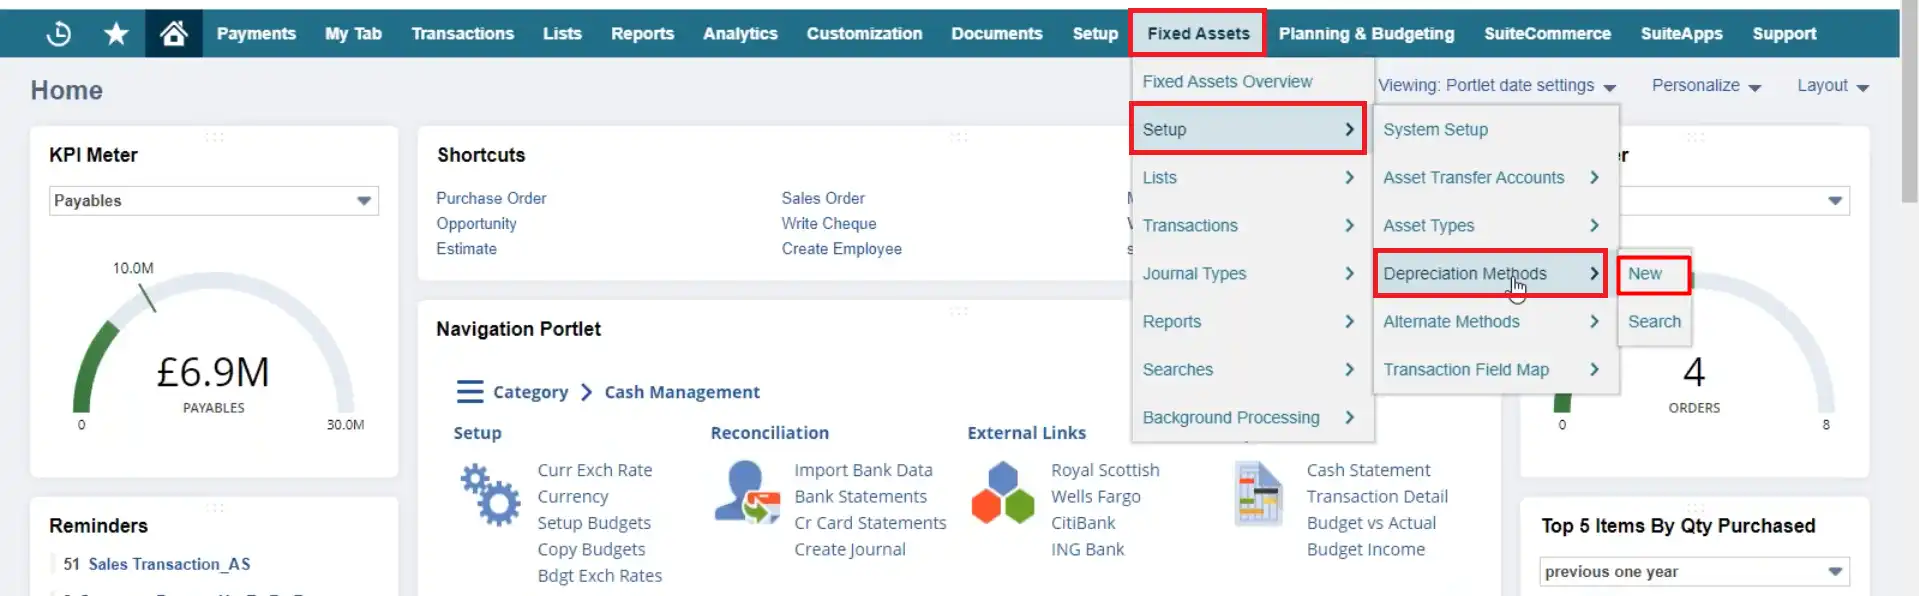
- b) A list of FAM Depreciation methods will be opened that contains the existing methods in the NetSuite application.

- c) Click on the “New FAM Depreciation Method” button.

- d) Add the details in the form such as depreciation name, period, next depreciation method, final period convention, etc.
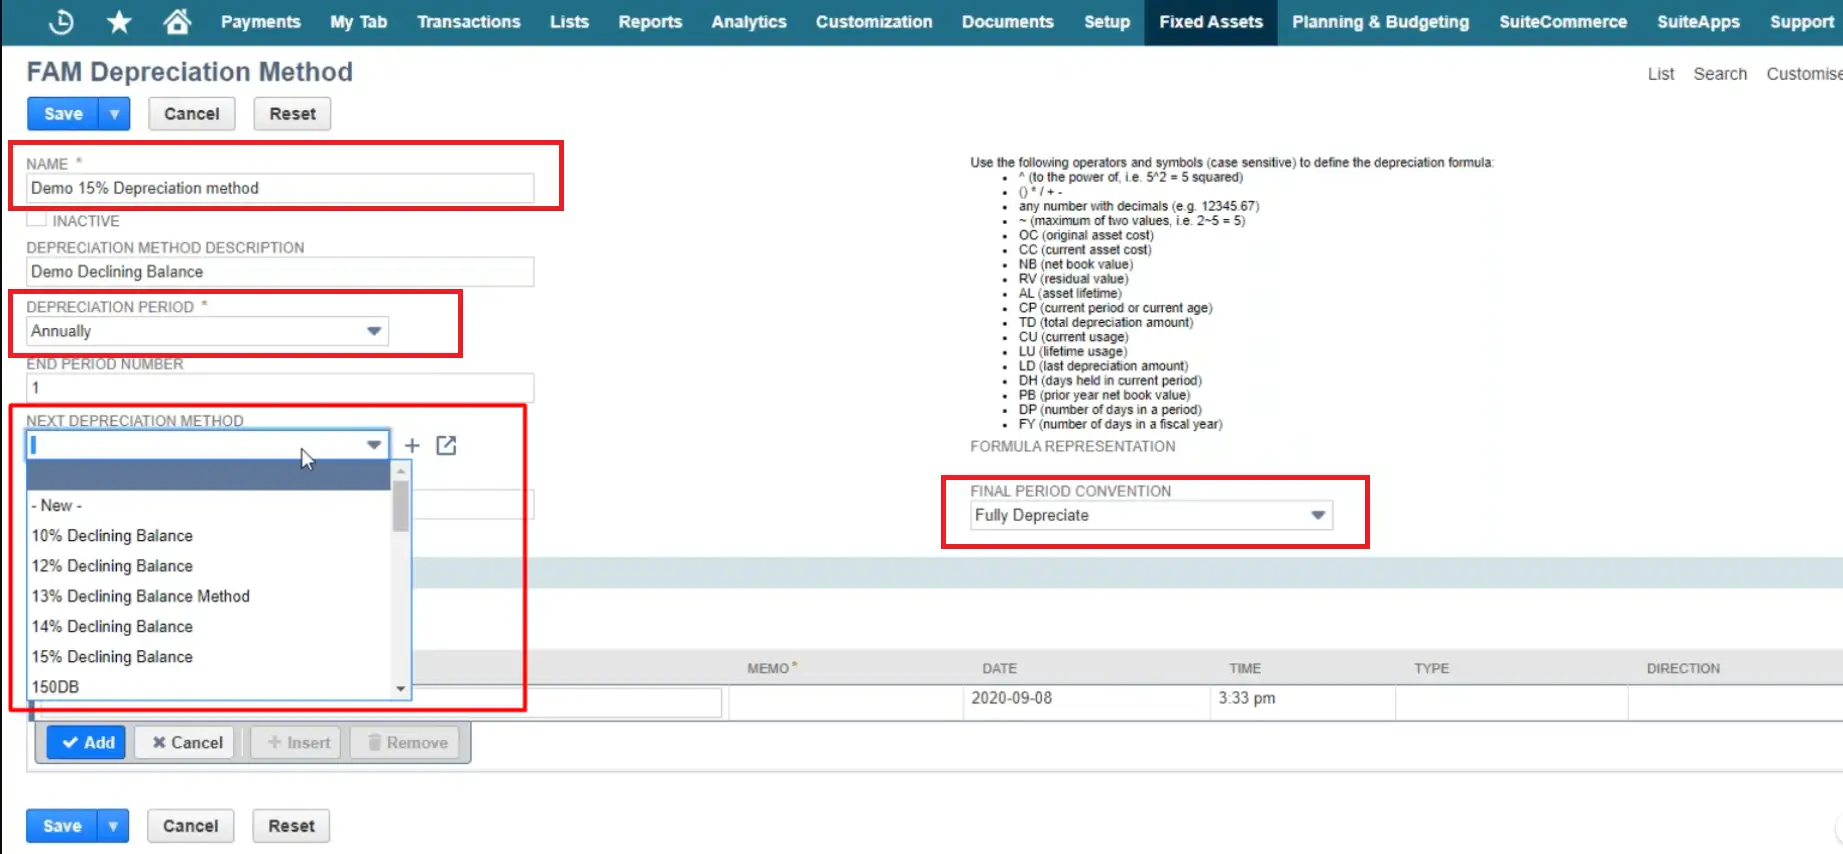
- e) Click on “Save” to save the method.

Step 6: Configuring Depreciation Schedules
What happens is most companies use different depreciation schedules for their fixed assets. They use one depreciation schedule for accounting purposes and the other one for their tax authority or any other statutory company that governs their business.
Hence, there are provisions in NetSuite Fixed Asset Management that you can create an alternate depreciation schedule. Still wondering why you are required to create an alternate schedule? Let’s understand why with an example.
Suppose, there is an asset that you think has a useful value of 10 years. However, the tax authority has specified the useful life for that particular asset as only 7 years from the time of its purchase. In such cases, your financial record will not be in compliance with the tax authority and you may face issues.
To resolve this issue, you can attach the alternate depreciation schedule along with selecting the accounting depreciation method when creating a new record in the fixed assets.
Take a look at the instructions below to create an alternate depreciation schedule in the NetSuite application:
- a) Click on Fixed Assets > Setup > Alternate Methods > “New” on NetSuite.

- b) A list of FAM Alternate methods will be opened that contains the existing methods in the NetSuite application.
- c) Click on the “New FAM Alternate Methods” button.

- d) Fill in the FAM Alternate Method form as required.
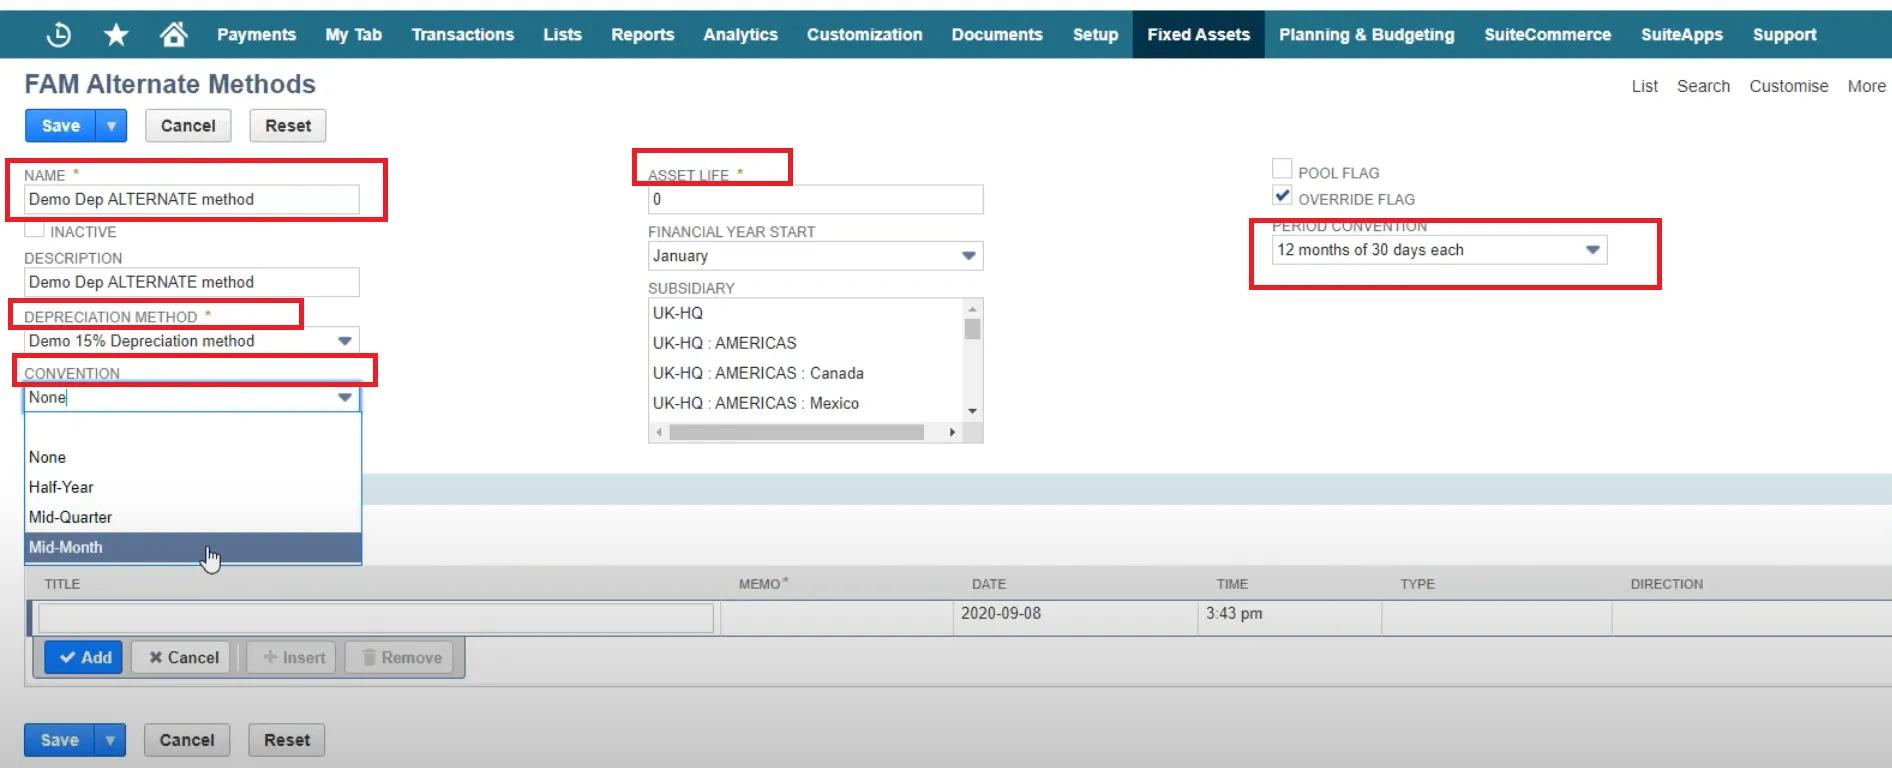
- e) Click on “Save” to save the alternate method.
Step 7: Integrating Asset Maintenance Workflows
The last step is integrating workflows to maintain the asset records in NetSuite. To do this:
- a) Click on Fixed Assets > Lists > Assets on NetSuite.
- b) From a list of fixed asset records, choose the one asset in which you want to integrate maintenance workflow.
- c) Scroll down on the fixed asset form and choose the “Maintenance” subtab.

- d) Fill in the required information such as maintenance company, next inspection date, type of maintenance, etc.
- Once filled, click on “Save”.
NetSuite will send you alerts during the scheduled time of the next maintenance. This will help you stay up-to-date with your organization’s fixed assets’s status.
Key Features of Netsuite Fixed Asset Management Module
Before moving forward, let’s recall once again the key features of NetSuite fixed asset management:
- a) Asset register and tracking capabilities: NetSuite offers a centralized process to register assets. As a result, it allows you to track and manage assets effortlessly.
- b) Depreciation calculation methods and customization options: NetSuite FAM provides various depreciation methods which means you don’t have to manually put the calculations for asset depreciation.
- c) Asset disposal and retirement functionalities: NetSuite also contains an asset disposal feature to smoothly remove an asset from the company’s active inventory. When the existing asset is no longer in use, NetSuite FAM disposes it while maintaining accuracy in the financial record.
Read more about NetSuite Inventory Management here.
- d) Reporting and analysis tools for asset performance: If you want to track the performance of your fixed asset, NetSuite’s reporting and analysis tools can be a savior. With these features, you can track your business’s financial records and analyze them to make informed decisions.
Want help with NetSuite’s Fixed Asset Management?
Connect with our NetSuite Support group!
4 Best Practices for Maximizing the Benefits of NetSuite Fixed Asset Management
Alright, till now we have covered the essential NetSuite fixed asset management steps. Now, let’s talk about how you can maximize the benefits of NetSuite FAM.
We would suggest implementing some of the best measures to use the fixed asset management feature of NetSuite to its full potential.
1. Regularly Update Asset Details and Attributes: To begin, you need to ensure that your team is consistently entering accurate and up-to-date information for each fixed asset. Besides, in order to leverage the full potential of NetSuite fixed asset management, you can:
- a) Take advantage of NetSuite’s customizable fields such as maintenance history or warranty information as per your business requirements.
- b) Regularly review each fixed asset detail so that you can promptly update any changes in the system.
2. Conduct Periodic Physical Asset Audits: Secondly, you need to establish specific procedures within the system for conducting physical asset audits. Before setting up the procedure, ask these questions:
- a) Who will be responsible for the audit?
- b) What will be the documentation process for the asset audit?
- c) What will be the frequency of these audits?
Want to explore our free business audit?
All you need is to schedule a meeting here!
The most important thing is to cross-verify assets with the records in NetSuite while auditing. This will help you identify any discrepancies and rectify them immediately. After completing a physical audit, make sure to update the record to reflect the changes done during the audit.
3. Optimize Depreciation Methods Based on Tax Regulations: Another essential criterion you need to take care of during the NetSuite fixed asset management process is to stay up-to-date with changes in tax regulations. You can also:
- a) Keep abreast of changes in tax regulations related to fixed asset depreciation.
- b) Periodically reassess the depreciation method applied to a particular asset to ensure its alignment with the current tax regulations.
- c) Analyze the impact of various depreciation methods on the financial statements using NetSuite’s reporting and analytics feature.
- d) Consult a financial expert who can help optimize the applied depreciation methods for tax advantages.
4. Leverage Reporting and Analytics to Identify Opportunities for Cost Savings: As mentioned above, the reporting and analytics feature of NetSuite can act as a useful tool for understanding how a fixed asset is impacting your business’s financial records. Hence, you need to carefully consider this parameter while conducting NetSuite fixed asset management.
Based on the insights you receive through reports, you can:
- a) Strategize the use of any fixed asset for better ROI.
- b) Negotiate better maintenance contracts for your assets to cut costs.

NetSuite Fixed Asset Management Case Study
In 2020, our NetSuite experts at The Ledger Labs helped a Detroit-based plastics and metal machining company struggling with decentralized fixed asset data. The company was reporting financial inaccuracy because all of their data related to fixed assets was scattered all over the place. Furthermore, the company was also facing challenges in calculating depreciation manually.
Our team stepped in and proposed that the client manage their fixed assets using NetSuite ERP. First, we imported all the fixed asset data from a spreadsheet to NetSuite. Then, we configured customized depreciation schedules that were aligned with Michigan’s tax regulations.
After successfully implementing NetSuite fixed asset management, the organization had a 30% reduction in manual errors. Besides, depreciation schedules improved tax compliance by 25%. Overall, NetSuite FAM brought a 20% increase in the organization’s financial reporting accuracy.
To Wrap Up
NetSuite is considered one of the most efficient tools for handling fixed assets in your business. Thanks to its various functionalities including centralized tracking, customizable depreciation, and disposal, you can easily control your assets. Read more about NetSuite training here.
We hope our “NetSuite Fixed Asset Management Made Easy” guide has helped you solve queries related to asset management. We assure you that if you dedicatedly follow the instructions mentioned in this blog, you can say goodbye to your worries related to managing fixed assets.
However, if you still find difficulty in managing your fixed assets or exploring Netsuite’s other modules, you can get in touch with us. Our team of Netsuite experts can solve your business financial management queries immediately.


