

If you want to keep your bookkeeping records accurate in QuickBooks, it is necessary to void checks properly. This, in turn, will not only ensure precise financial statements but will also protect your business from fraud. Most business owners often wonder how to void a check in QuickBooks efficiently so that they can prevent issues during bank reconciliation. If you are one of them, this blog will help you solve all your queries.
Just so you know there are different ways for voiding checks in QB and our guide aims to navigate you through those processes smoothly. Additionally, we will provide you with insights into alternative methods for voiding checks in QuickBooks.
But before learning about the steps, let’s understand why voiding a check in QuickBooks is important.
Why Void a Check in QuickBooks?
Voiding checks in QuickBooks helps businesses maintain financial records by canceling payments that are no longer valid. After voiding a check in QB, you can easily see if that check is available for payment again. And this quick detection will save your account from unethical activities.
Simply put, you can void a check in QuickBooks Online to:
- Correct the mistakes made in a check without altering your financial records inaccurately
- Prevent the same payment from being processed twice
- Keep your check register tidy
- Clean up your accounts payable so that you don’t accidentally process payments for old checks
- Keep a clear record of an action taken to maintain accountability in the financial transactions
Now that we’ve covered the importance of voiding checks, let’s look at the steps of how to void a check in QuickBooks online. We’ll explore various methods for voiding checks within the application.
Need help with QuickBooks?
Shoot your questions, our experts are ready!
Method 1: Voiding a Check from the Check Page in QuickBooks Online
Among many ways, the most common one is to void a check directly from the Check page in QBO. This method is appropriate if you want to review the details of the initial transaction and ensure financial accuracy in your “Checking Account”. Here’s how you can proceed:
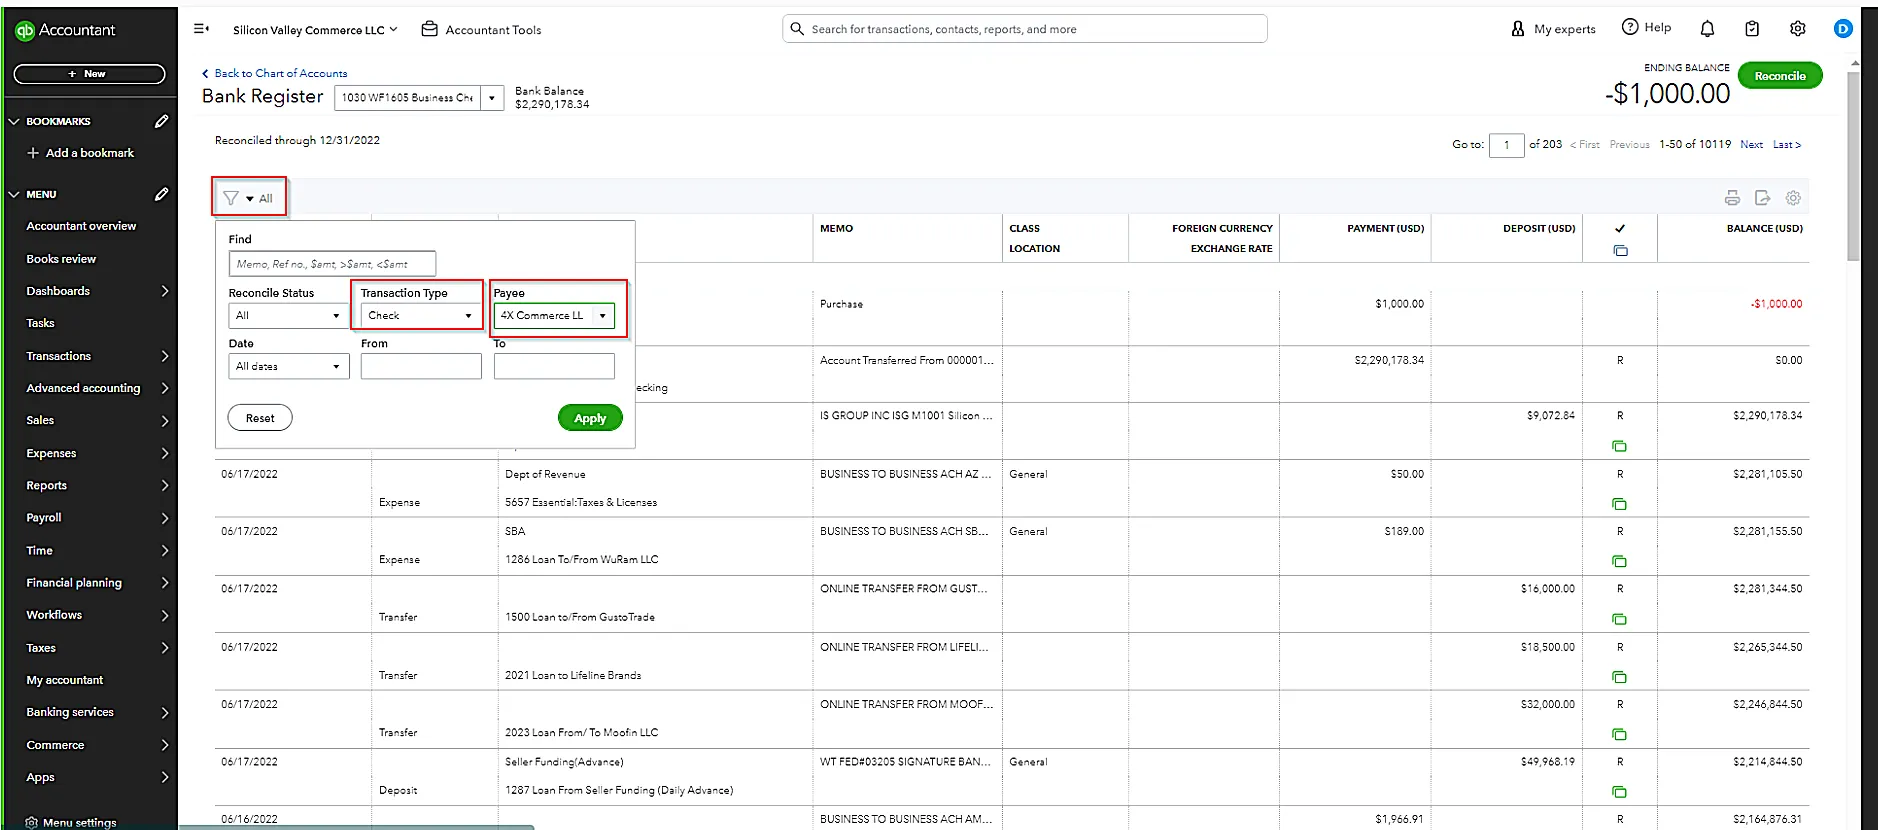
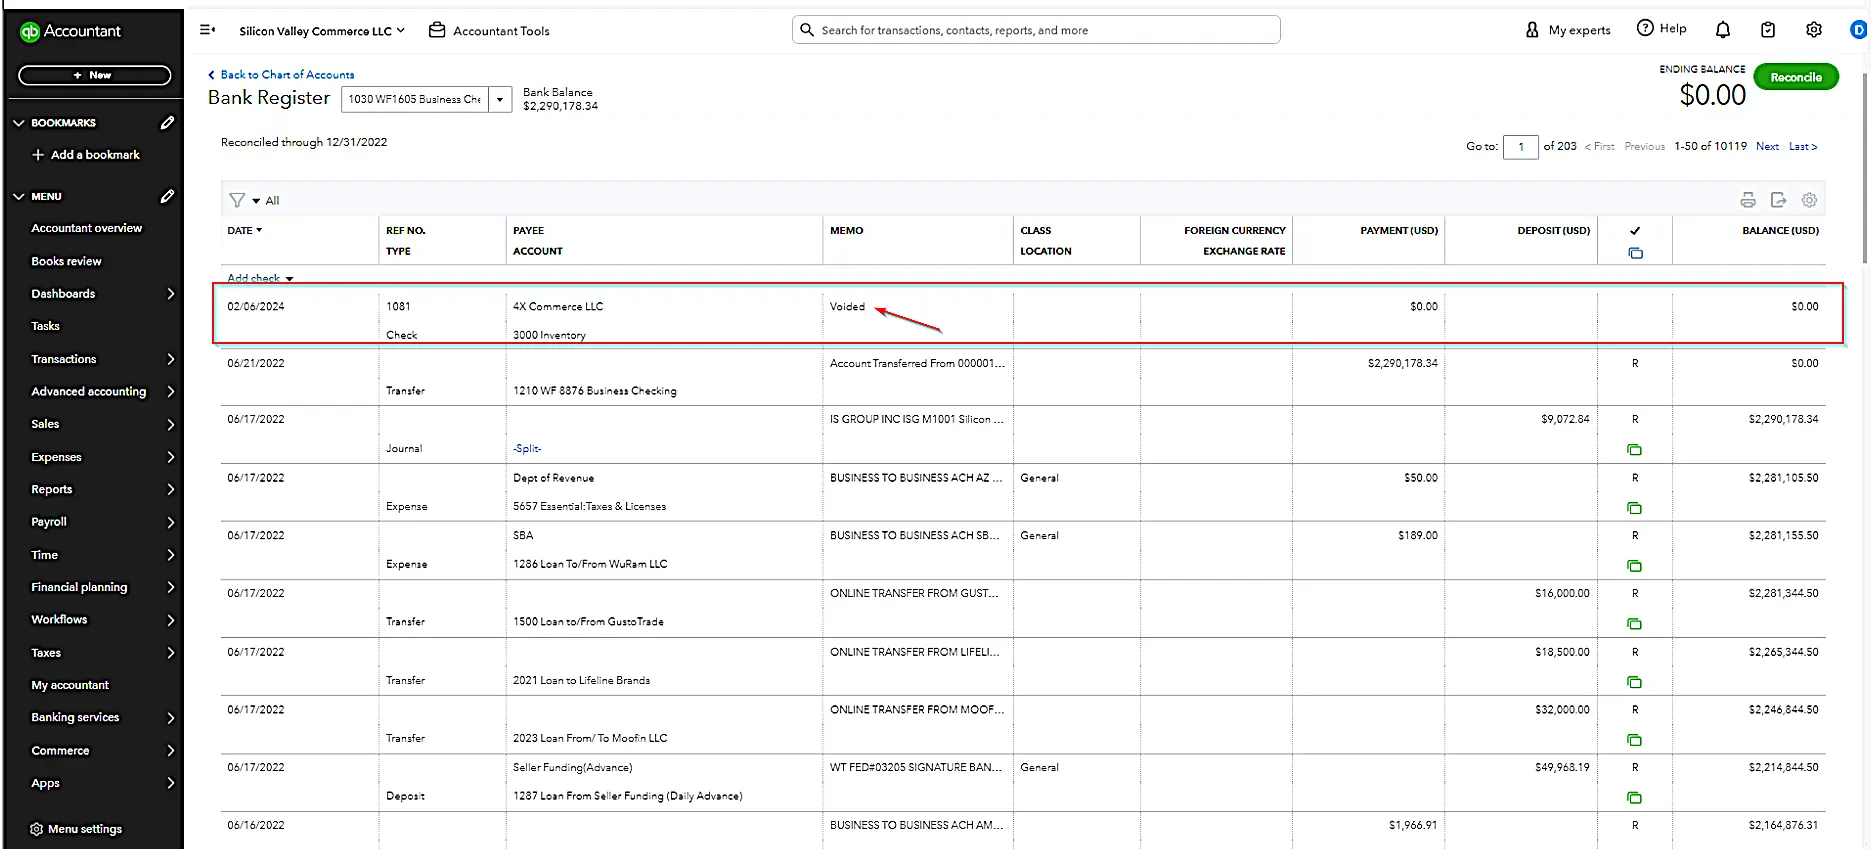
1. Navigate to the “Bank Register” in QuickBooks Online by clicking on “Banking” in the left-hand toolbar or selecting the bank account under “Bank Accounts” section on the Dashboard.
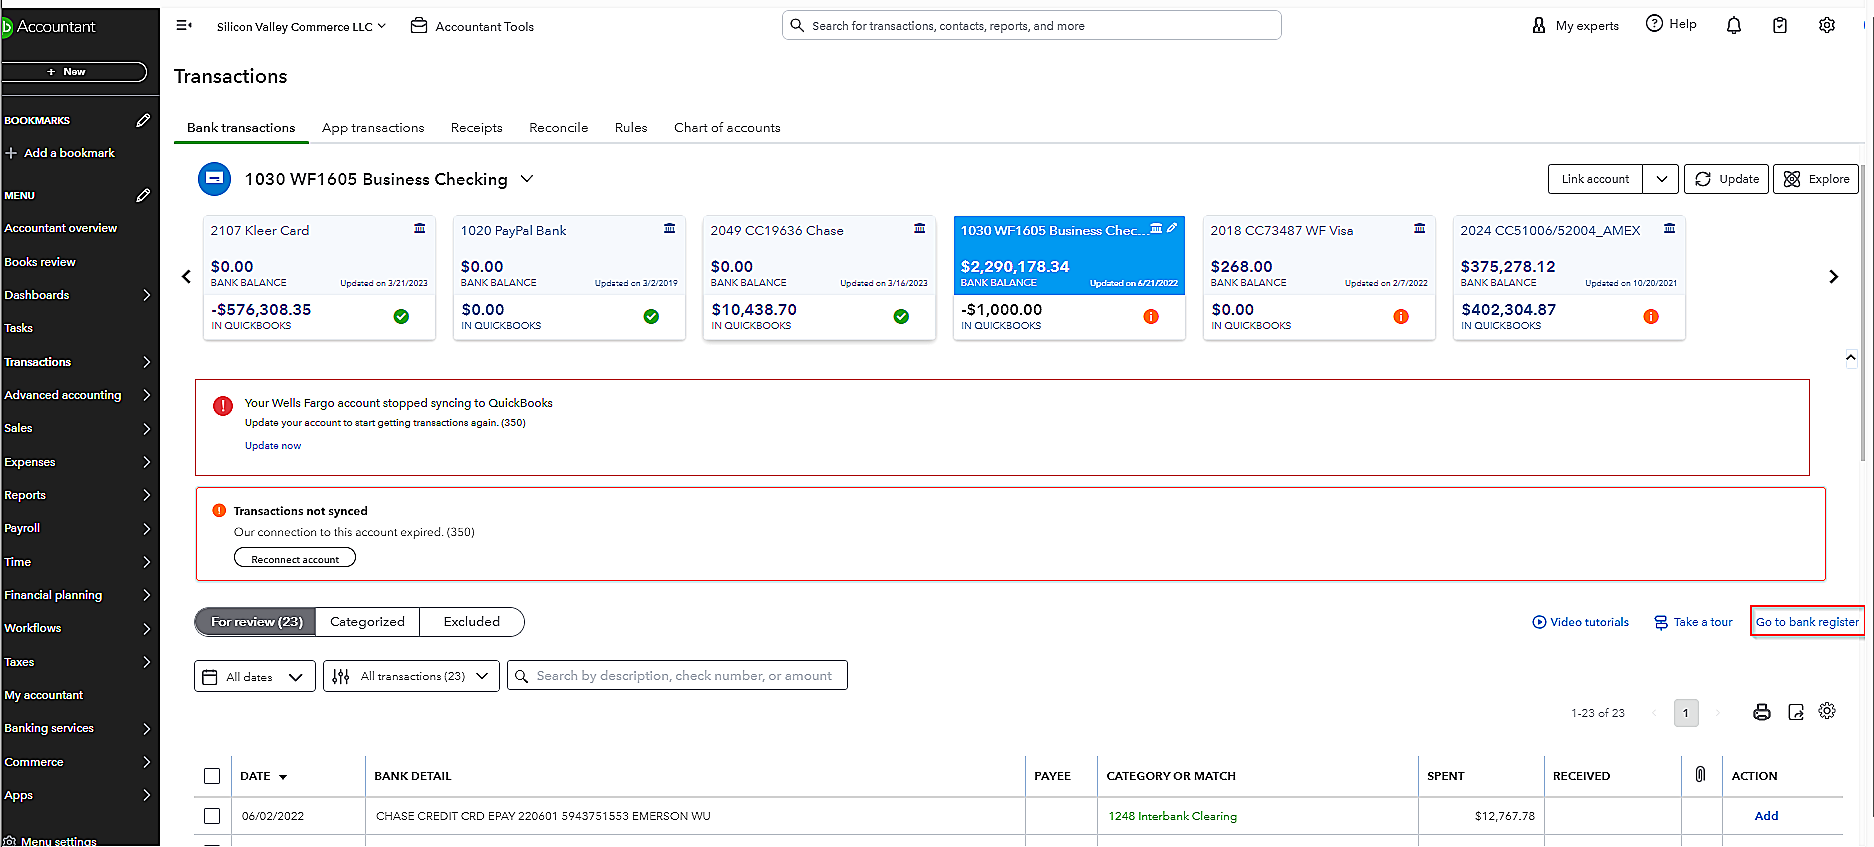
2. After clicking the “Go to Bank Register” button, the detailed list of issued checks will open
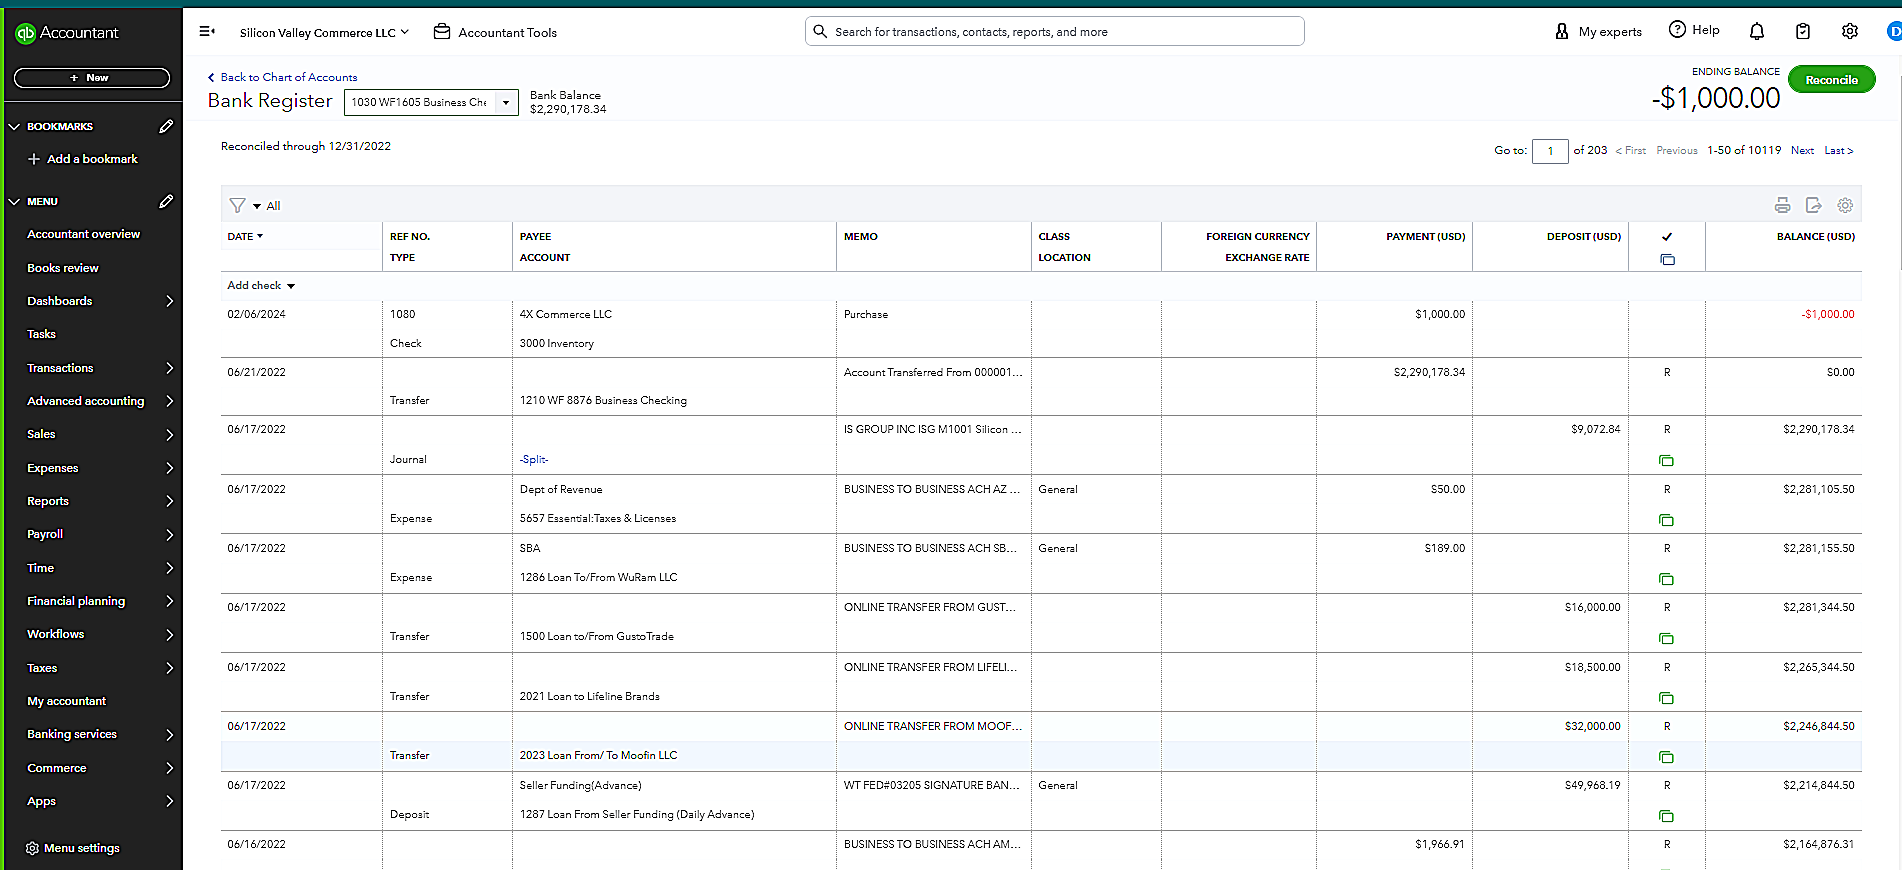
3. From the list of issued checks, locate the one you want to void.
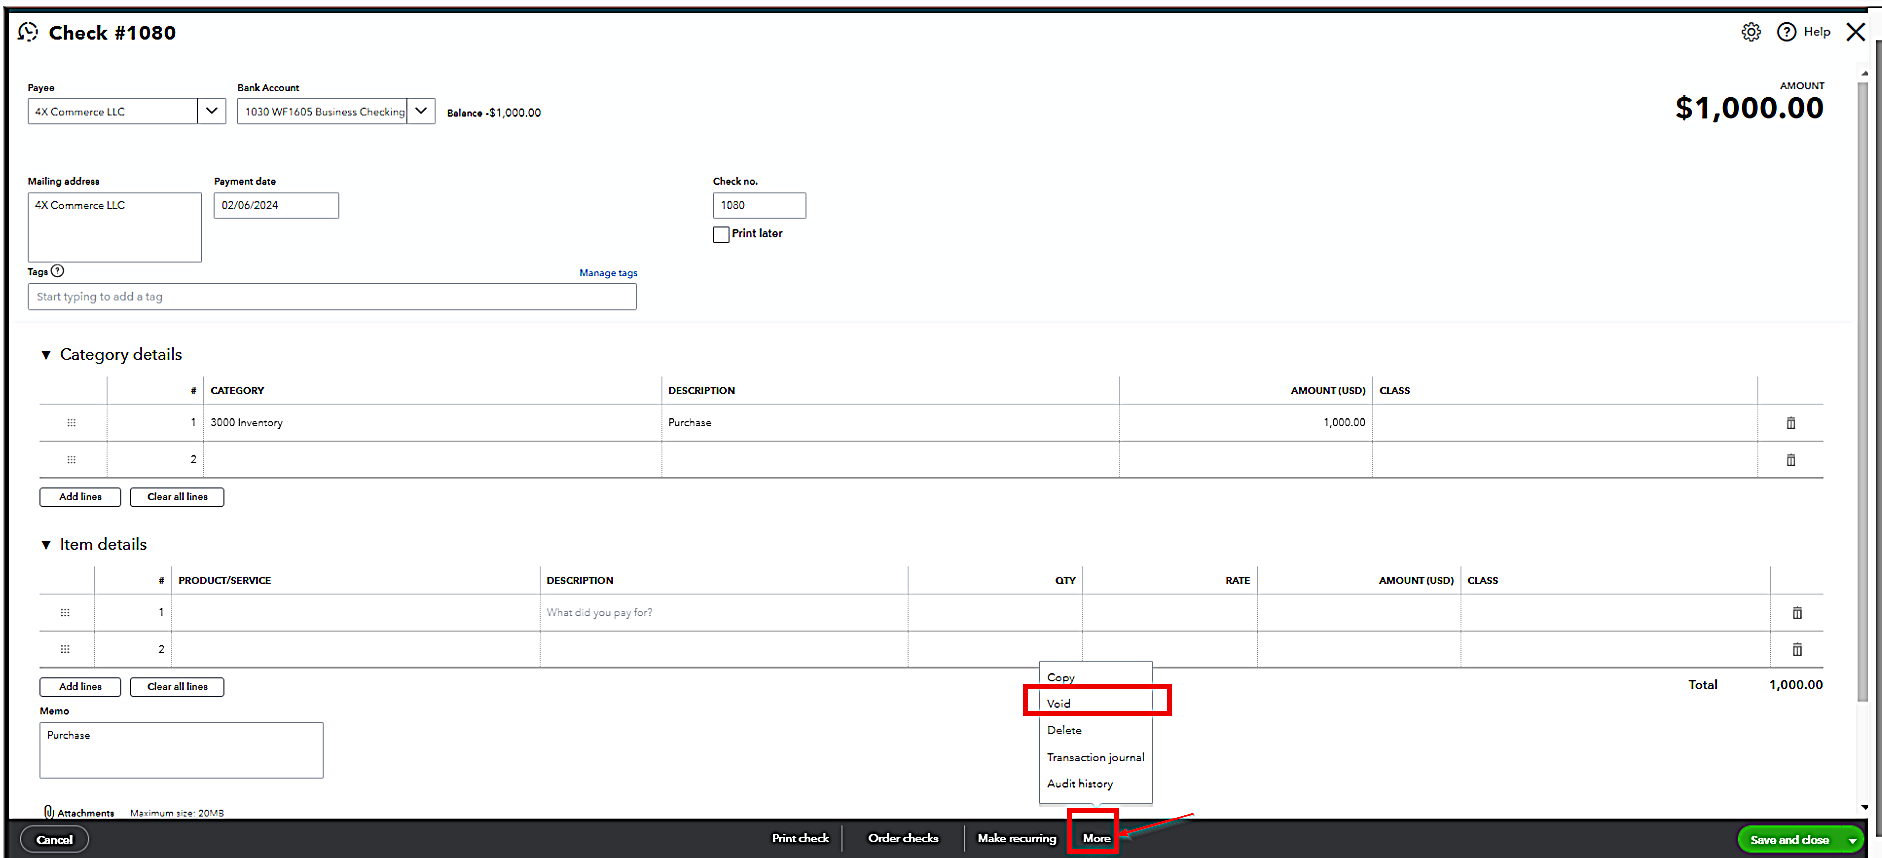
4. Then, click on the check mark to select the “Edit” option.
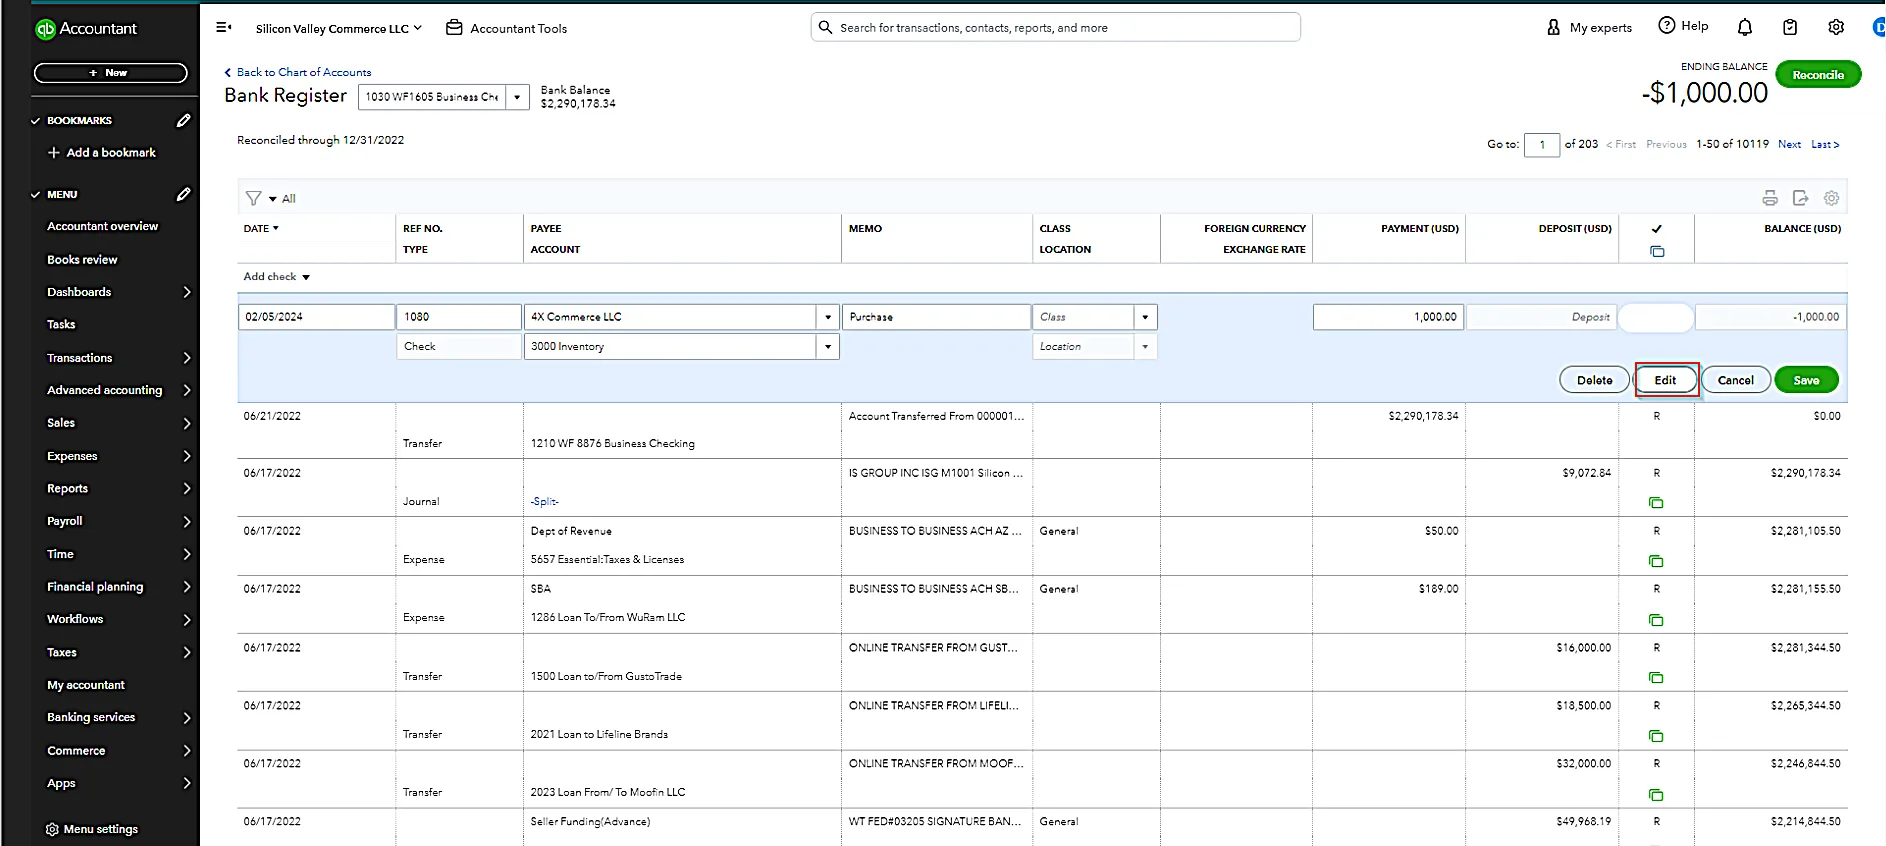
5. From the “More” options at the bottom of the screen, select “Void”.
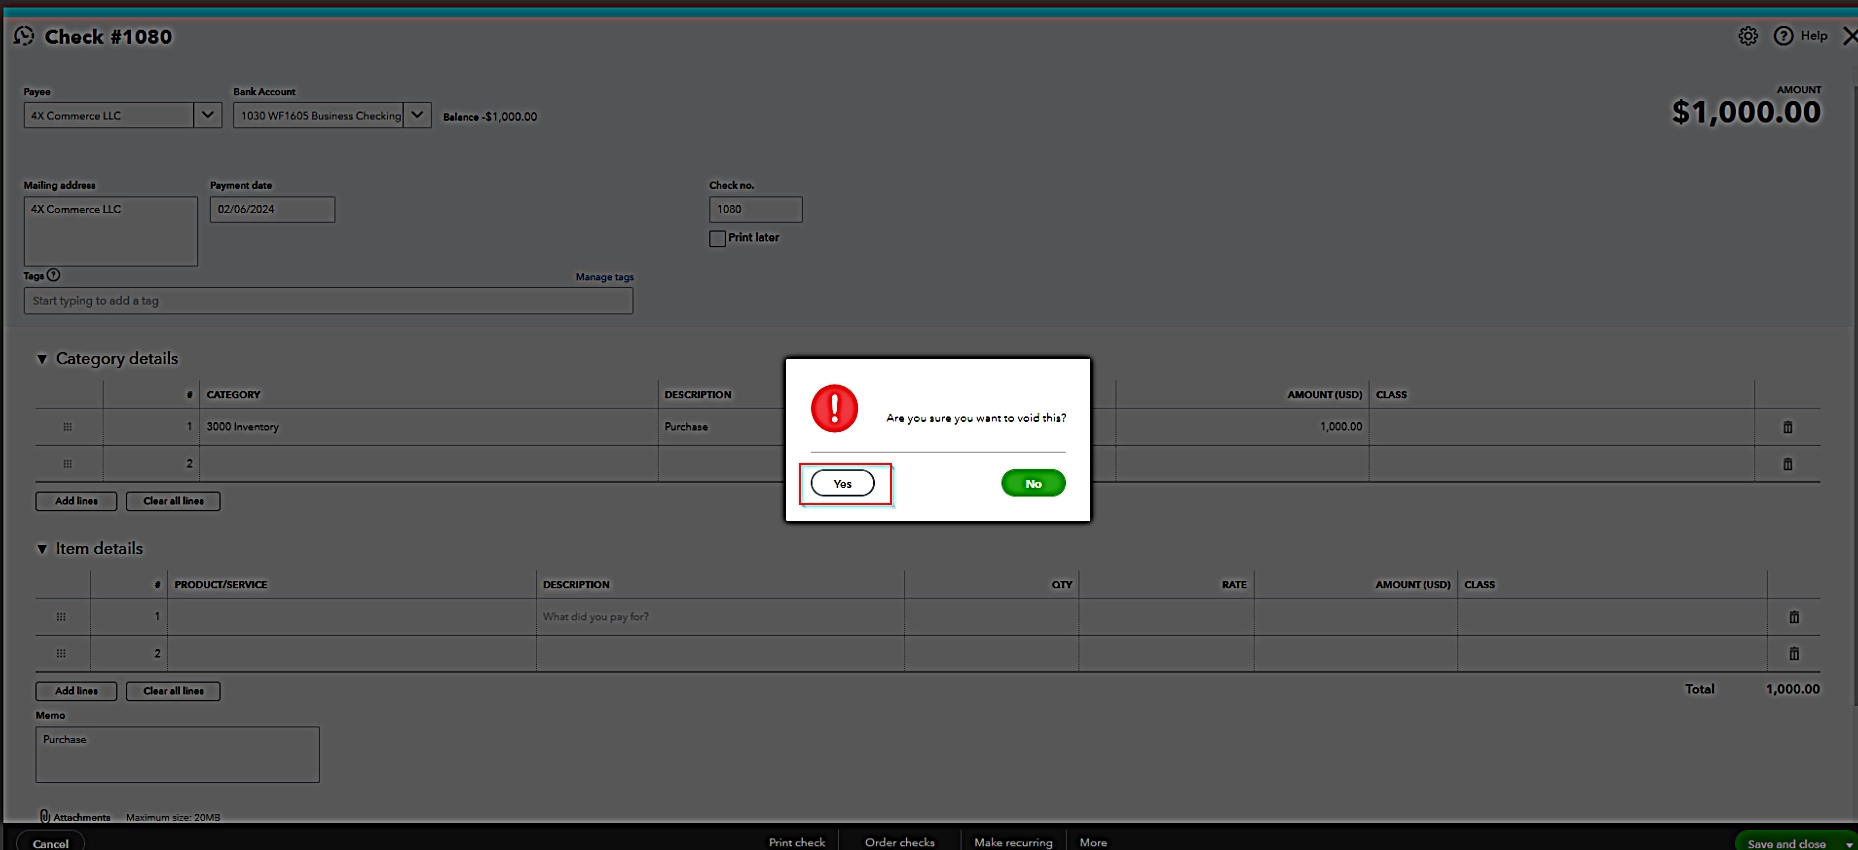
6. Confirm you want to void the check by clicking “Yes” on the prompt. The warning is just to inform you that the check was used to pay a bill. Once you click yes, the payment will be canceled and the bill will update showing open and payable on your A/P reports.
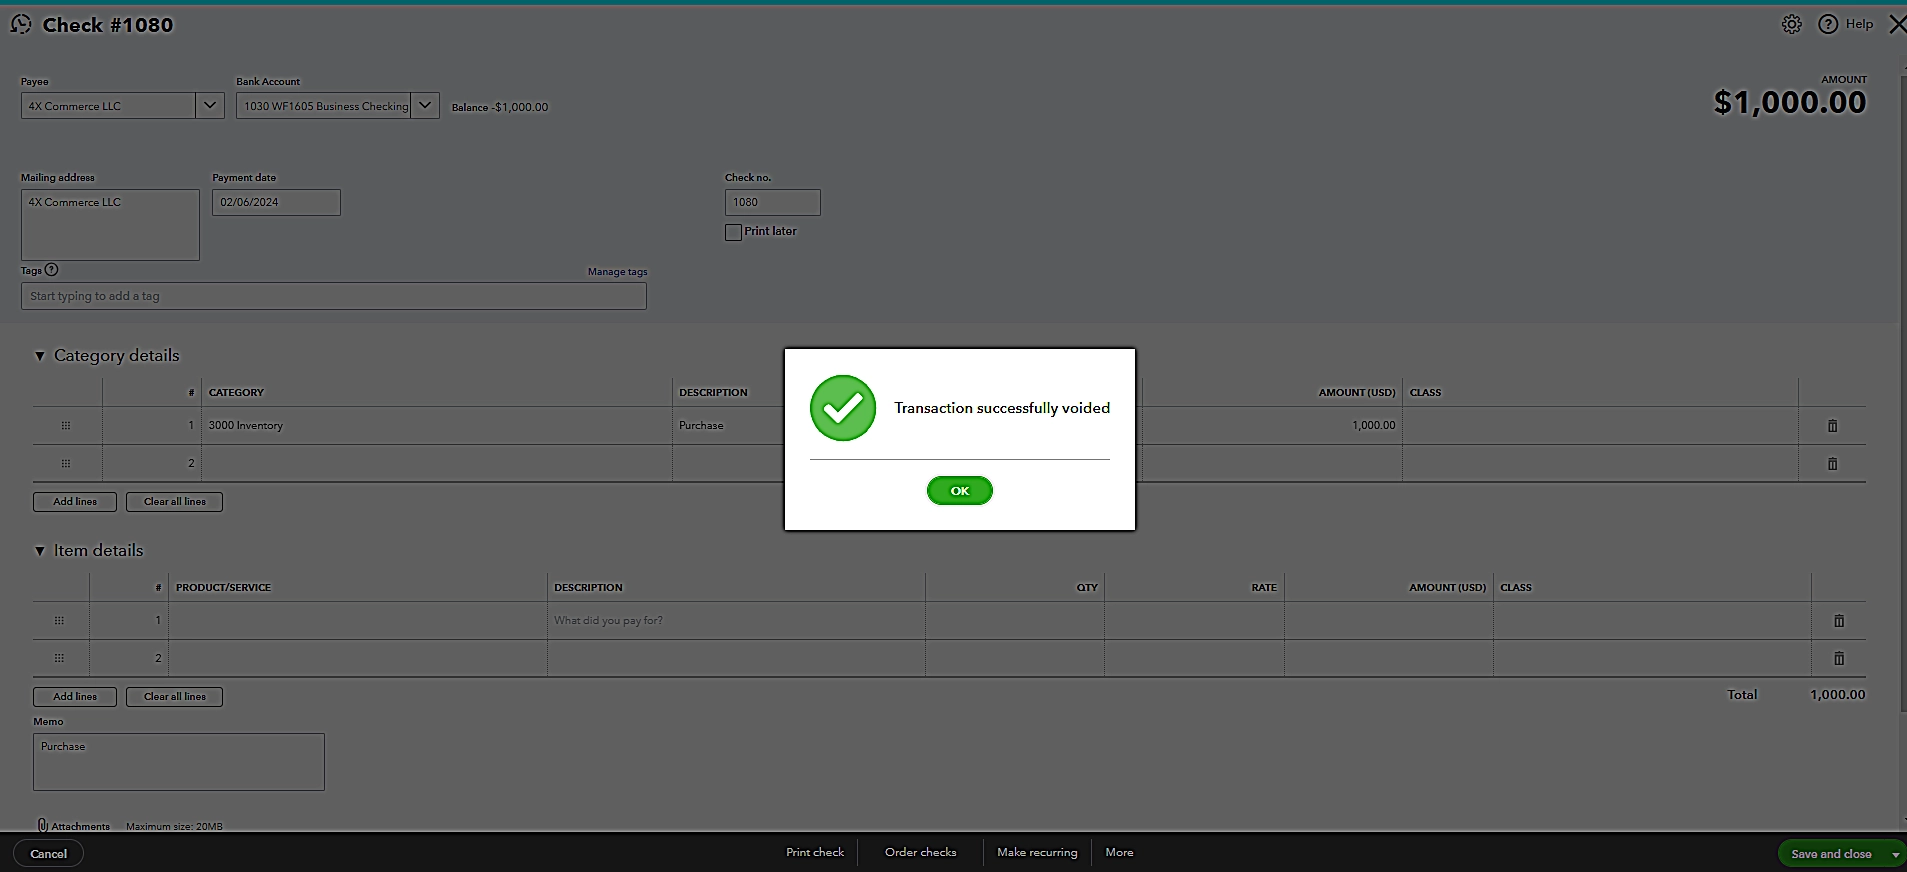
7. Once done, you will get a prompt “Transaction Successfully Voided”. Click “OK”.
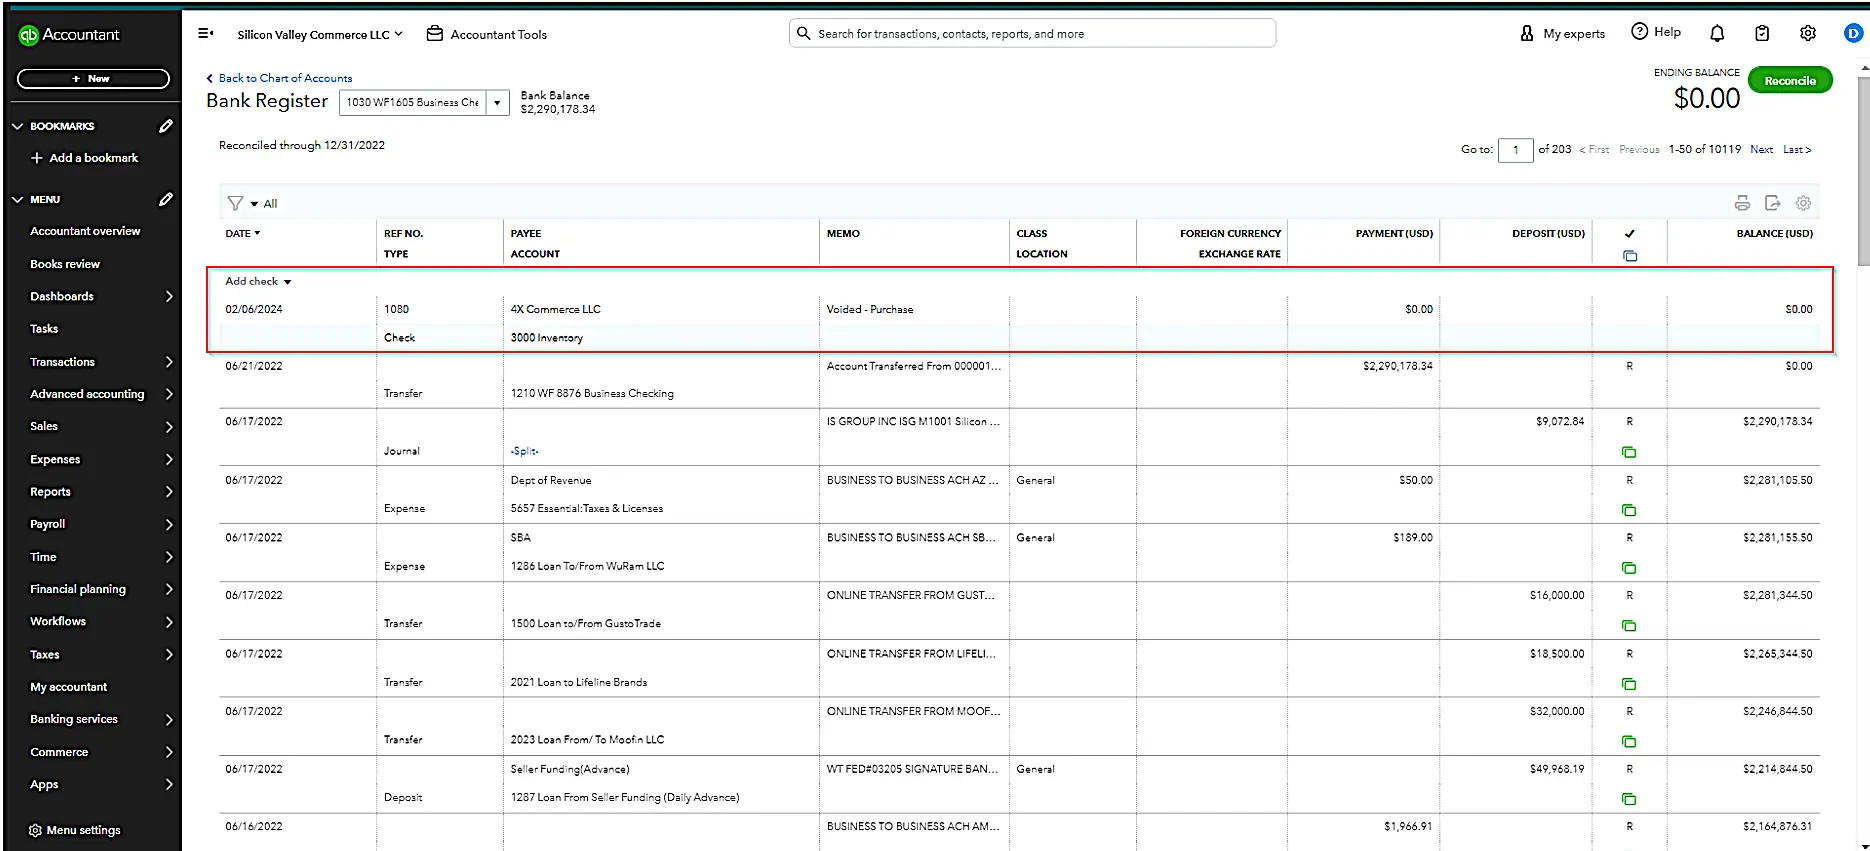
8. Review the “Check Register” to ensure the check now appears as voided with a $0 amount.
Method 2: Voiding a Check Without Opening the Transaction
The second method of voiding a check in QuickBooks Online is to do it directly from the “Expense Transaction” list. The steps to do the same are:
1. Navigate to the “Expenses” tab in QBO dashboard.
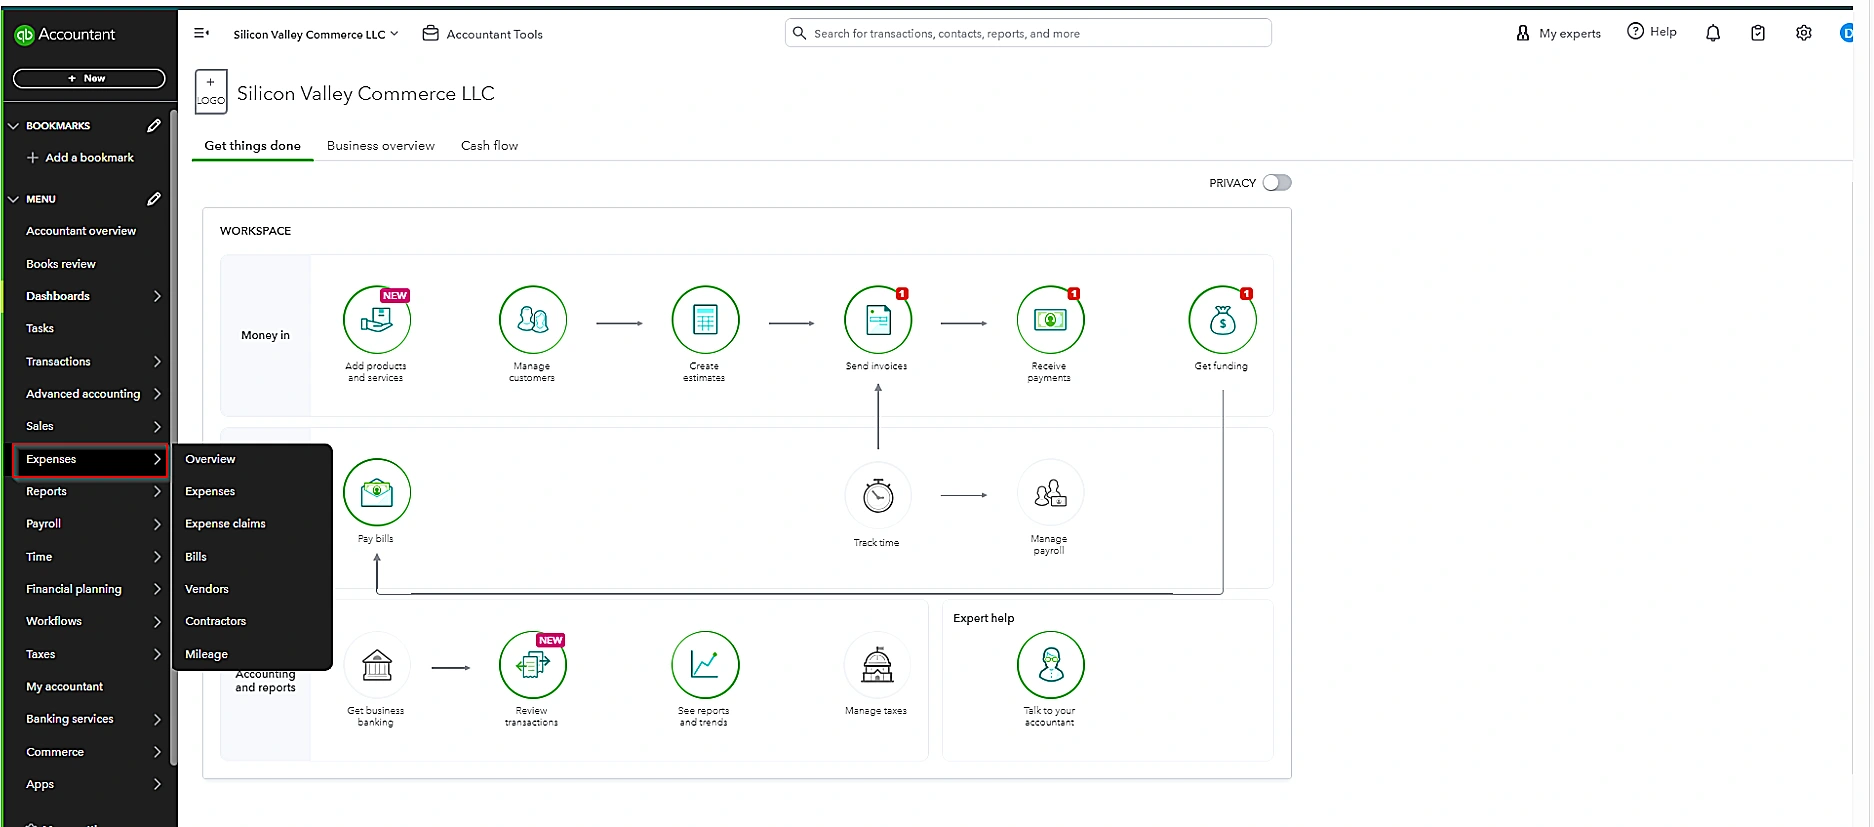
2. On the “Expense Transactions” list, find the check you want to void.
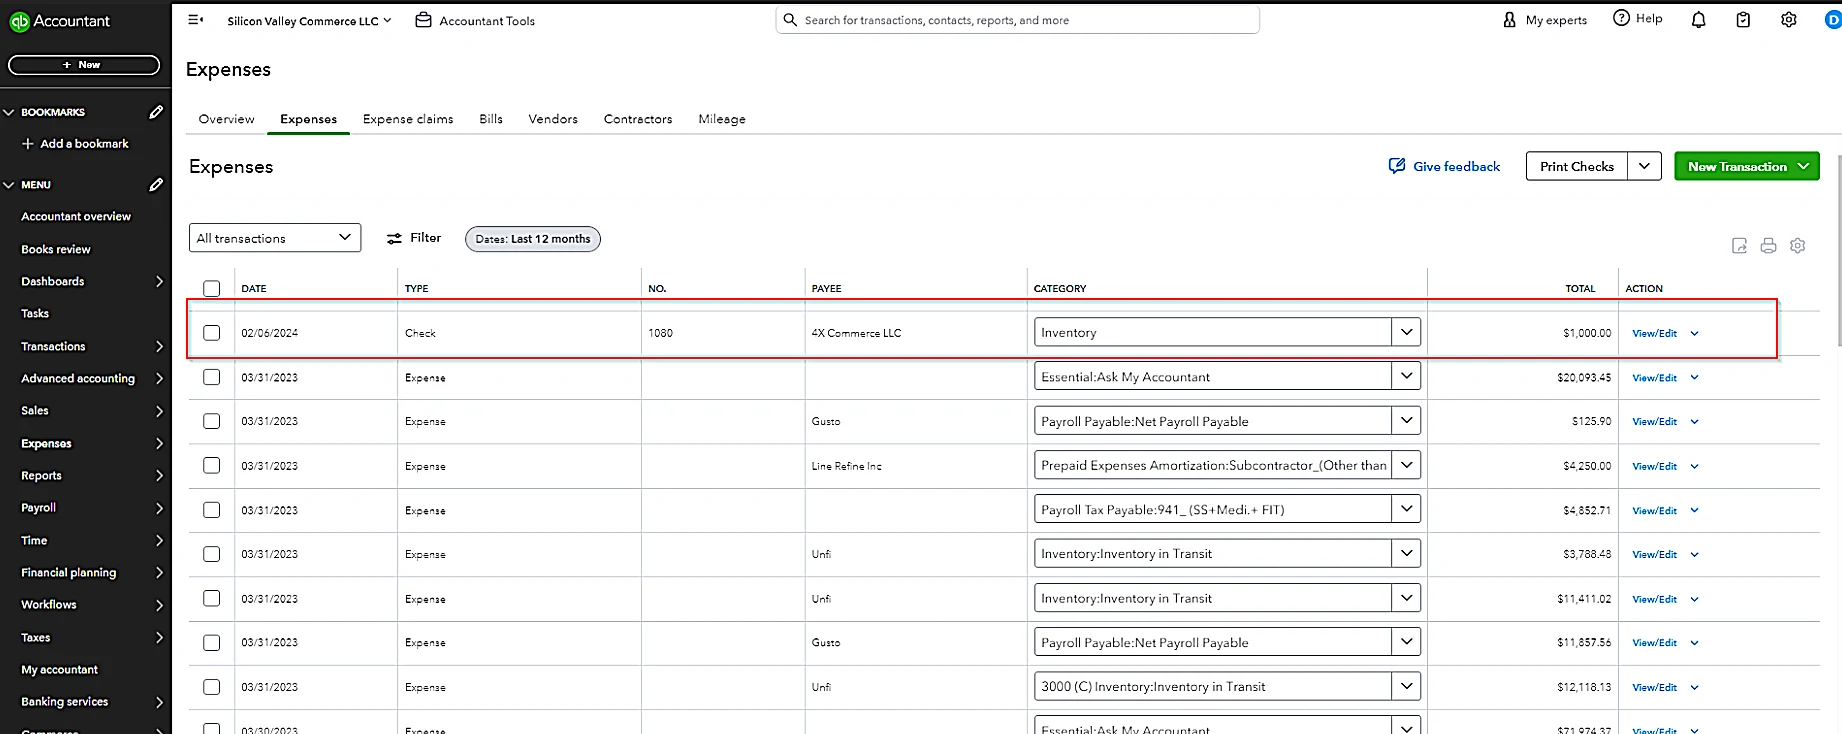
3. Find and select ‘Void’ in the ‘View/Edit’ dropdown menu available in the ‘Action’ column.
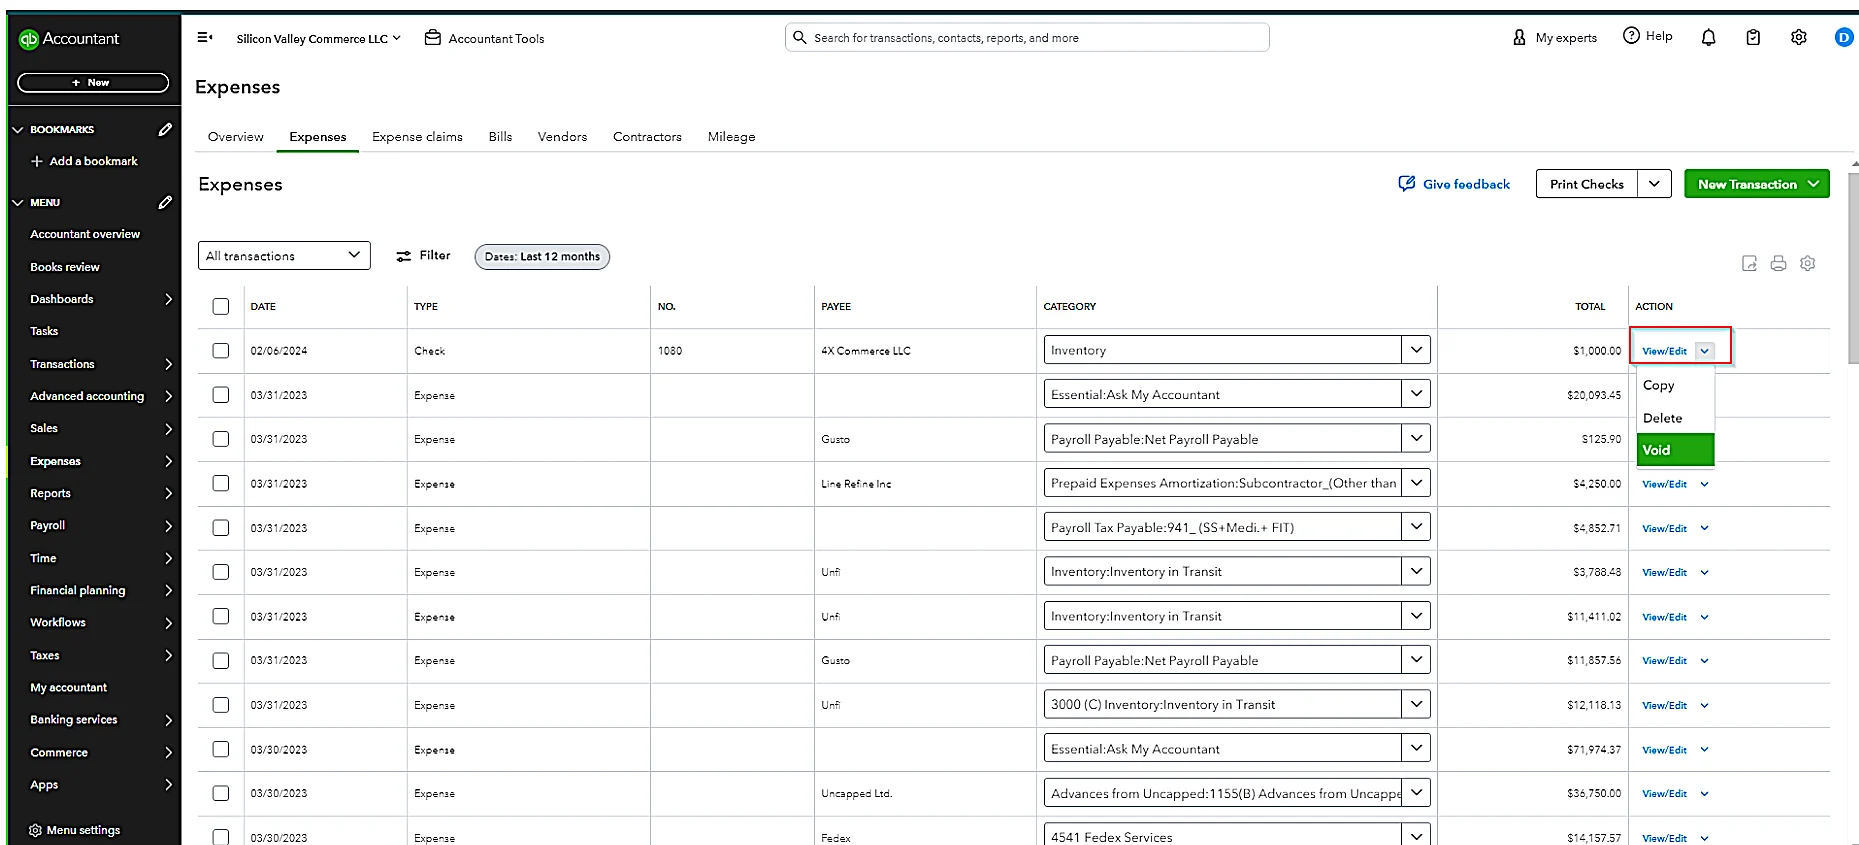
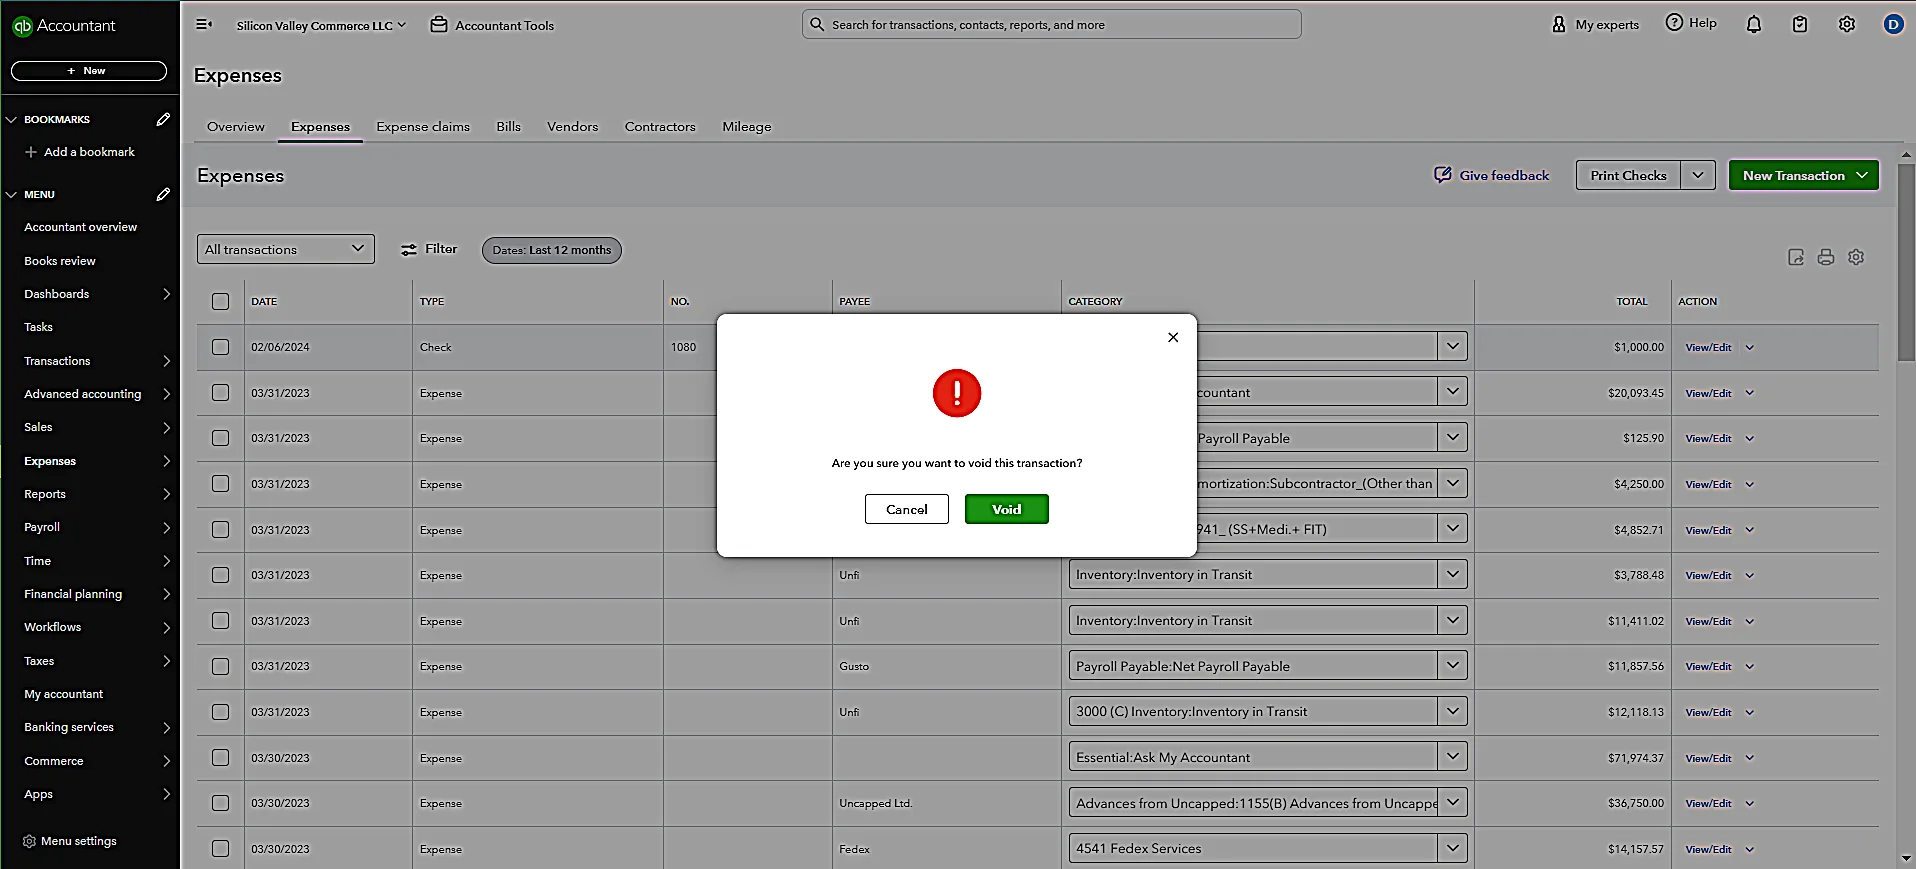
4. Once you click on “Void”, QBO will send an alert saying, “Are you sure you want to void this transaction.” Click on “Yes” to solidify your action.
Method 3: Voiding a Check Not Previously Entered
Many times it happens that your vendor/customer wants to set the payment method to electronic for managing their further business transactions. In such instances, we recommend voiding a check number even if the check is never recorded in the first place. This step might look inessential but will only prove beneficial for your business in the long run.
The steps to do the same are similar to creating a check as usual. Let’s have a look:
1. Access the QuickBooks Online Dashboard and click the “New” button.
2. Choose “Check” under the Vendors section.
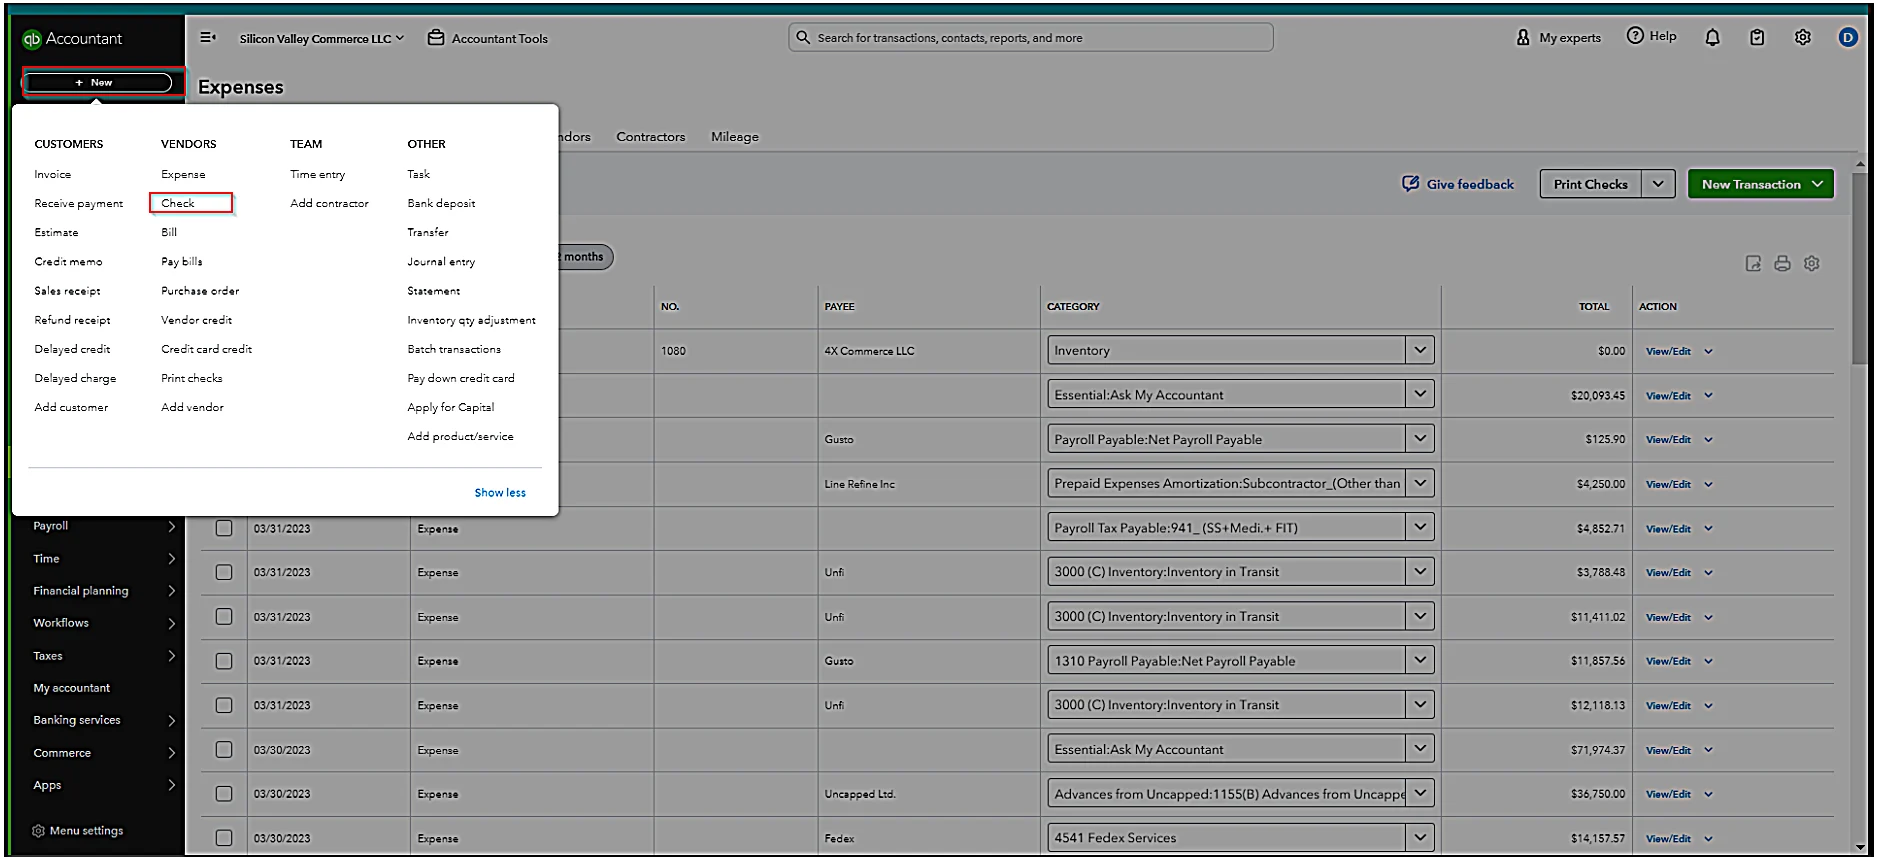
3. Fill in the details for the check, including the payee’s name, date, check number, bank account, and category.
4. Enter an amount of $0.00 and specify in the description box that it is a voided check.
5. Click the “Save and Close” button to finalize the voided check entry.

6. Review the Check Register to confirm that the check now appears as voided with a $0 amount.
Method 4: Voiding a Check from a Prior Accounting Period
When you discover that you need to void a check from a prior accounting period, then you have to follow a different procedure. This revised process is only necessary if the check was written in a previous year and the books for that year have been closed. You will want to use this modified step to maintain accurate financial records. Follow the below instructions to do the same:
1. Create a Deposit to Offset the Voided Check:
- a) Click the “New” button on the dashboard, then select “Bank Deposit” under “Other.”
- b) Fill out the “Bank Deposit” form as usual.
- c) Choose the correct bank account.
- d) Set the date to one within the current accounting year, such as January 1st or December 31st.
- e) In the “Received From” field, enter the name of the vendor to whom the original check was written.
- f) Select the same account used on the voided check. If the original check was split over multiple categories, create a multi-line deposit.
- g) In the description, enter something like “Entry to void check #(check number) from the prior period.”
- h) Leave the “Payment Method” and “Ref. No.” fields blank.
- i) Enter the amount of the original check.
- j) Click “Save” to record the deposit.
2. Mark the Original Check and Deposit as Reconciled:
- a) In your next reconciliation, mark both the original check and the deposit you just created as reconciled. This step ensures that your bank statements align correctly.
3. Create a New Bill if Necessary:
- a) If the voided check was used to pay a bill that is still due, create a new bill dated in the current accounting year. So that you can keep your accounts payable records up to date.
Tips and Considerations While Voiding a Check in QuickBooks Online
As we’ve seen above, voiding a check in QuickBooks Online is generally simple. However, it is essential to consider a few factors while performing the steps to maintain accurate financial records. Keep the following helpful tips in mind during the voiding process.
1. Be cautious as voiding a check cannot be undone after bank reconciliation
Voiding a check in QuickBooks Online is a kind of permanent action. Especially when you’ve reconciled your bank statements. So, you must double-check before voiding the check to avoid any inaccuracies in your financial records.
2. Keep track of the changes made for future reference
Whenever you void a check, make sure you are keeping a record of the process whilst you make the required changes. This will come in handy for future reference as it will help maintain a clear audit trail of your transactions. Read what is a financial audit and how to prepare for it?
3. Communicate with relevant parties about the voided check
Communicating the changes made is essential for maintaining good business relationships. Hence, you should let the relevant parties, either vendor or employees, know about the voided check to avoid any confusion. Ensuring everyone is on the same page when it comes to financial transactions is a healthy practice
Common Issues While Voiding a Check in QuickBooks and Troubleshooting Them
Though the steps mentioned above on how to void a check in QuickBooks can help you attain the results easily, you may likely encounter some common issues. Let’s explore some of those problems and see how you can resolve them.
Common Issue 1: Unable to void a check due to restrictions or errors
Solution: To resolve the error-related issues, check user permissions to ensure you have the necessary access. In addition, verify if the check or related transaction or bill is locked. If locked, then unlock it so that you can make changes without any error.
Common issue 2: Difficulty in reconciling bank statements after voiding a check
Solution: The easiest way to troubleshoot this problem is to update your bank reconciliation to reflect the voided transaction once you have voided the check. This time verify if you are reconciling with the correct information and also match the ending balance with your bank statement.
Read more about QuickBooks Bank Reconciliation Discrepancy.
Common Issue 3: Reissuing a new check after voiding the original
Solution: After voiding the original check, you can reissue a new check by creating a fresh transaction in QuickBooks. Make sure you add the correct details in the transaction. This step is usually required when you have mistyped incorrect information in the original check. Some tips that can help you avoid making further mistakes:
- Ensure that the new check reflects the accurate details of the payee, amount, and date.
- Link the new check to the original transaction
- Add the voided check details in the memo field of the new check
- Review your records to verify the details of the reissued check
Still have issues with voiding a check in QuickBooks?
Why not ask our QuickBooks Support team!
Alternative Methods for Handling Checks in QuickBooks
When it comes to alternate ways of handling checks, there are various techniques to go for. Till now we have looked at several methods of using the “Void Check” function in the application, which sets the check amount to $0.
However, this function also zeroes out all accounts affected by the check in the prior period. Unless you or your team thoroughly take care of financial records, this method can lead to discrepancies in financial reports.
That is why it is imperative to explore alternative methods for handling checks in QuickBooks.
Alternative Method 1: Requesting a stop payment from your bank
One option to cancel a check in QuickBooks is to request the bank to stop payment. Here’s how it works:
- Contact your bank and ask them to stop the payment on the check you want to cancel.
- Provide them with check information such as the check number, date, and amount so that the bank can identify it.
- Give the bank time to process your request once you’ve raised the issue to stop payment.
- The bank will confirm when the payment has been stopped.
- After receiving confirmation from your bank, update the check status in QuickBooks to reflect it as “canceled payment”.
Alternative Method 2: Requesting a journal entry in QBO to handle an unneeded check
Another alternative way to handle a not-needed check in QuickBooks Online is by requesting a journal entry. You can do the same by following the below instructions:
- Go to the “Company” menu in QuickBooks Dashboard.
- Select the “Make General Journal Entries” tab.
- Ensure the date of the journal entry is after your last bank reconciliation was completed.
- Debit the checking account from which the check was issued and credit miscellaneous income
- In the memo section, include the
- a) Original check’s date and number
- b) A note indicating it’s voided
6. After creating the journal entry, you need to go back to the original check form. Then, make a note of the journal entry number and date in the memo field for future reference.
Final Thought
Voiding checks adequately and managing them post-voiding is crucial to maintaining financial accuracy while mitigating check fraud risk. We hope with the help of our guide you understand how to void a check in QuickBooks effectively. You can easily void a check in the application if you follow any of the methods that we’ve mentioned above.
Just keep a note that voiding a check will change your financial records. Make sure to always verify the details of the voided check before reconciling in QuickBooks. Besides, reviewing your financial statements regularly is a healthy practice you must follow.
Nonetheless, if you need assistance with QuickBooks accounting, you can consult the experts at The Ledger Labs. We, as a leading outsourced accounting and bookkeeping service provider, can offer you our QuickBooks expert assistance immediately.
FAQs
Is it better to void or delete a check in QuickBooks?
Voiding a check in QuickBooks changes its amount to $0. This method ensures accuracy in your financial records. Plus, you have the feasibility to always re-enter a voided check if needed.
On the other hand, deleting a check completely removes the transaction from QuickBooks, as if it never occurred. You can’t restore a check once deleted. But it’s possible to re-enter it if necessary.
Overall, voiding a check is preferred over deleting it to maintain an accurate transaction history. If you delete a check, it might lead to the creation of accidental duplicates in the future.
How to void a check in Quickbooks Desktop?
Though the concept of voiding checks in both Quickbooks Online and Desktop is the same, there are some variations in the steps. In QuickBooks Desktop, the process to void a check generally includes the following basic steps:
- Navigate to the “Banking” menu and choose “Use Register”.
- Select the account associated with the check from the dropdown menu.
- Within the “Bank Register”, locate and click on the check.
- Choose “Edit” and then “Void Check” from the drop-down options.
- Confirm by clicking on “Record”.
How to reverse a voided check in QuickBooks Online?
You can easily reverse the process of voiding checks in QuickBooks Online. Voided checks can be restored to their original state. All you have to do is create a new check in your QuickBooks account by adding the same information from the original check. Apart from that, you have to also correct the balances to maintain financial accuracy.


