

Hey there, business owners! Do you sometimes feel keeping track of finances is an uphill battle? Have you found yourself struggling when managing invoices and credit memos in QuickBooks? If that’s the case then, don’t worry. In this blog post, we’ll show you all the required steps on how to apply credit memo to invoices in QuickBooks Online.
Think of this guide as a friendly hand that will direct you to smoothly balance credit memos and invoices in QB Online. Before we dive into the steps, let’s first understand the role of credit memos and invoices in QuickBooks.
What is a Credit Memo in QuickBooks?
Invoices and credit memos are both essential components of the invoicing process. While an invoice is a commercial document that records a product list exchanged for money, a credit memo is a document indicating a reduction in the amount due to returned goods. It is usually required when a customer prefers getting credit instead of a refund for a returned item or you have made a mistake and want to make adjustments to the amount owned by your client.
Using credit memos can be a helpful tool for your business as you can ensure your customers are charged accurately and their accounts are adjusted properly. Besides, these memos can also help you in tracking sales, refunds, discounts, and other changes applied to a customer’s account.
To summarize, QuickBooks Online features many types of credit memos that cater to the specific needs of a business. Some of the commonly used ones are:
- Standard Credit Memos: Leverage standard credit memos to record credits, refunds, and adjustments made to a customer’s account.
- Discount Credit Memos: Offer discounts to your customers for making purchases or returning items with the help of discount credit memos.
- Recurring Credit Memos: Regularly apply refunds or discounts to your customer’s account using recurring credit memos. This credit memo is quite beneficial if you have a subscription-based business.
- Void Credit Memos: Cancel an existing issued credit memo if the refund is no longer required or your customer has already received a refund or credit.
Step-by-step Guide on How to Create a Credit Memo in QuickBooks Online
As you know now, a credit memo can ease the process of recording adjustments in transactions. Whether it is for returned goods or overpayments, you can use credit memos to ensure that your financial records reflect the exact amount owed by your customers.
Now, let’s look at the steps needed to create a credit memo in QuickBooks Online:
Step 1: Accessing the Credit Memos Section
To access the credit memos section in QuickBooks, follow these steps:
- a) Log in to your QuickBooks Online account.
- b) Locate the “New” option on the left-hand side of the dashboard.

- c) Click on “New” to open a menu having various options. From these options, select “Credit Memo“.

Step 2: Entering Customer Details
- a) Next, enter all the relevant details related to the customer in the “Credit Memo Form”. Such as customer name, email address, and billing address.

- b) Also, add the date of making the credit memo.
Step 3: Adding Items or Services to the Credit Memo
- a) Within the credit memo form, add the products or services for which the credit is applicable.
- b) Add the quantities of the products with accuracy.

Step 4: Calculating the Credit Amount and Saving the Credit Memo
- a) Calculate the total amount to be credited by changing quantities, as needed.
- b) Verify the calculated credit amount to avoid any mistakes. The total refund amount will be reflected on the right-hand corner of the form.

- c) Once verified, save the credit memo to record the adjustments made.
Want QuickBooks Online Invoicing help?
Connect with our QuickBooks experts!
Understanding the Different Methods to Apply a Credit Memo to an Invoice
Once you have created a credit memo, you can apply it to a customer’s invoice in the following three ways:
Method 1: Applying the Credit Memo During Invoice Creation
When you are creating a new invoice for your customer, QuickBooks Online offers an option to apply the existing credit memos directly to the invoice. This option comes in very handy when you want to balance out the outstanding credit with the invoice amount.
Here’s a brief guide to applying the credit memo during invoice creation:
- Create a new invoice in QuickBooks Online.
- Choose the customer for whom you are creating the invoice.
- Add the products or services that they are buying from you.
- Click on the “Credits” option and choose the credit memo you want to apply.
- Save the invoice to finish the process.
- You can verify in the customer’s account whether the credit memo is adjusted in the invoice or not.
Method 2: Applying the Credit Memo to An Existing Open Invoice
The second method to apply a credit memo in QB Online is very straightforward. All you need to do is adjust the amount of the credit memo to an existing, open invoice in the customer’s account.
We will be explaining the detailed steps to perform this method in QuickBooks in a short while. So, stay tuned.
Method 3: Applying the Credit Memo to Future Invoices
Suppose your customer’s account doesn’t have any open invoices but there is some credit or discounts you have to adjust in their account. So, how are you going to do it?
For this, QuickBooks Online has a feature called “delayed credit” where an existing credit will get adjusted automatically to the customer’s future invoices. This method will not only ensure accurate accounting but will also streamline the complete invoicing process.
To perform this method, you will have to create a delayed credit. Here’s a quick rundown to create the same:
- Login to QuickBooks Online
- Click on the “New” option available on the left-hand side of the dashboard.
- Choose “Delayed Credit” from the drop-down menu.
- Select the customer’s name in the Customer dropdown menu.
- Enter the required details and then click on “Save and Close”.
It will be saved as delayed credit and you can turn on “Automatically apply credits” from the QuickBooks Online Settings option. This means the next time you create an invoice for this particular customer, the credit will get adjusted.
Detailed Instructions on How to Apply a Credit Memo to an Open Invoice in QuickBooks Online
Earlier, we explained the steps for creating a credit memo in QuickBooks Online. Now, to apply this credit memo to an open invoice, follow the below-mentioned instructions:
Step 1: Navigating to the Customer’s Account
- a) Log in to your QuickBooks Online account.
- b) Click on the “Sales” tab in the left navigation bar.
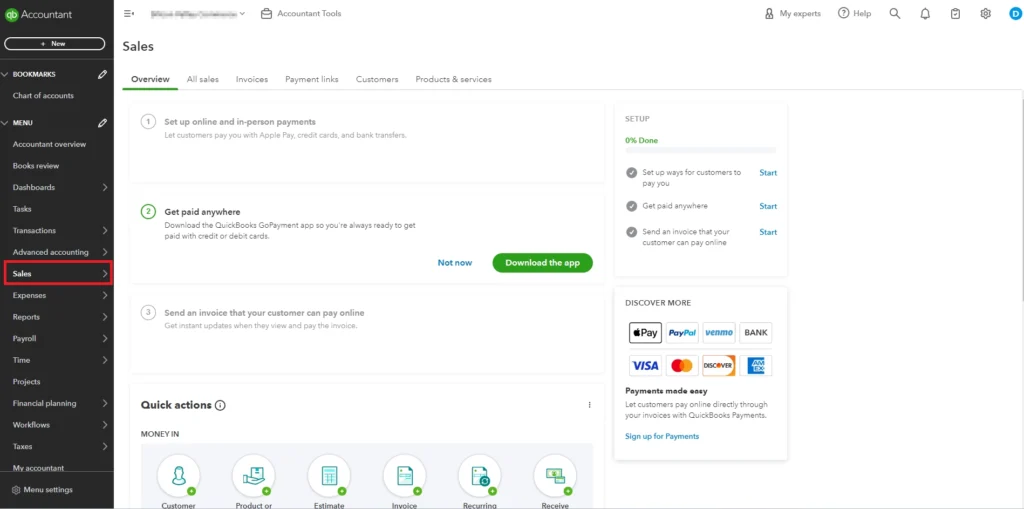
- c) From the drop-down menu, select “Customers”.
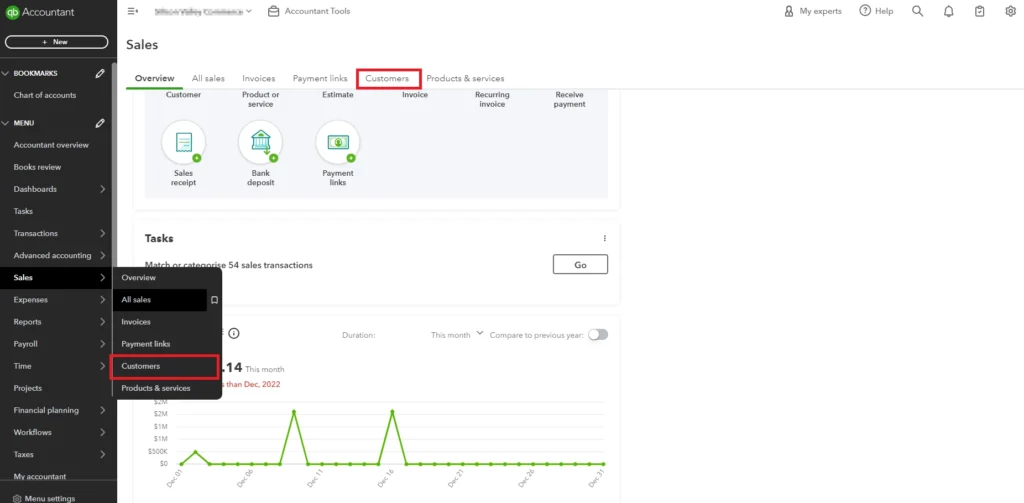
- d) Once you click on “Customers”, the customer’s account will open.

Step 2: Locating the Open Invoice
- a) In the customer’s account, select the open invoice from the search tab. This invoice should be the one in which you want to adjust the credit memo.

- b) The invoice will be opened in the next window.
Step 3: Applying the Credit Memo Using the “Receive Payment” Feature
- a) Click on the “Receive Payment” tab displayed on the right-hand side corner of the invoice.

- b) The “Receive Payment” form will open that will display invoice details and the customer’s balance.
- c) Look for the “Credits” section in the receive payment form that allows you to apply for a credit.

- d) Select the “Credit Memo” from a list of available memos you want to adjust in this invoice.
- e) Once the credit memo is applied, QuickBooks Online will automatically update the total balance amount to be received from the customer.

- f) Once you have reviewed the adjustments, click on “Save” to save the updated customer’s balance in the invoice.
- g) Now, go to the customer’s account to review the customer’s balance to ensure whether the credit memo has been successfully applied or not. You will find that the invoice reflects the adjusted amount.
Pro-tip!
After verifying the customer’s balance, you can consider sending the updated invoice or statement to your customer. Although it is optional, we would recommend doing so as a best practice of using the credit memos feature in QuickBooks Online.
Want QuickBooks Online Invoicing help?
Connect with our QuickBooks experts!
Tips and Best Practices for Managing Credit Memos and Invoices in QuickBooks Online
As you would have realized by now how QuickBooks Online can help you effectively manage credit memos and invoices. Simply put, it plays a vital role in maintaining accurate financial records and promoting transparency with your customers.
However, there are a few best practices that you need to adopt to maintain a healthy relationship with your customers when managing their financial accounts in QuickBooks. Let’s look at these practices one by one:
1. Keeping Track of Applied Credit Memos and Their Remaining Balance
Firstly, to effectively manage credit memos in QuickBooks Online, you need to prioritize regular reviewing of your customer’s account. Keep a track record of applied credits and the remaining balances to maintain financial accuracy.
This practice will make you aware of the outstanding credits to be adjusted in future transactions. As a result, you can avoid overlooking the available pending credits and it will also keep your customer up-to-date with their financial statements.
2. Sending Updated Invoices to Customers Reflecting the Credit Memo Adjustments
If you want to maintain positive customer relationships, then you have to stay transparent with them. To do so, we recommend sending the updated invoices to your customers that keep them informed about their outstanding credits. These invoices should clearly indicate the adjustments made after applying a credit memo of a certain amount.
As an outcome, this practice will enhance customer trust and will reduce the chances of misunderstandings and confusion in the future.
3. Regularly Reviewing and Reconciling Credit Memos and Invoices to Ensure Accuracy
Another important factor that you should take care of while managing credit memos is to perform regular reconciliations in QuickBooks Online. With this practice, you can ensure that your financial records in QuickBooks align with the customer’s actual transactions.
As a consequence, you can easily identify any discrepancies in the customer statements and safeguard your business from financial mismanagement.
Wrapping Up
Mastering the art of applying credit memos to invoices in QuickBooks Online is essential for any business owner. Not only you can maintain financial accuracy in your business with this feature, but can also foster positive customer relationships.
We hope that the steps we have outlined above to apply credit memos to invoices in QuickBooks Online will make your invoicing process easier.
However, if you still face any difficulties, you can connect with our QuickBooks specialists and they will instantly provide the guidance you seek.


