Analyzing the financial health of a business becomes challenging if your ERP Accounting module is not properly configured. Unorganized financial data may result in errors and inconsistencies, and can also hinder the process of conducting a meaningful analysis. In such cases, a Chart of Account (CoA) serves an important purpose. It properly segregates the key features of accounting, providing you with clear information on your financial data. Therefore, in this blog, we will cover how you can easily create and configure chart of accounts in Odoo.
Before we go ahead to understand the configuration of Odoo chart of accounts, let’s first check what this feature is all about. As the name suggests, CoA or chart of accounts is a list of accounts. It contains the details of different types of transactions your business organization makes. This list of accounts can be used by your business to manage different financial statements like balance sheets and profit and loss. Read more about chart of accounts and its types.
Though there are some pre-configured Odoo chart of accounts templates, you can create your own according to your company’s requirements. Owing to Odoo’s open source capability that has a full-fledged accounting module helping businesses like yours create and manage CoA effortlessly. Let’s understand how effectively managing a chart of accounts in Odoo can benefit your business.
5 Key Benefits of Successfully Managing Chart of Accounts in Odoo
As mentioned above, Chart of Accounts in Odoo plays a crucial role in organizing financial data. Here are five important advantages of efficiently handling the Chart of Accounts in Odoo:
1. Clear Financial Tracking: First and foremost, CoA helps you easily track where your money is coming from and going. This clarity on your business’s financial transactions is beneficial if you want to analyze your business’s long-term plan.
2. Accurate Reporting: Secondly, it enables you to generate accurate financial reports like balance sheets and income statements. These reports play a major role in understanding your business’s financial health.
3. Informed Decision-Making: It’s obvious that by providing a clear financial record, Odoo chart of accounts allows you to make better decisions. The insights into your business’s financial performance and the trends it provides can drive data-driven decisions.
4. Compliance: Another important advantage of effectively handling CoA in Odoo is that it ensures that your financial data is as per the accounting standards and regulatory requirements. This means your business is free of penalties that may occur when an organization doesn’t follow the rules set by a statutory body.
5. Efficiency: You can integrate CoA seamlessly with other modules within Odoo. Modules like invoicing, purchasing, and inventory management. This integration can ensure accuracy and consistency across different business functions.
Explaining the structure of a chart of accounts in Odoo
Now that you have understood the benefits of managing chart of accounts in Odoo, let’s break down how CoA is set up in this ERP software. In Odoo, the structure of accounts is divided into different categories. Each category represents a type of financial transaction, like money coming in from sales or going out as expenses.
Furthermore, you can create sub-categories within each category for more specific transactions called as Odoo Chart of Accounts hierarchy. Let’s understand these categories one by one.
Odoo Chart of Account Category and Their Purpose
As we’ve mentioned earlier, the chart of accounts typically handles two main financial statements: the Profit and Loss statement and the Balance Sheet. Under the Profit and Loss statement, you can manage accounts related to income and expenses. Whereas, under the Balance Sheet, you can organize accounts for Assets, Liabilities, and Equity. Read more about
If you see the image given below, the left-hand side column depicts the financial reports, then the middle one is the account category, and the third one is the type of Account.
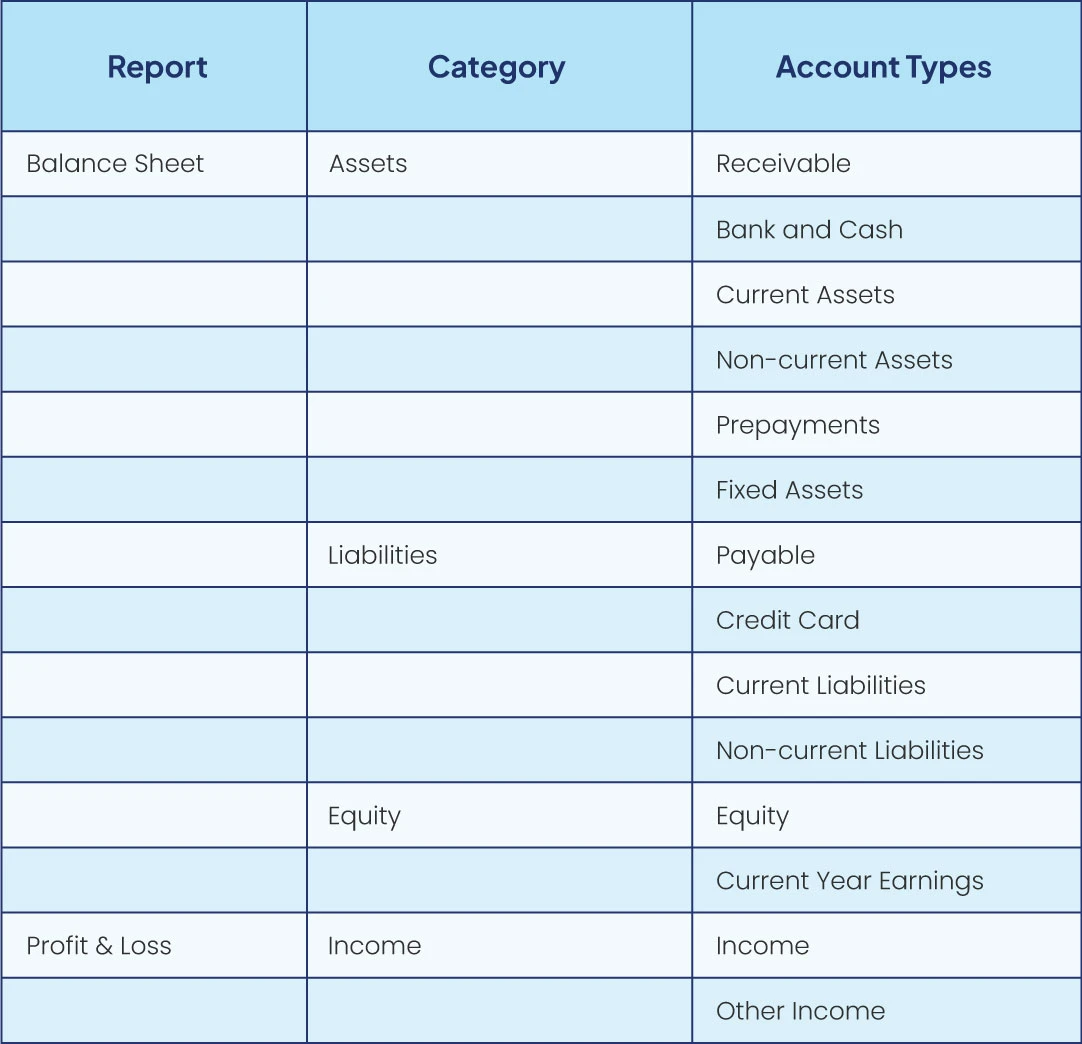
Take a look at what these account categories depict:
1. Asset Accounts: These represent resources owned by the company, such as cash, equipment, inventory, or property.
2. Liability Accounts: These track obligations or debts owed by the company, like loans or accounts payable.
3. Income Accounts: These record revenue generated by the company, such as sales or service income.
4. Expense Accounts: These track the costs incurred by the company in its operations, like salaries, rent, or utilities.
5. Equity Accounts: These reflect the ownership interests in the company, including capital contributions or retained earnings.
6. Receivable Accounts: These reflect the amount due to an organization for goods or services used or delivered but not yet paid.
Hierarchical Structure and Organizing Accounts in Odoo
You can set a parent-child relationship between accounts in Odoo accounting called a hierarchical structure. The Odoo chart of accounts hierarchy determines how accounts are related to one another. It is one of the most important features in the accounting module of Odoo because it helps to manage multiple chart of accounts in a single CoA.
Key features of the Chart of Account hierarchy are as follows:
- It can be viewed in a folded-unfolded view
- Hierarchy can be generated between any dates
- It can be created based on target moves, account & account type
- Hierarchy can be generated with or without including zero-amount transaction
Confused about the chart of accounts hierarchy?
Speak to our Odoo Support group.
Creating a New Chart of Accounts in Odoo
When you create a new database or add a new company to your existing database in Odoo, the country you choose determines the default fiscal localization package installed. This package includes a pre-configured standard chart of accounts set according to the regulations of that country. You can either use it as is or adjust it to fit your company’s specific requirements.
If you want to set it according to your business requirements, create a new account. The steps of creating chart of accounts in Odoo are as follows:
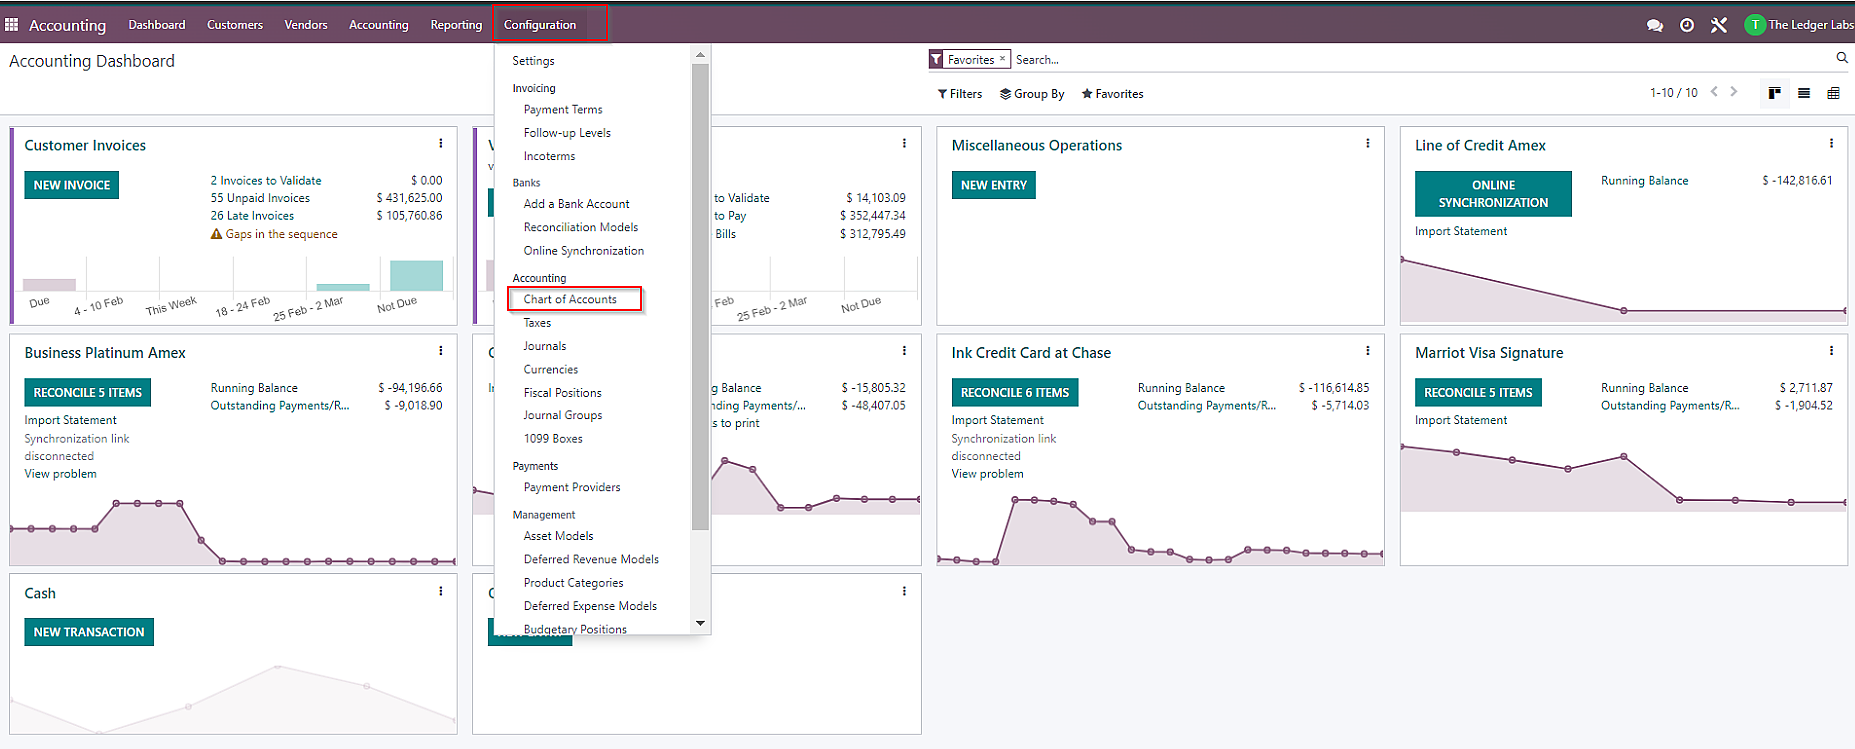
1. On the Odoo Dashboard, click on “Configuration” and then select “Chart of Accounts” from the drop-down menu.
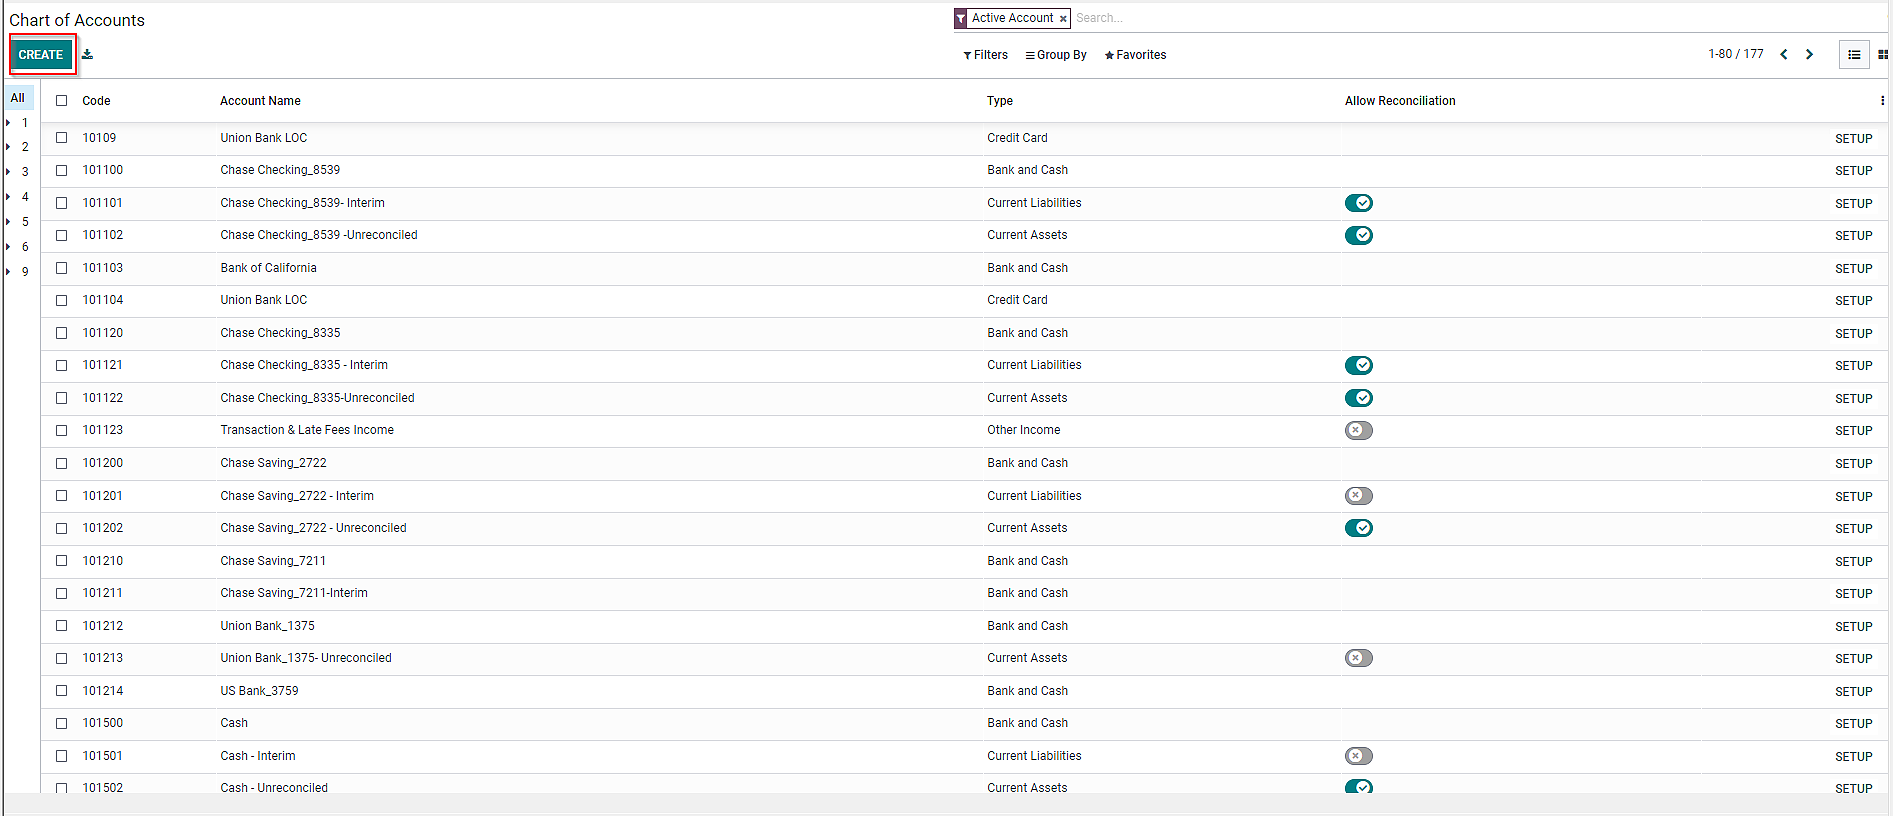
2. A list of accounts will be displayed on the screen. Click on “Create” available on the left-hand side of the Chart of Accounts list.
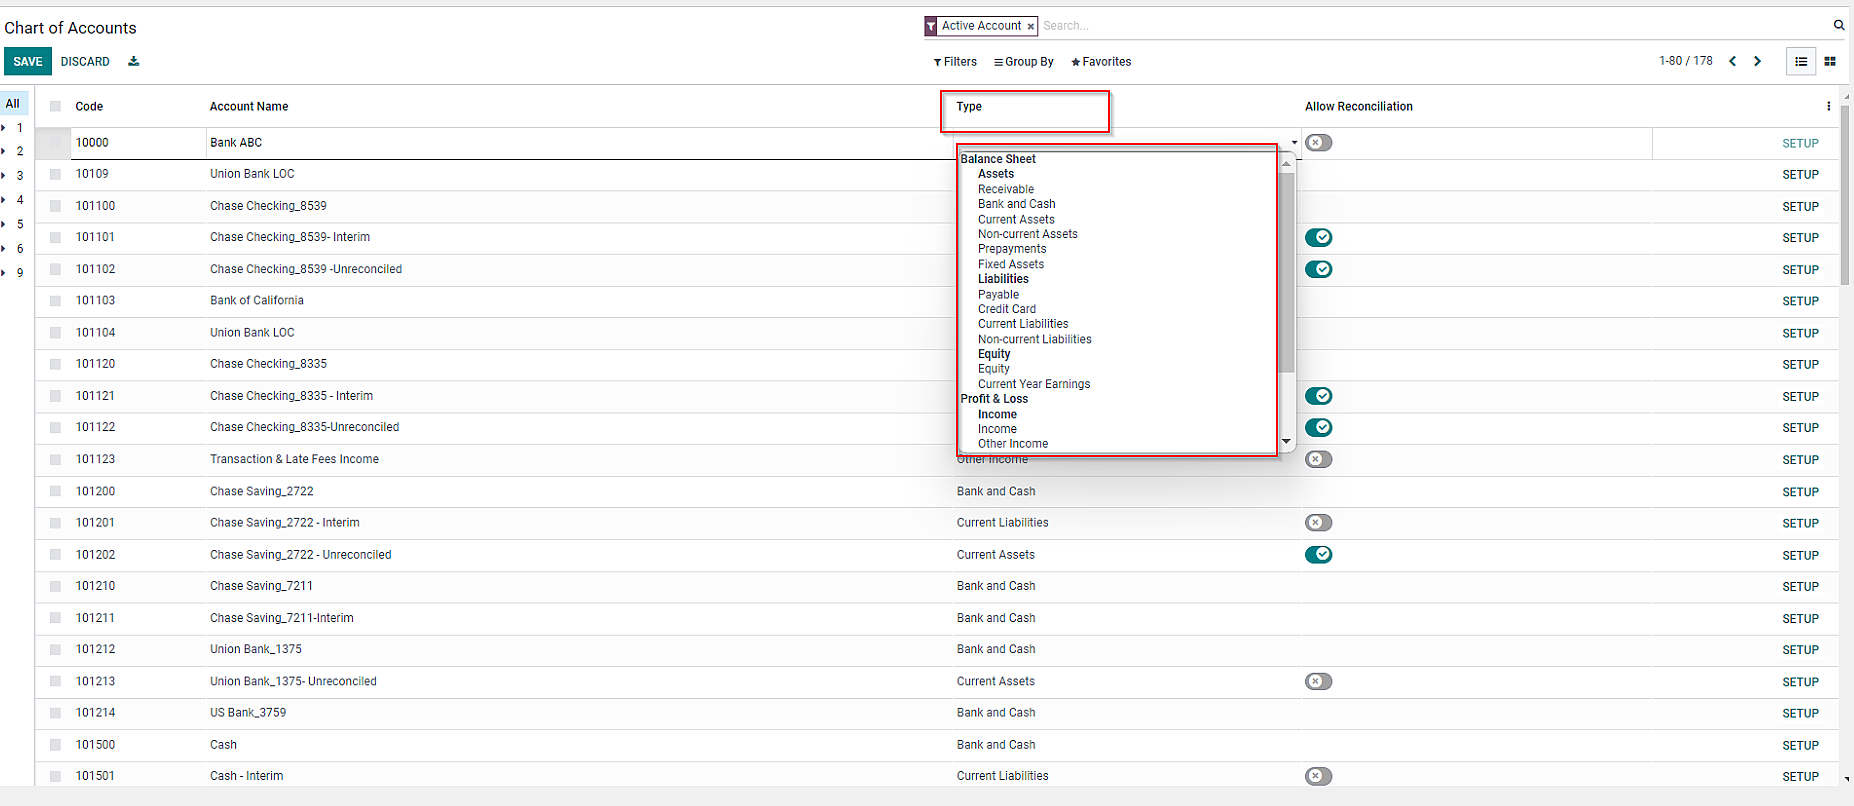
3. Fill in the required fields such as “Unique Code”, “Account Name”, “Account Type”, etc.

4. After filling in the information, click on “Save” to add a new account.
Configuring Accounts in Odoo CoA and Understanding Their Properties
Once you’ve created the list of accounts according to your business needs, it is essential to configure them properly. So that you can record the financial data of your organization accurately. There are numerous ways you can configure accounts in Odoo. We will be explaining some of them one by one.
1. Configuring Account Type in Chart of Accounts
Previously, we’ve mentioned that you need to fill in the required fields while creating chart of accounts in Odoo. Those fields are:
- a) Code: It is a unique number given to identify each account in Odoo chart of accounts.
- b) Account Name: The name of the account basically indicates its purpose.
- c) Account Type: As explained in the beginning, account type defines the category of an account, such as asset, liability, income, or expense.
It is essential to configure the account type correctly as it serves various objectives:
- a) Details on an account’s purpose and behavior
- b) Produce legal and financial reports tailored to specific countries
- c) Set the rules for closing the fiscal year
- d) Create opening entries
The steps to configure an account type:
- a) Click on “Type” on the Chart of Accounts page.
- b) From the drop-down list, select the corresponding account type.
2. Defining Analytic Accounting Tags
Another important attribute of Odoo CoA is that you can assign analytic tags to each account. They track and analyze financial data based on different dimensions, such as projects, departments, or cost centers.
The analytic account tags feature can only be available once you enable its developer mode from the settings. Then, you will be able to define analytic tags. Now, let’s see the steps to do so:
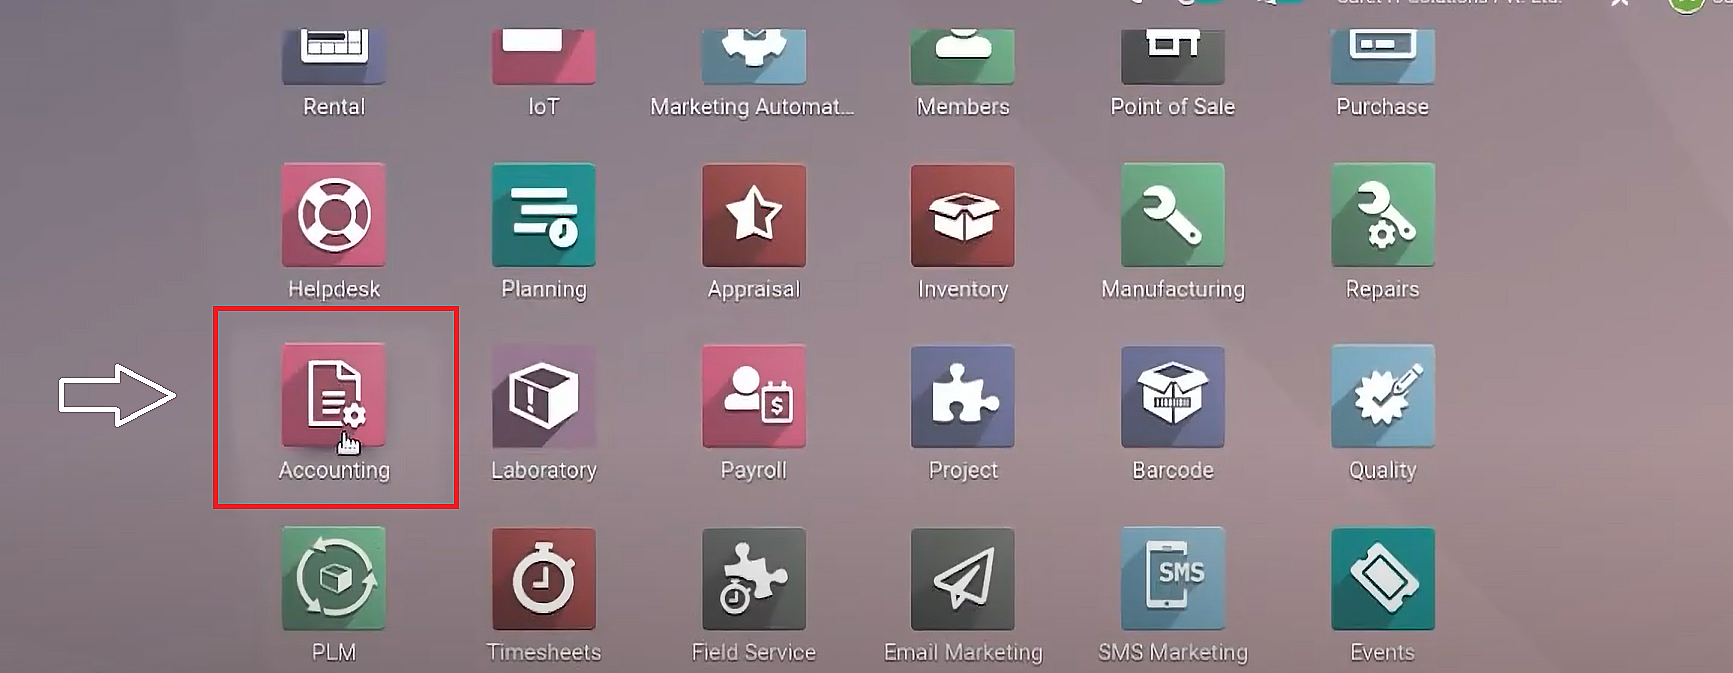
a) First, you need to create an analytic account group in the Odoo Chart of Accounts. For this, navigate to the “Accounting” app.
b. Click on “Configuration” and select “Analytic Account Groups”.
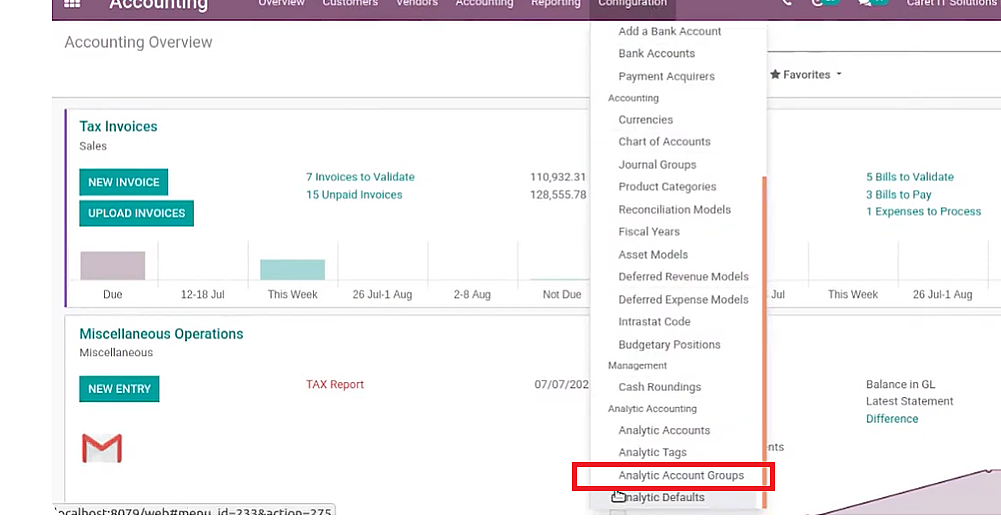
c. Click on “Create” to create a new group.

d) Then, you have to form a new analytic account. For this, click on “Configuration” and select “Analytic Account”
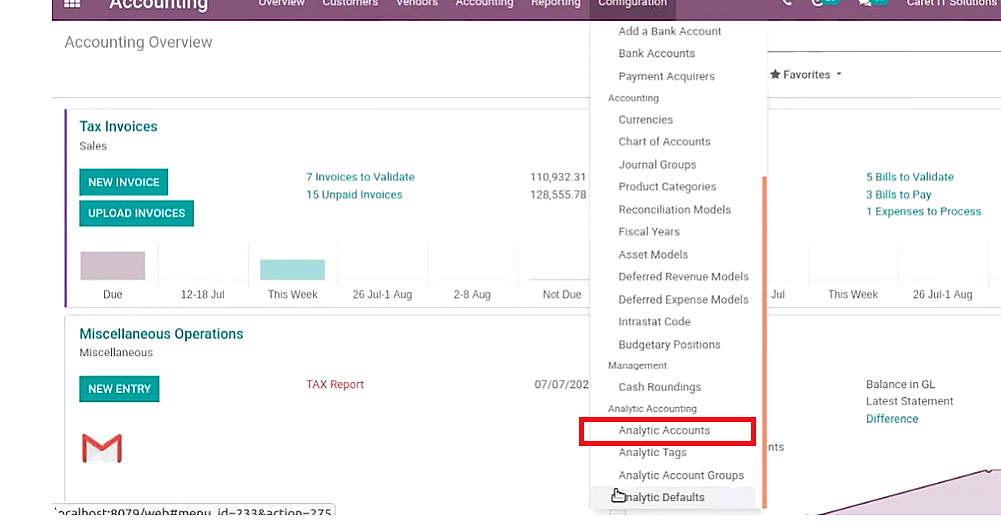
e) On the Analytic Accounts page, click on the “Create” button available on the left-hand side corner. Once you’ve created an analytic account, you can check the same by clicking on the “Group By” button and selecting “Associated Partner”.

f) The last step is to create an analytic tag. For this, navigate to “Configuration” and click on “Analytic Tags”.

g) On the next page, make a new tag by clicking on the “Create” button.
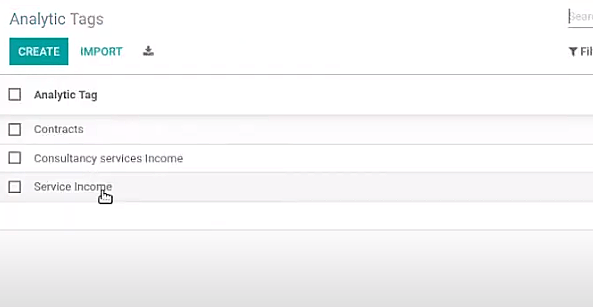
Once all these three aspects are set in Odoo accounting, you can add them to a customer invoice to analyze the data regularly.
3. Using Group By Feature in Odoo Chart of Accounts
Odoo CoA has an amazing feature called “Group By” that helps to group accounts for better functionality. All the accounts grouped are under a typical head inside the reports. In the fiscal reports, every one of them won’t be shown independently. However, just the net absolute of the relative header will be depicted in the report.
So to use this “Group By” option, follow these steps:
a) Click on “Configuration” on Odoo Dashboard to select “Chart of Account”.
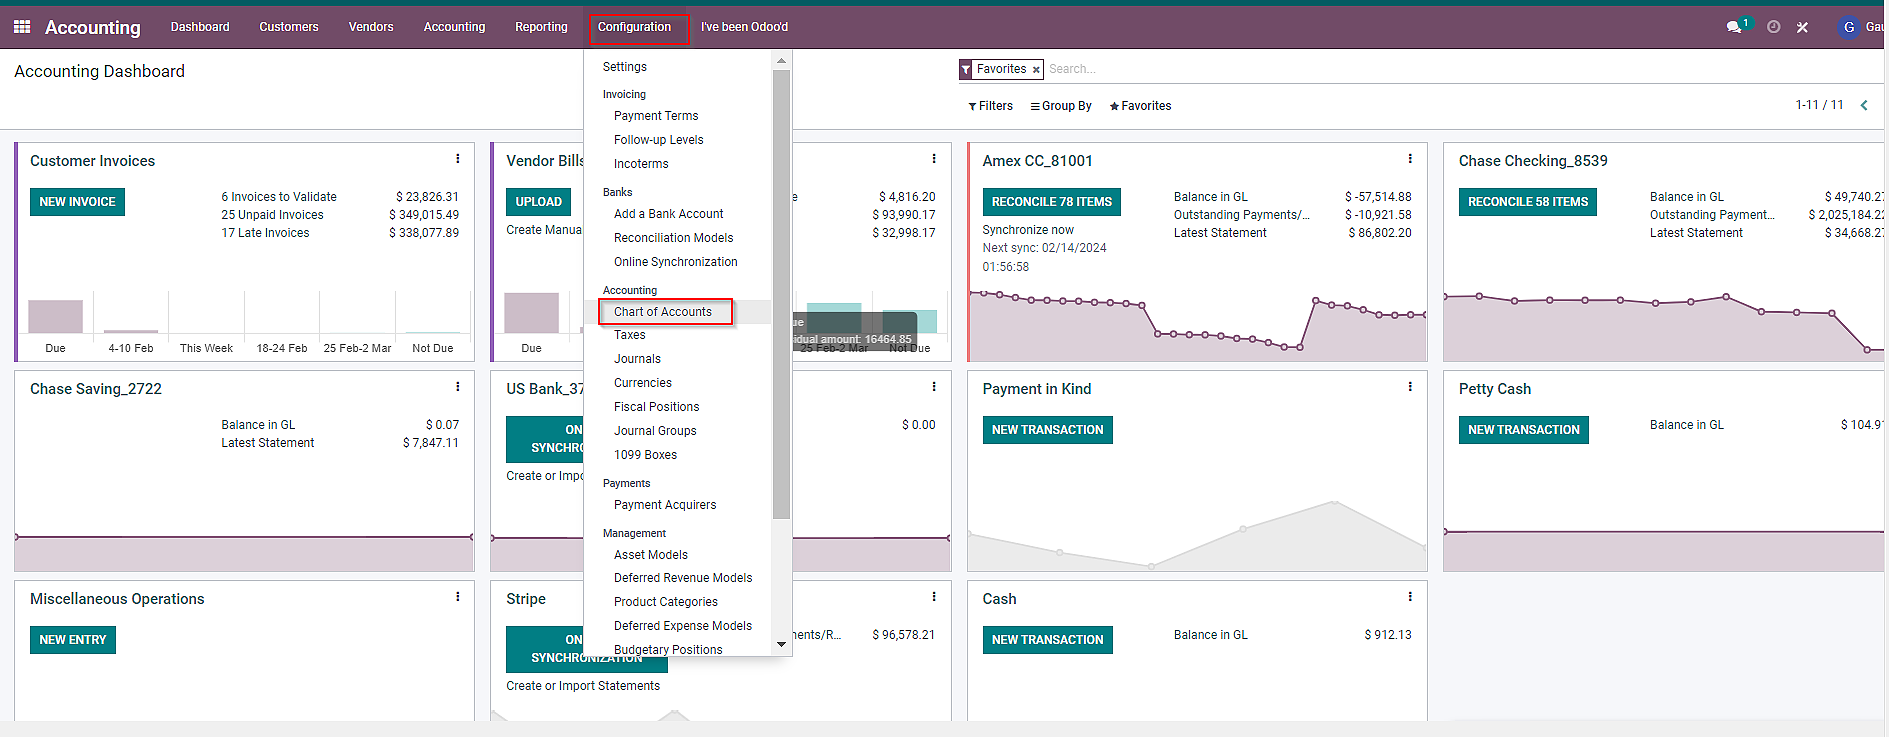
b) On the center of the screen, you will see a “Group By” button. Click on it.

c) From the drop-down menu, select “Account Type”.

d) A list of grouped accounts by accounting type will be displayed on the screen.
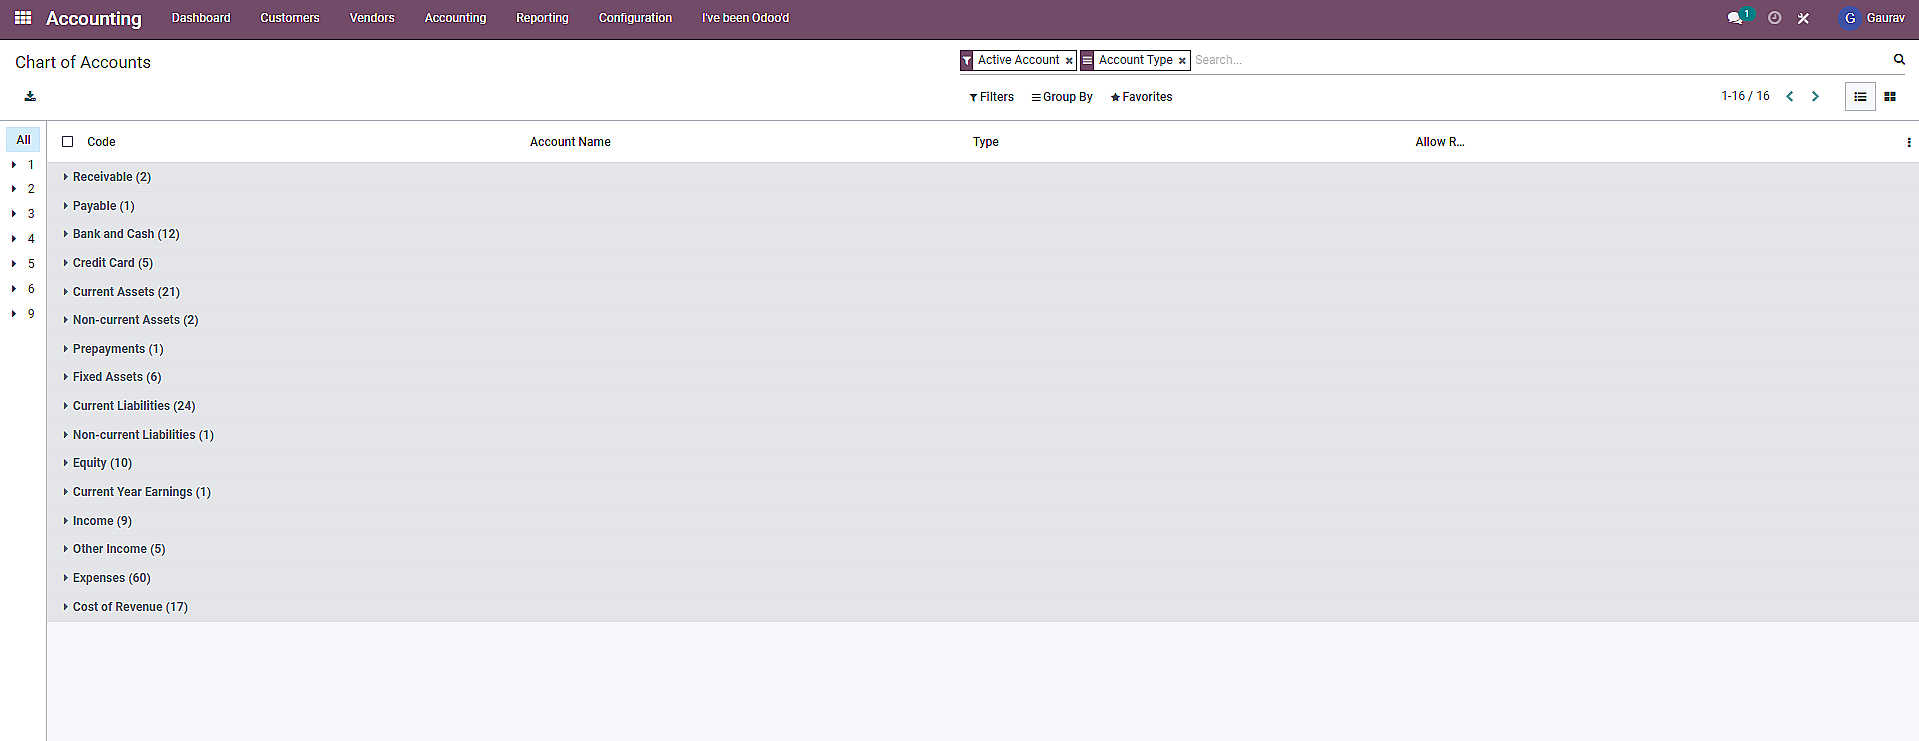
This “Group By” feature enables a business to filter the information and identify easily without having to create so many accounts.
4. Specifying Account Defaults and Financial Report Mapping:
In Chart of Account Odoo, we can also specify various behaviors like currency, tax, fiscal position, etc. The steps to configure each one of them are mentioned below.
To configure Taxes in Odoo Accounting:
a) Click on “Configuration” and choose “Taxes” from the drop-down menu.
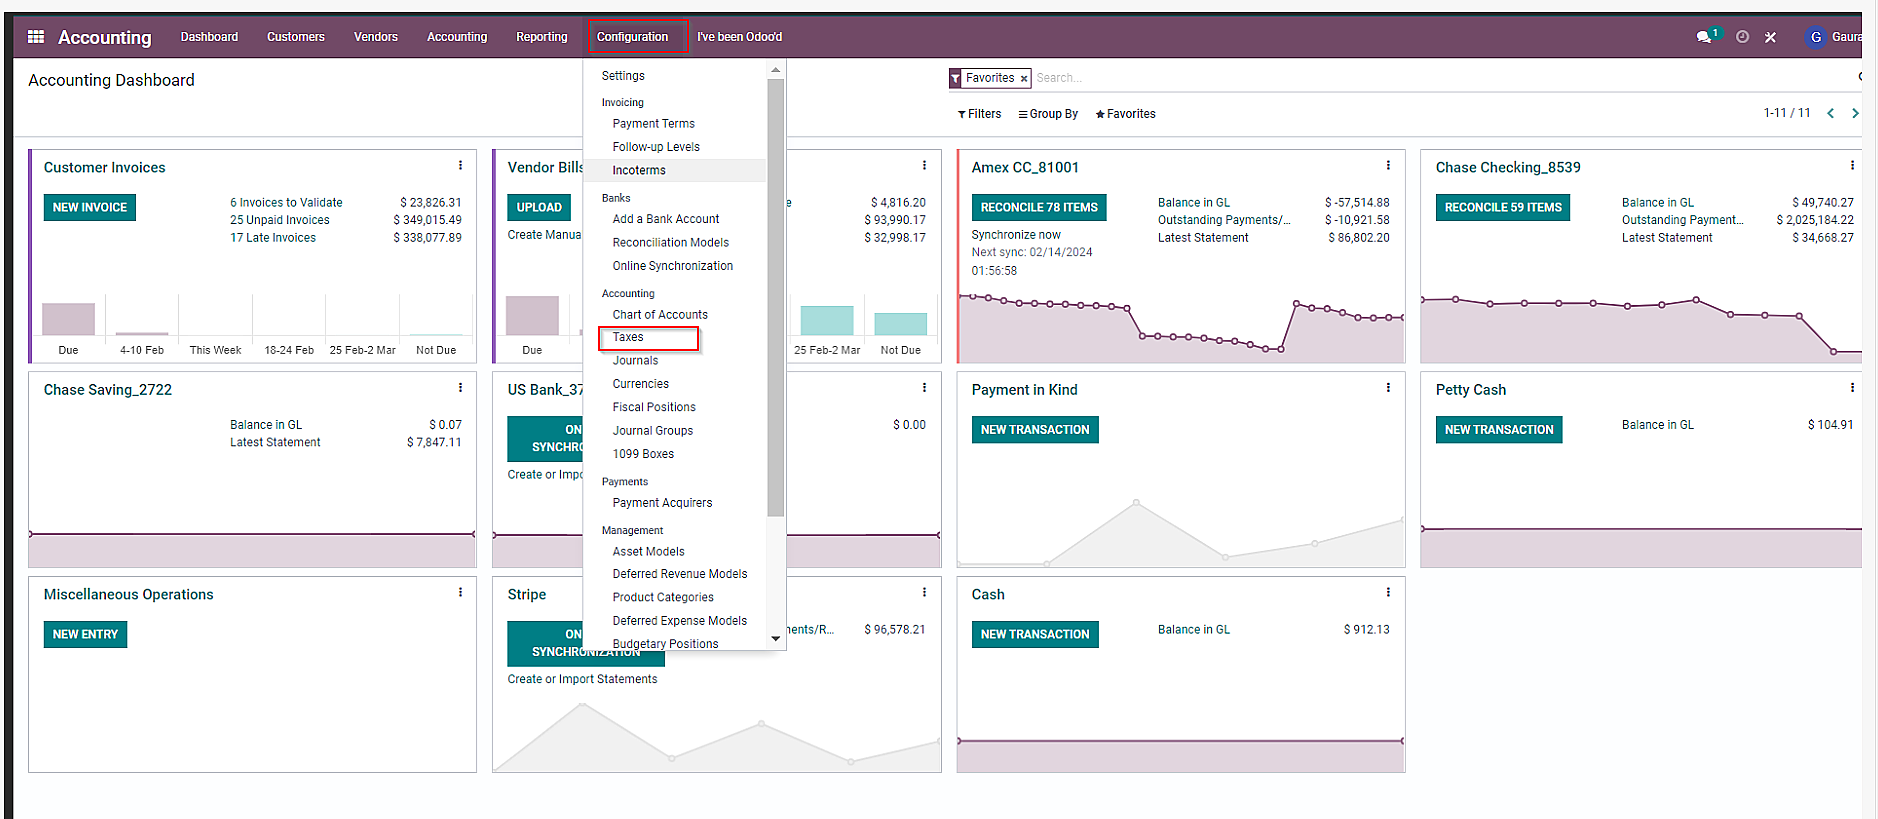
b) Click on “Create”.
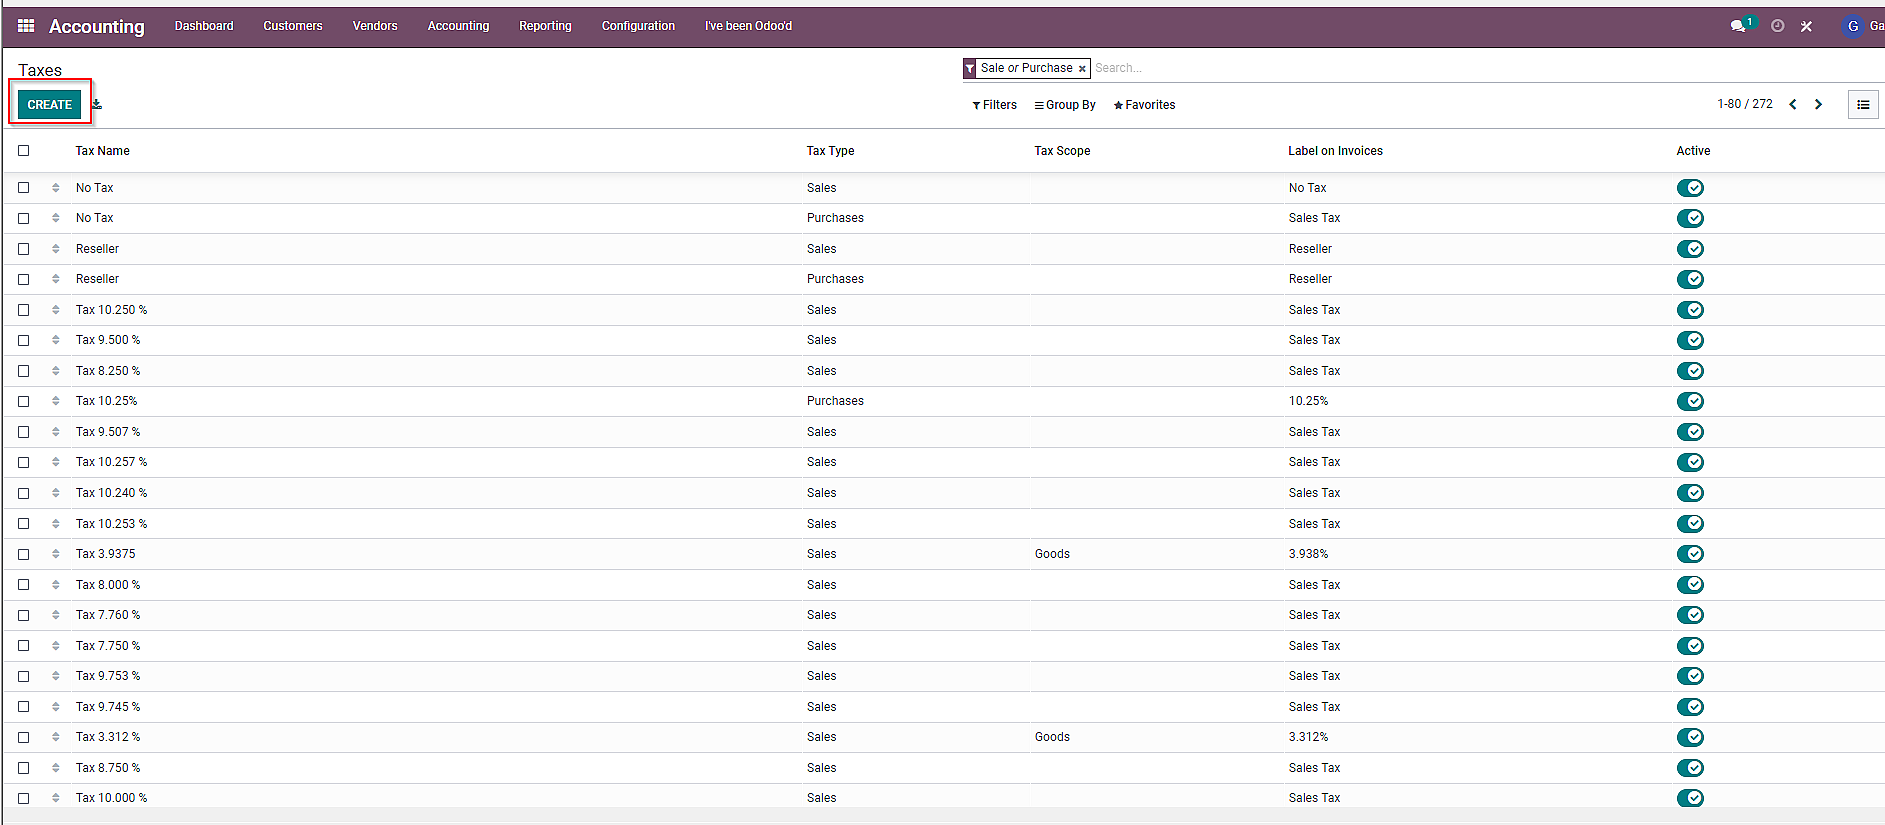
c) Fill in the required information on the “Taxes” form and click on “Save” once done.

To configure Currencies in Odoo Accounting:
a) Click on “Configuration” and choose “Currencies” from the drop-down menu.
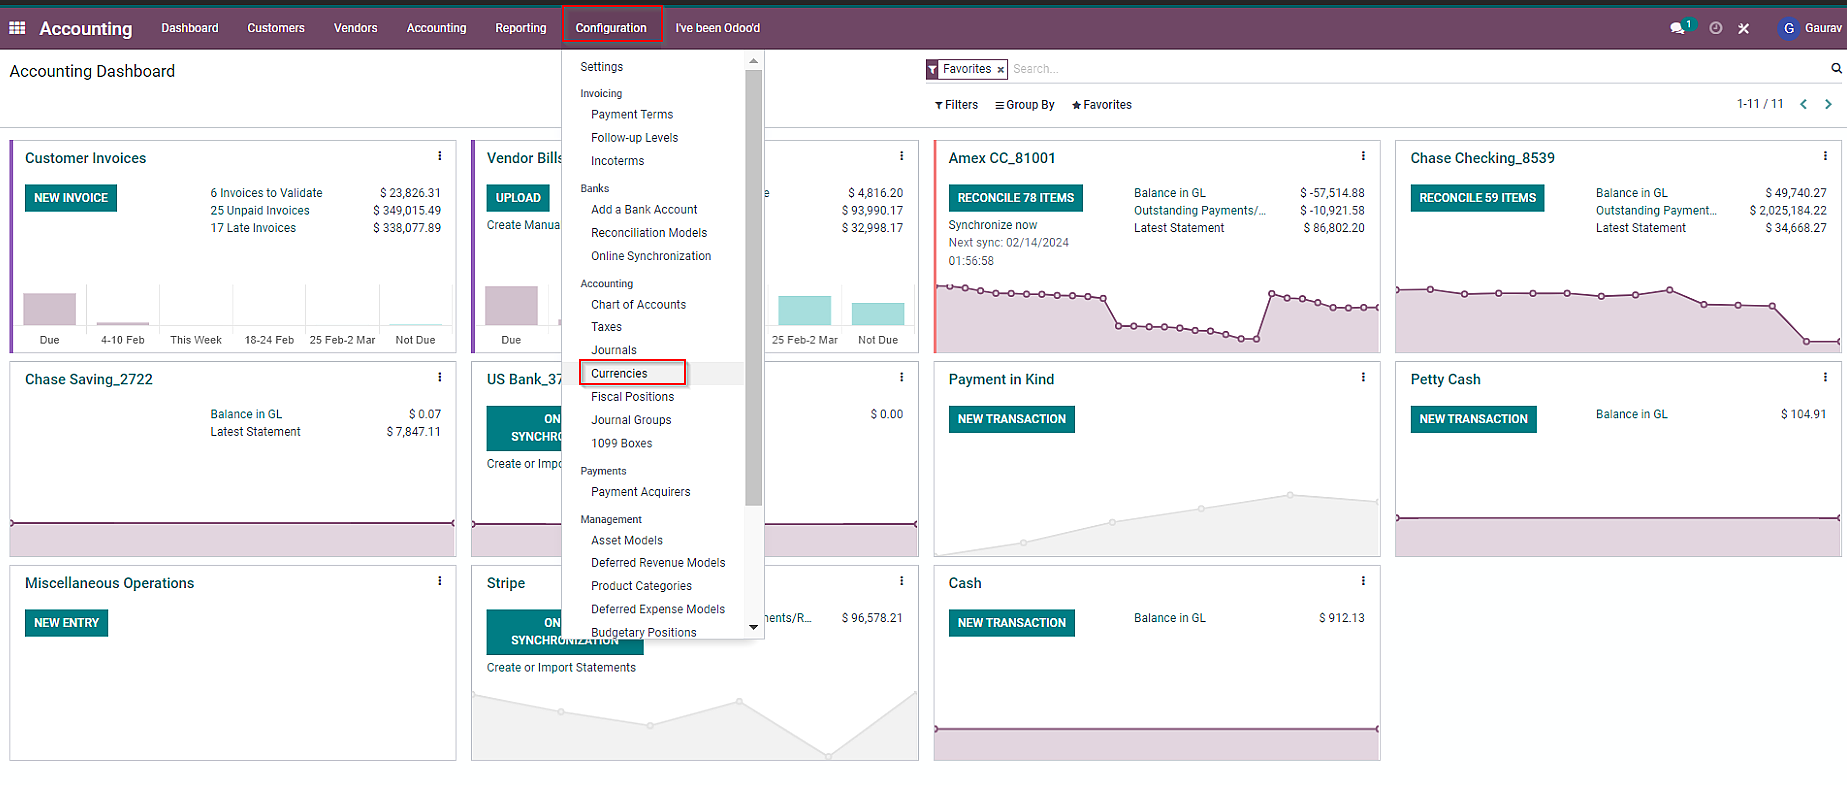
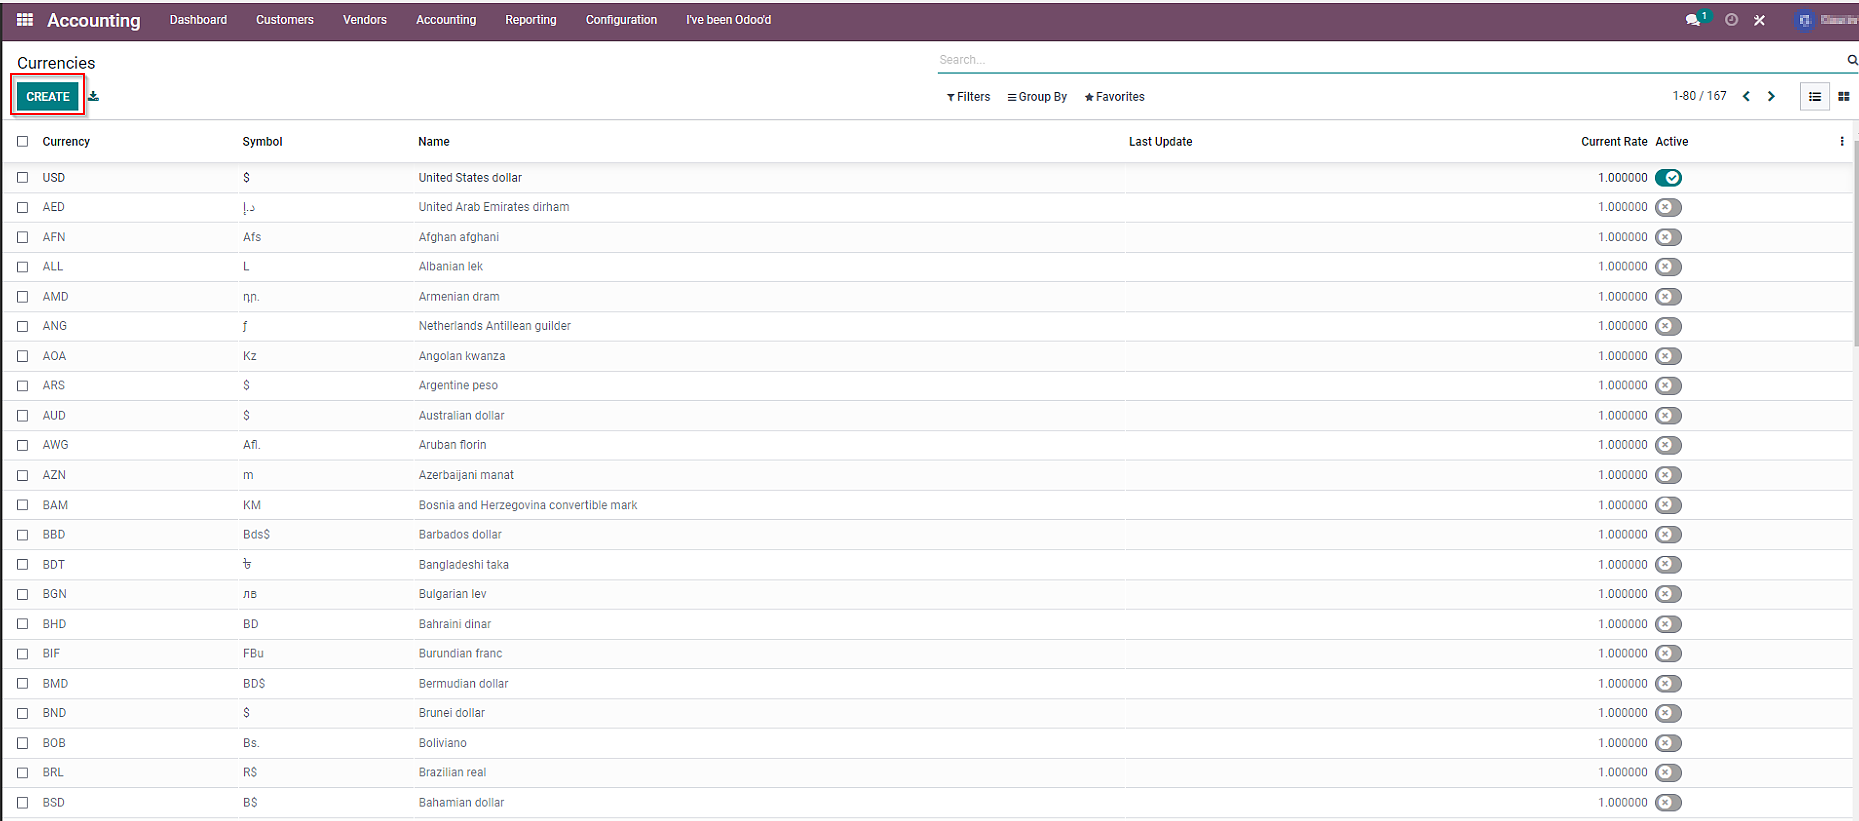
b) Click on “Create” to add a new currency.
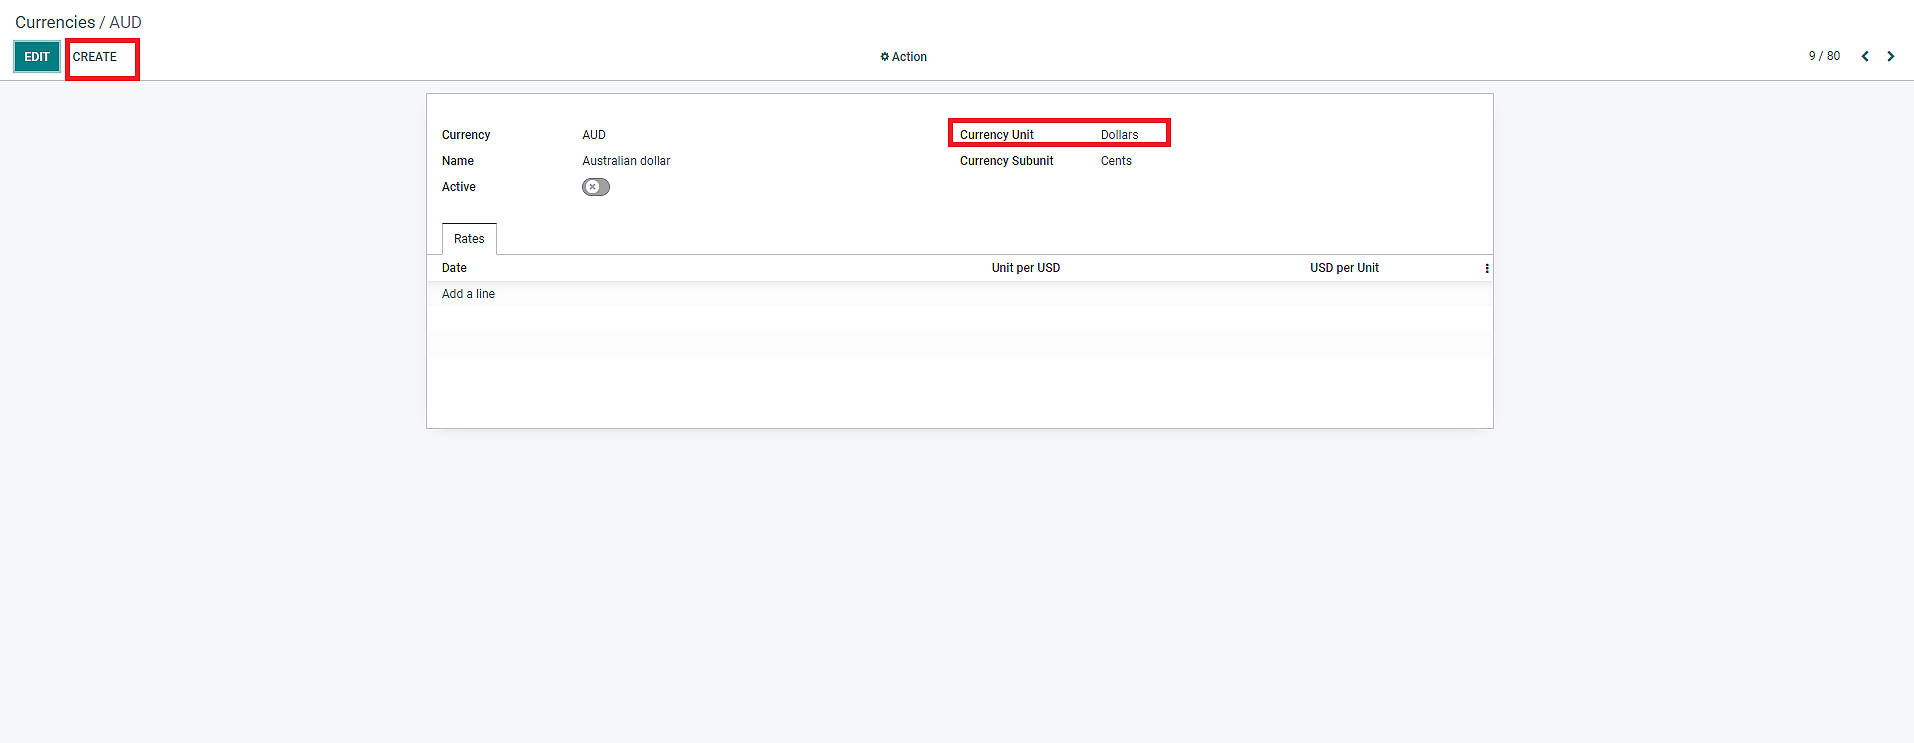
c) Fill in the required details on the “Currencies” form and click on “Create” once done.
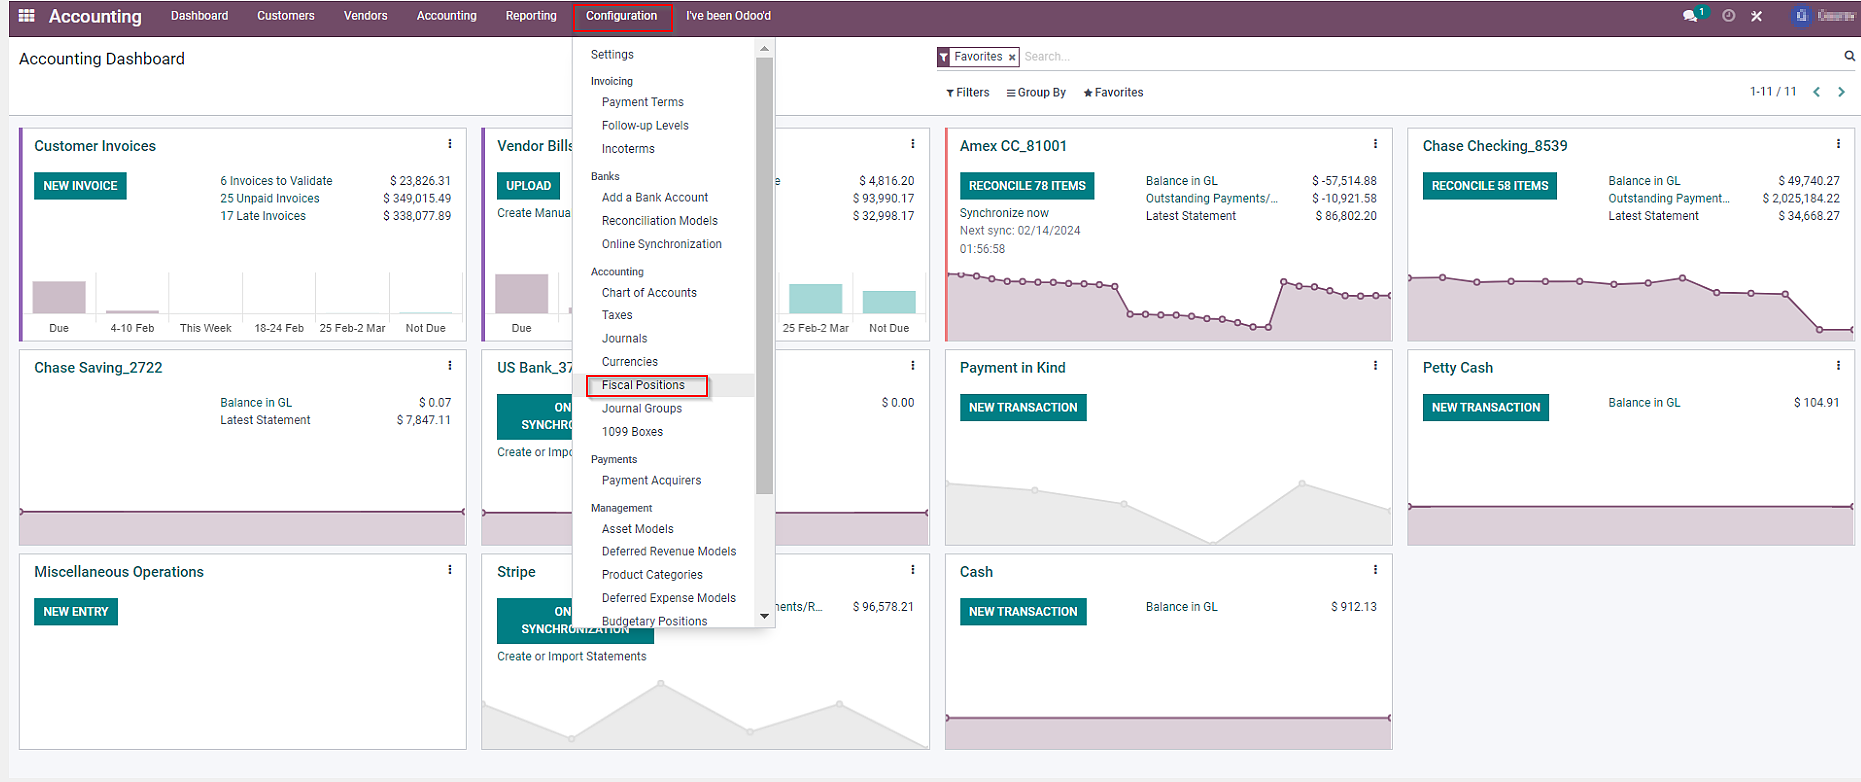
Odoo configure Chart of Accounts Fiscal Position in the following way:
a) Navigate to the “Fiscal Positions” tab by clicking on “Configuration” on the Accounting dashboard.
b) Click on “Create” to form a new fiscal position.
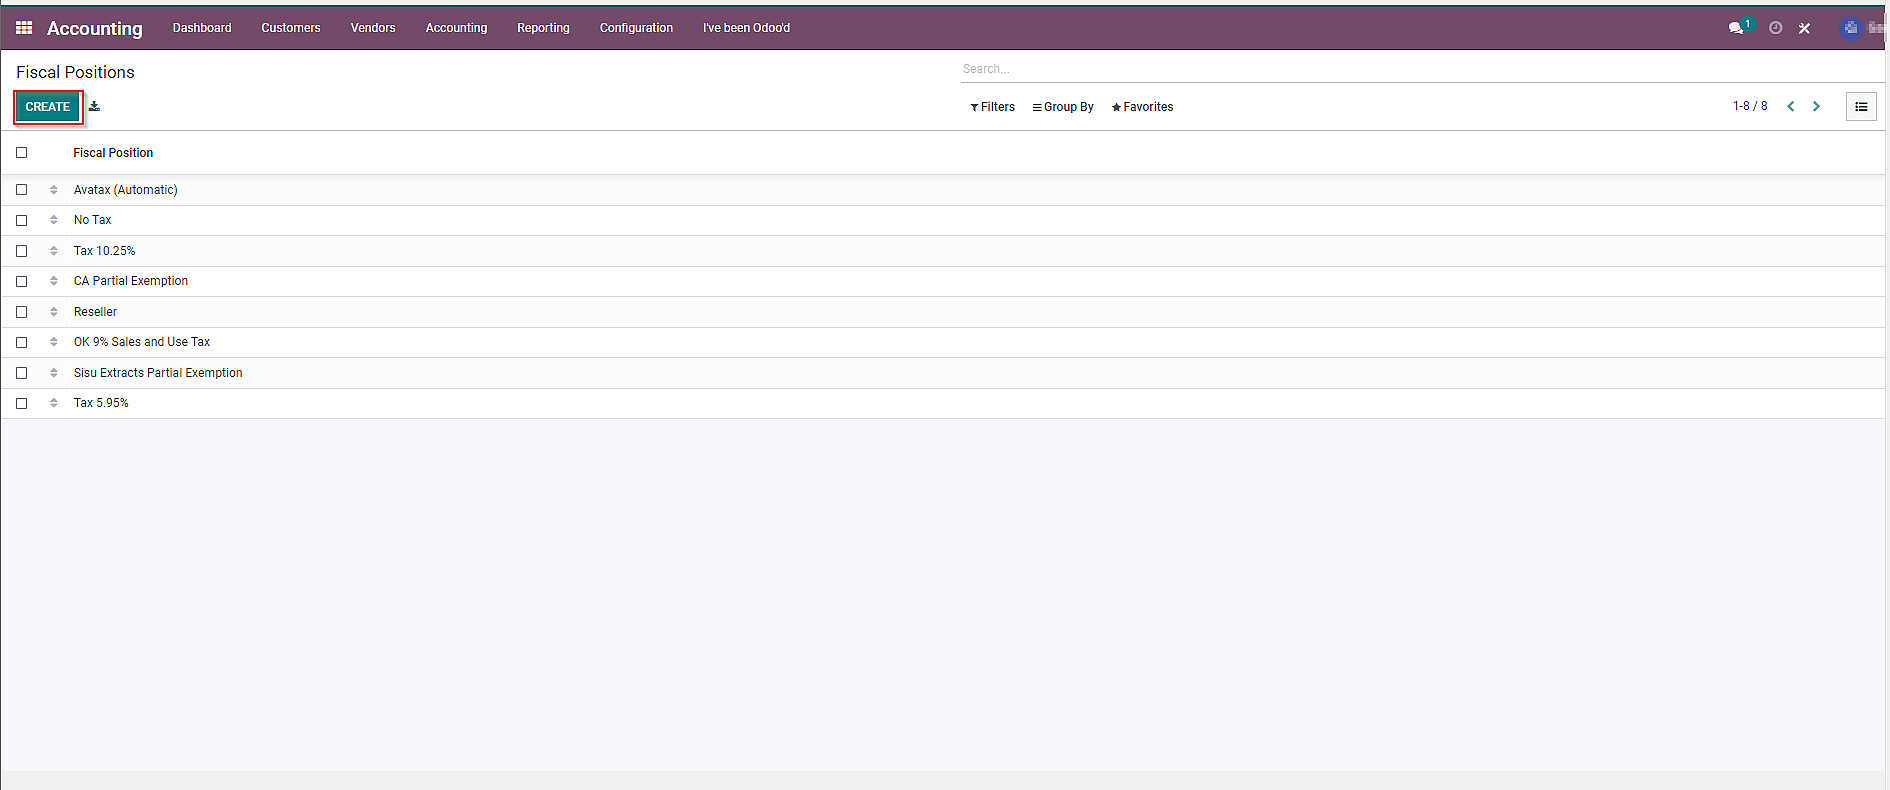
c) Fill in the required information in the form and click on “Create” once done.
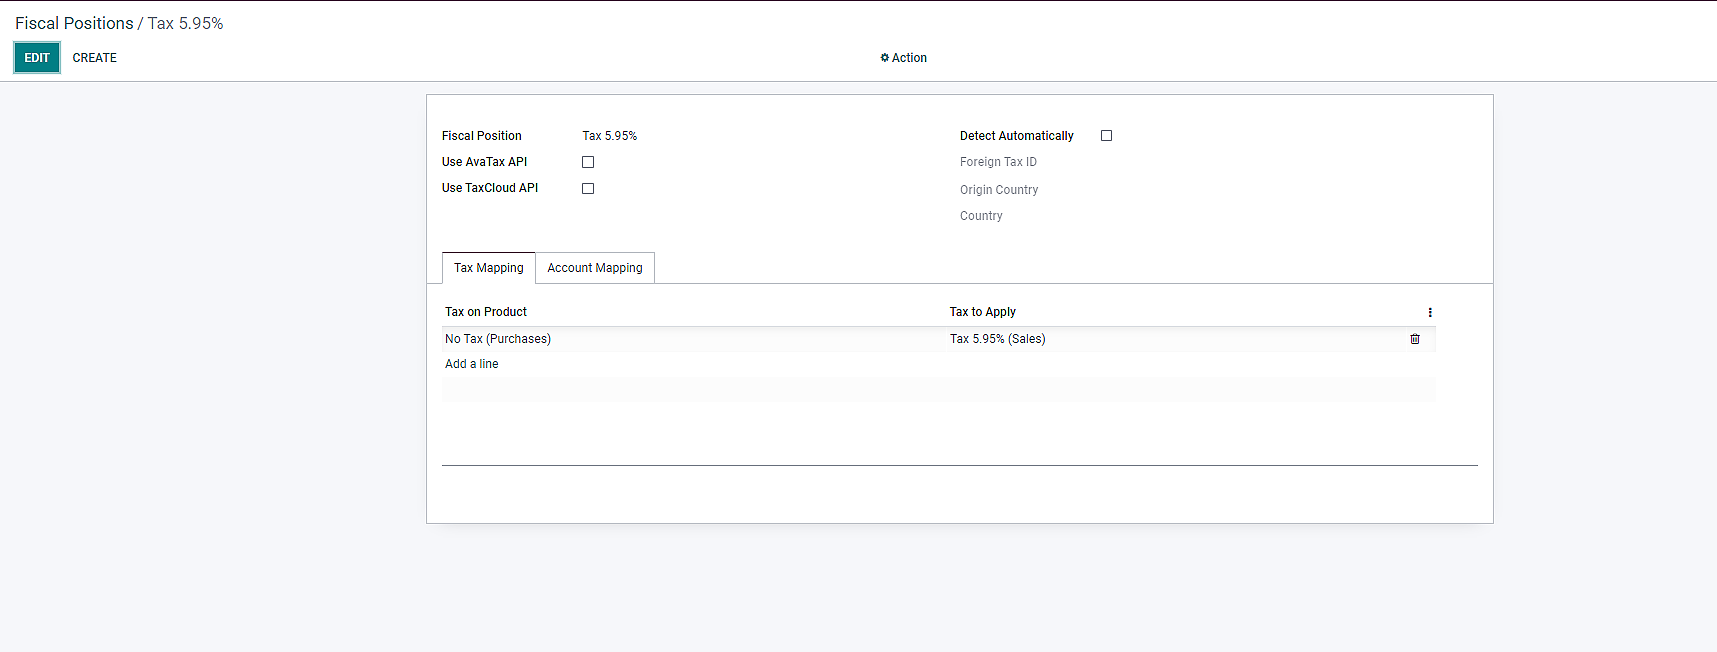
Are you wondering why you need to configure fiscal position in chart of accounts in Odoo? This is because fiscal positions will enable you to apply different tax rates, exemptions, or deductions to transactions based on the jurisdiction’s tax laws or your customer’s tax status.
In addition, it allows businesses to produce financial reports in compliance with specific accounting standards.
Managing Account Balances and Initial Entries
Moving forward to the ways through which you can manage accurate financial data of your business in Odoo. It includes two main tasks:
1. Updating Chart of Accounts Using CSV File: The importing of financial records from a CSV file makes your life easier. As it reduces the manual labor of updating each information in the application. Above that, this method ensures that account balances and records are accurate, without having any errors.
2. Creating Journal Entries for Initial Account Setup: Setting initial balances for accounts via journal entries has many benefits. Firstly, it ensures that Odoo CoA starts with correct balances, and secondly, it reflects the financial status of the business accurately.
Stuck while using chart of accounts in Odoo?
Don’t be, our Odoo Support is here for you!
Now, let’s have a look at how we can perform the above-mentioned two tasks in Odoo.
1. Updating Chart of Accounts in Odoo Using CSV File
Since this process involves multiple steps, it is essential to pay attention to the details.
a) Click on “Configuration” on the Odoo Accounting dashboard, then select “Chart of Accounts”
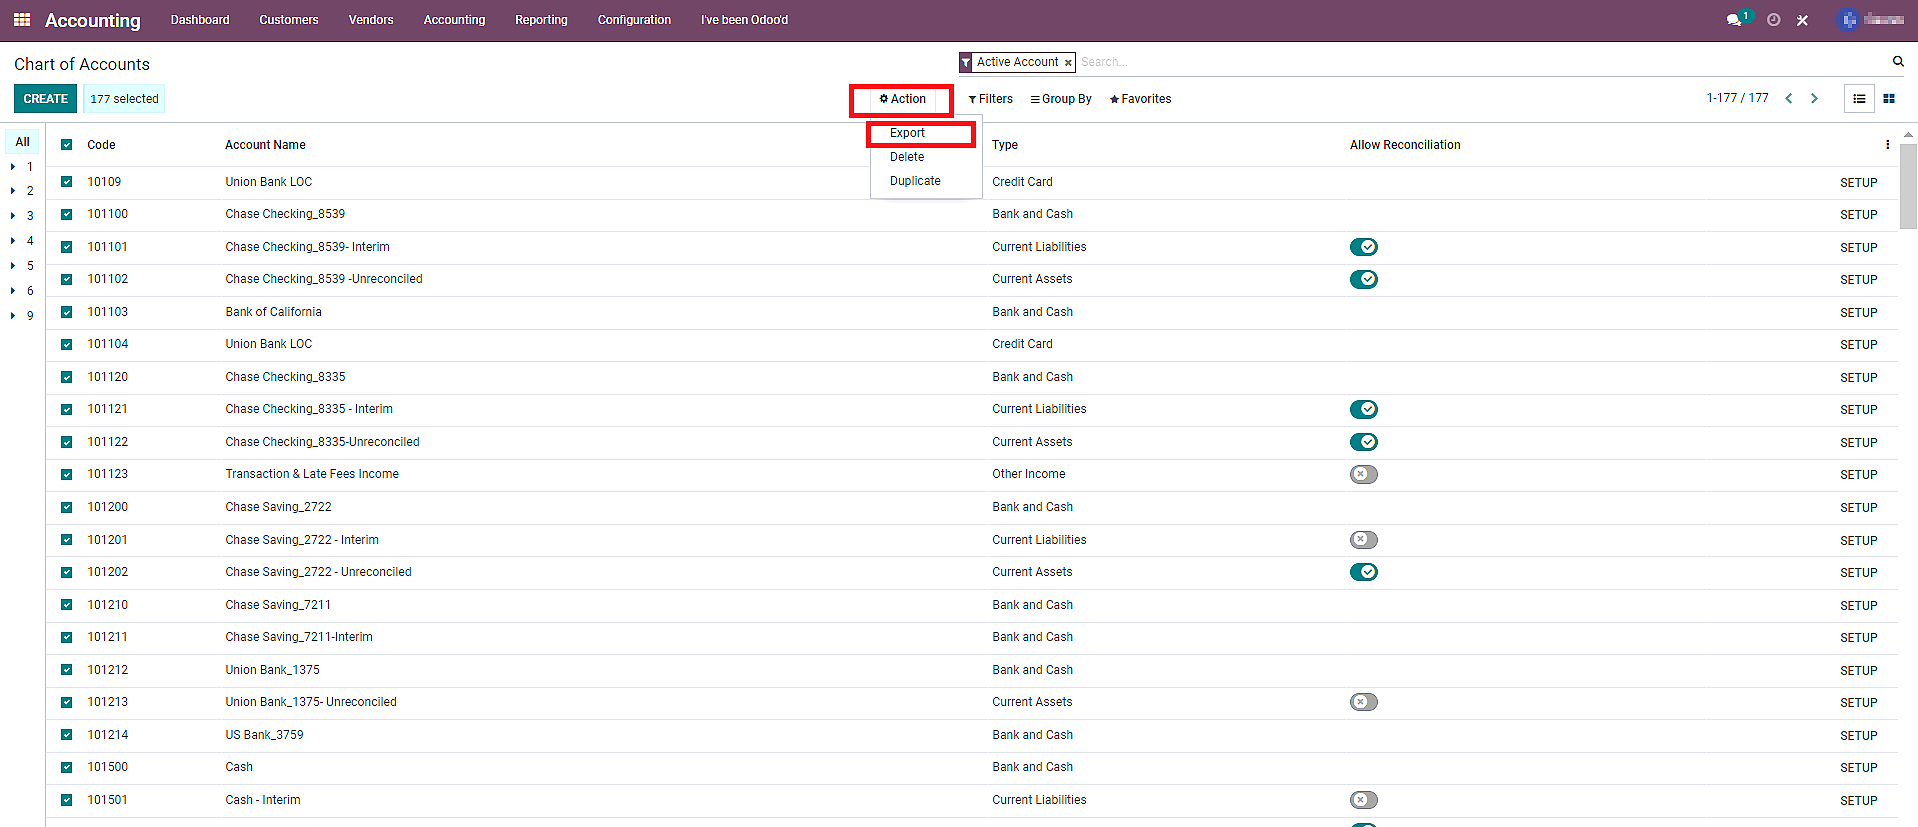
b) On the left side of the page, you will see small square boxes adjacent to “Code”. Select the whole list in the CoA menu by clicking on the checkered box.

c. Click on “Select all xxx numbers file” (Here “xxx” means the number of accounts available in the list)
d. Click on the “Action” button > “Export”.
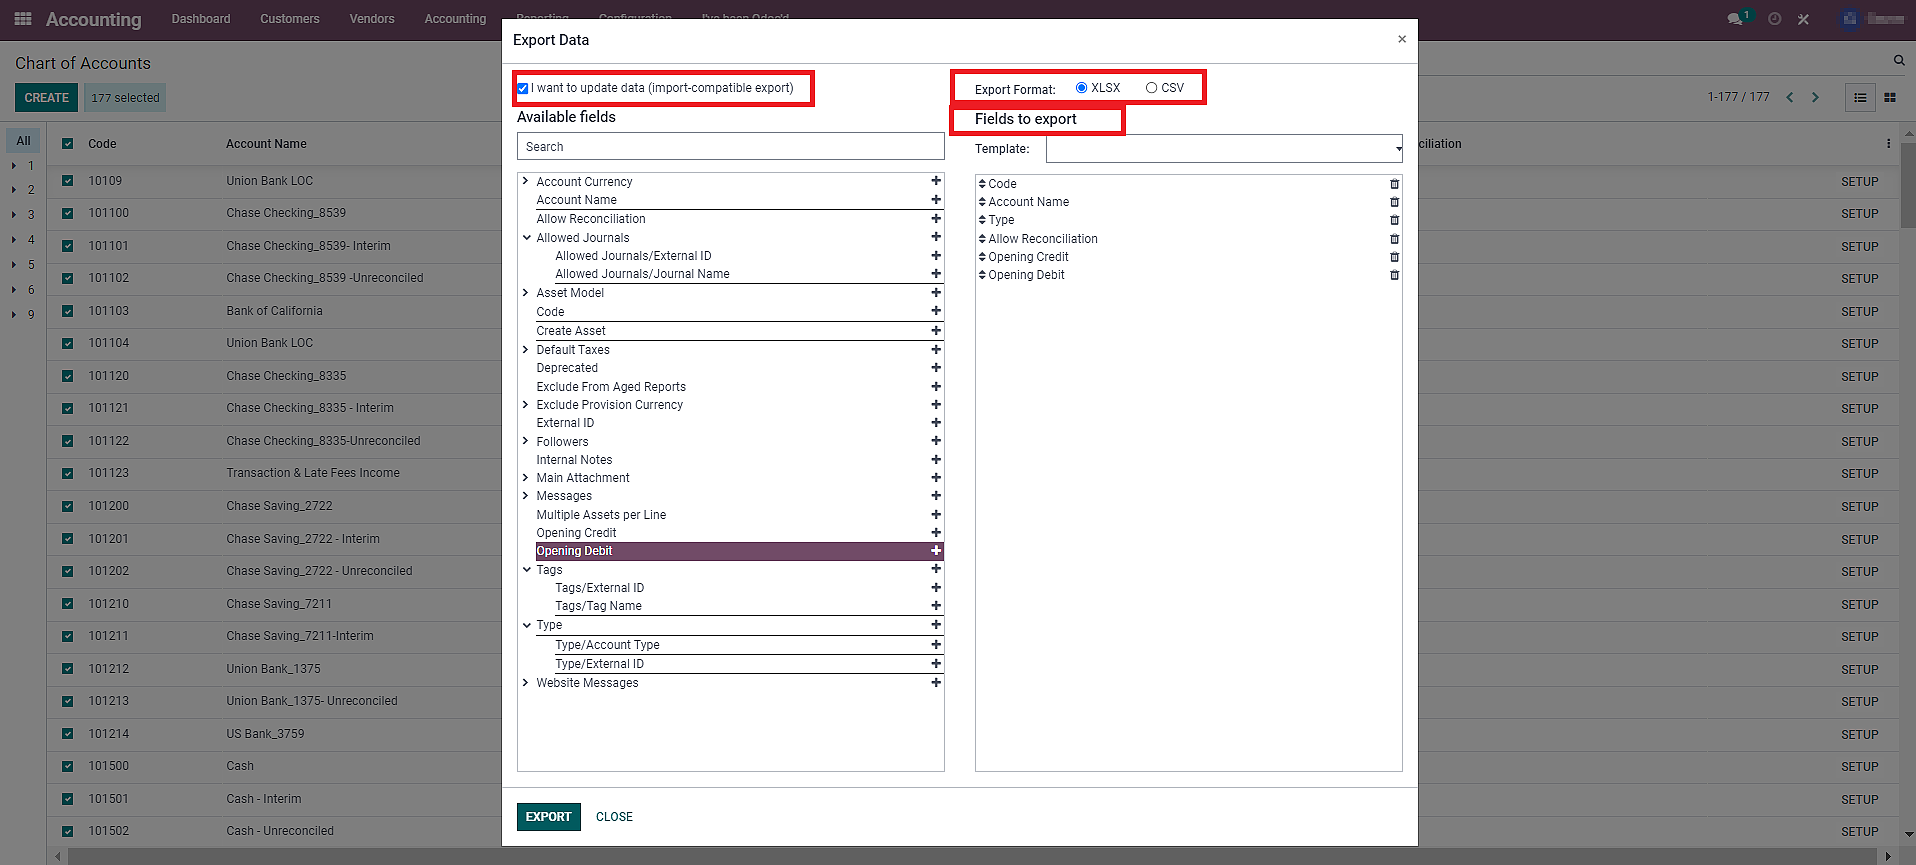
e) You will see the information on the “Export Data” on the next screen. Select the “check box” stating “I want to update data”. Then, click on “Export“.
f) Open the Excel file that you’ve exported.
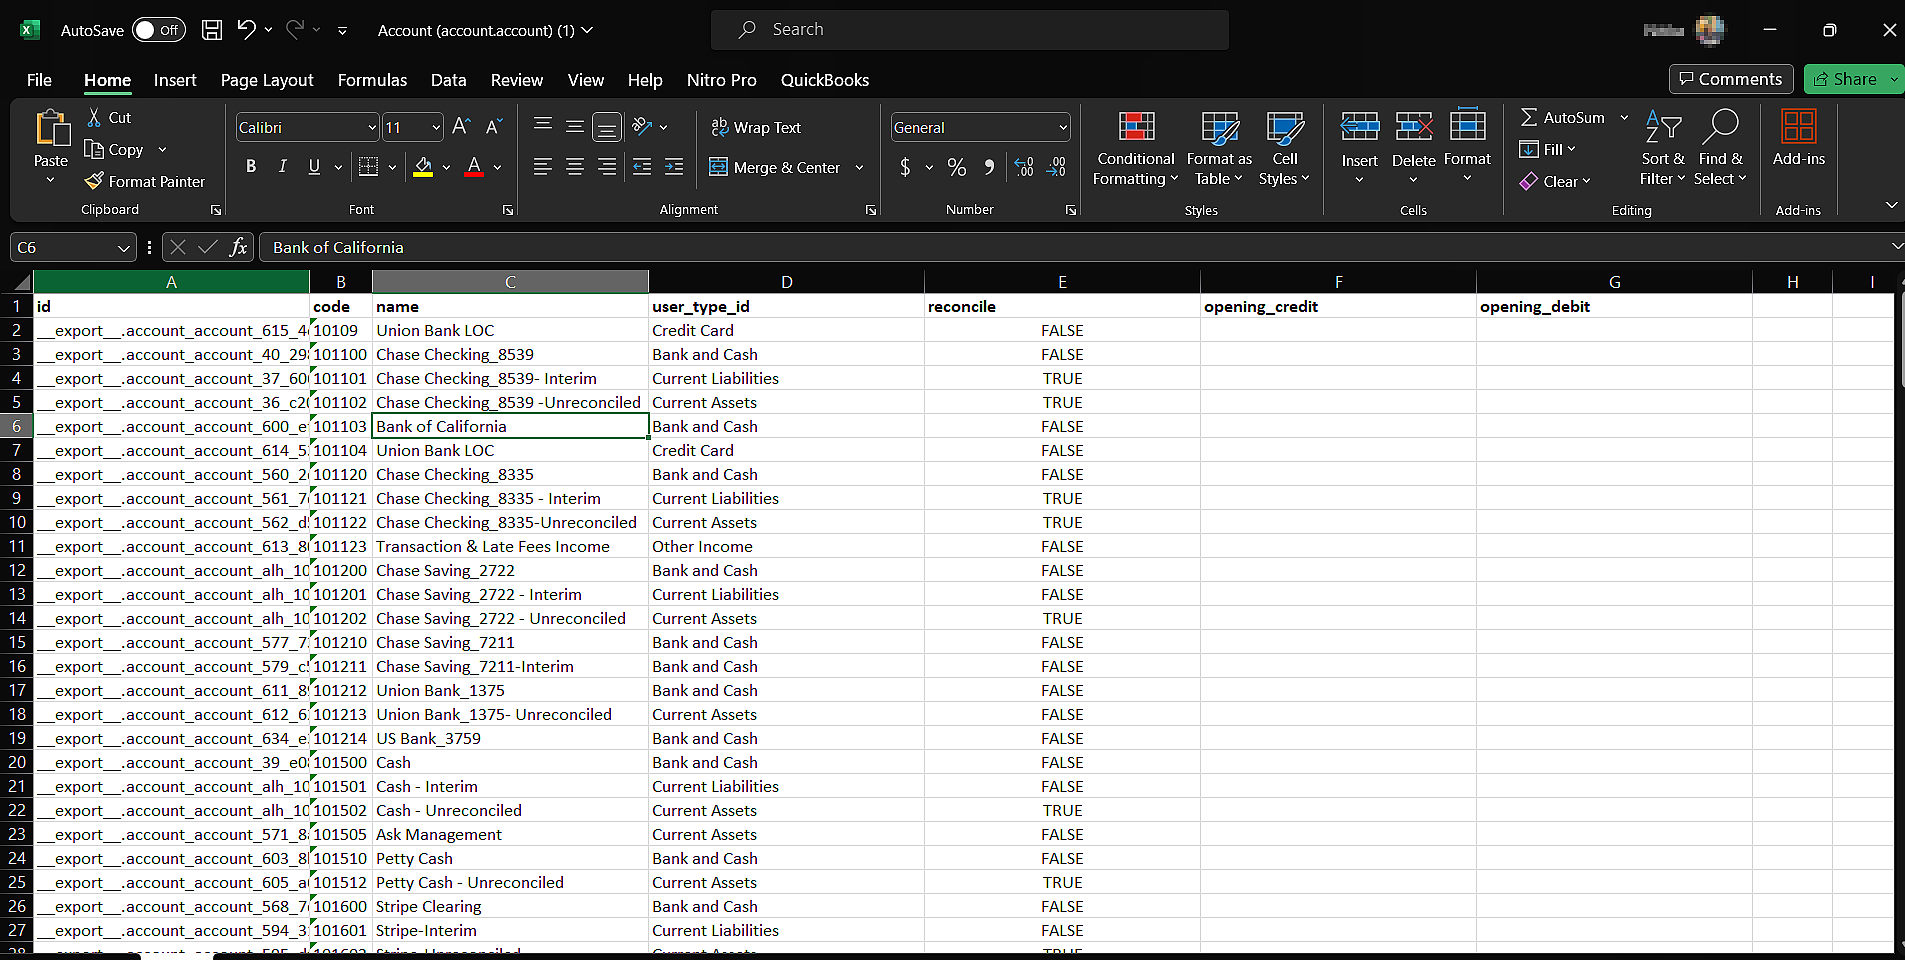
g) In the Excel file, do not update the existing unique ID and user_type_Id (account type). (As highlighted in the image below). Apart from this, you can update other sections.
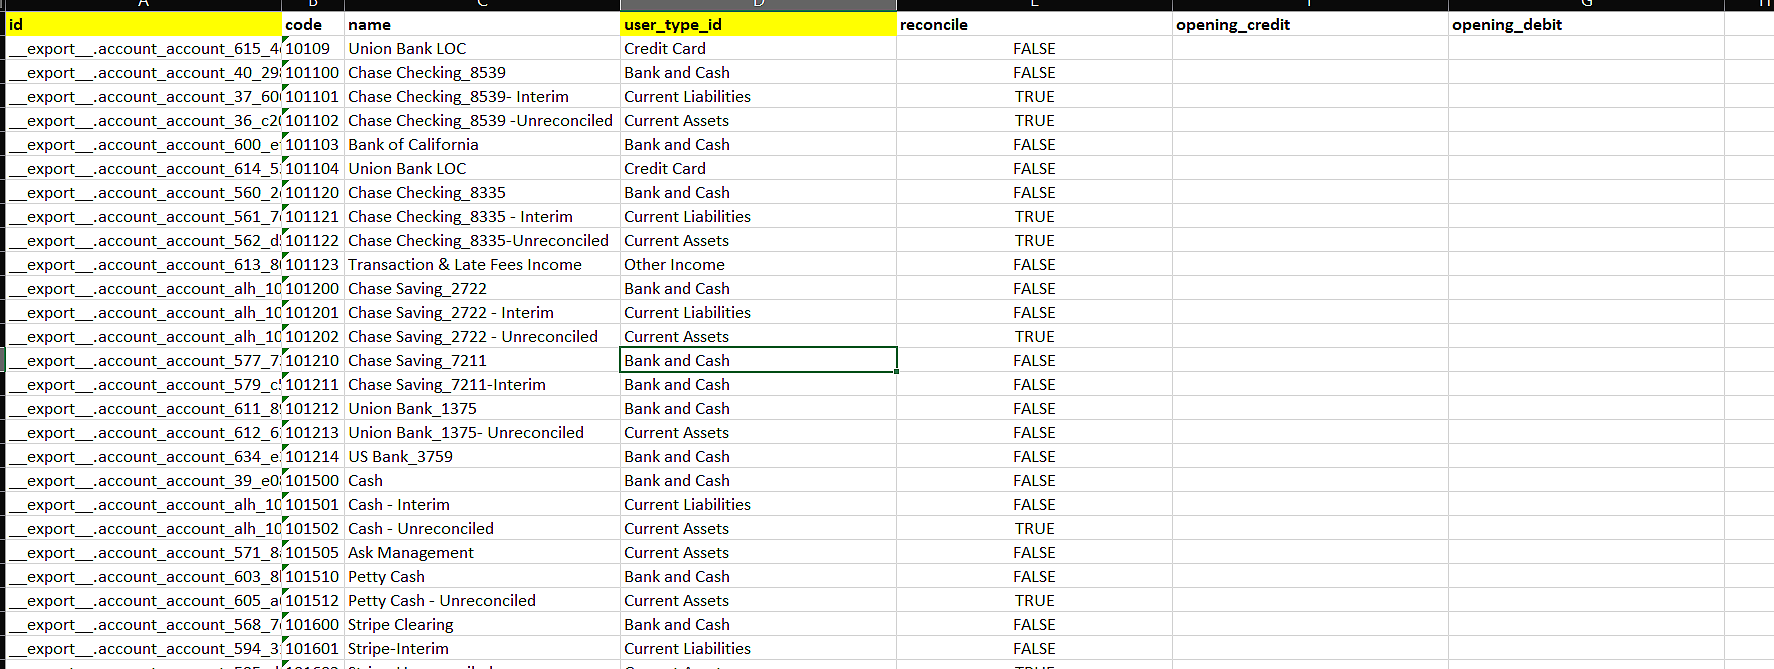
h) You can add new account records.

i) Once changes have been made, save the Excel as CSV.
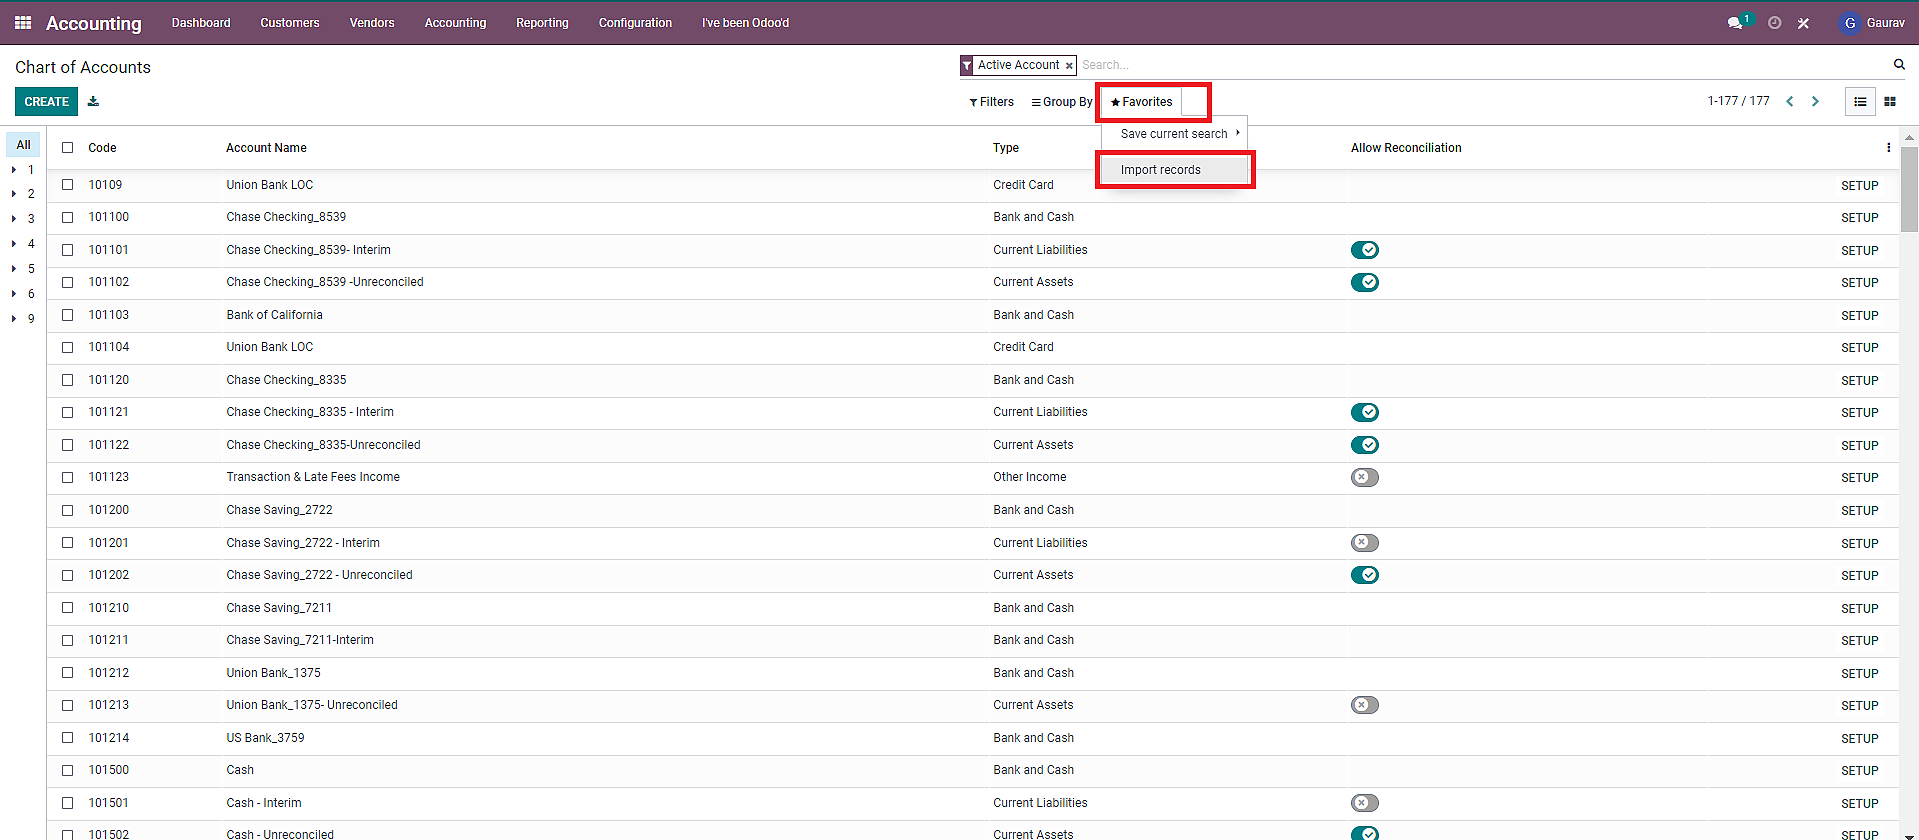
j) Go back to the database and update it through “Import”. For this Click on “Favorites” and then “Import Records”.
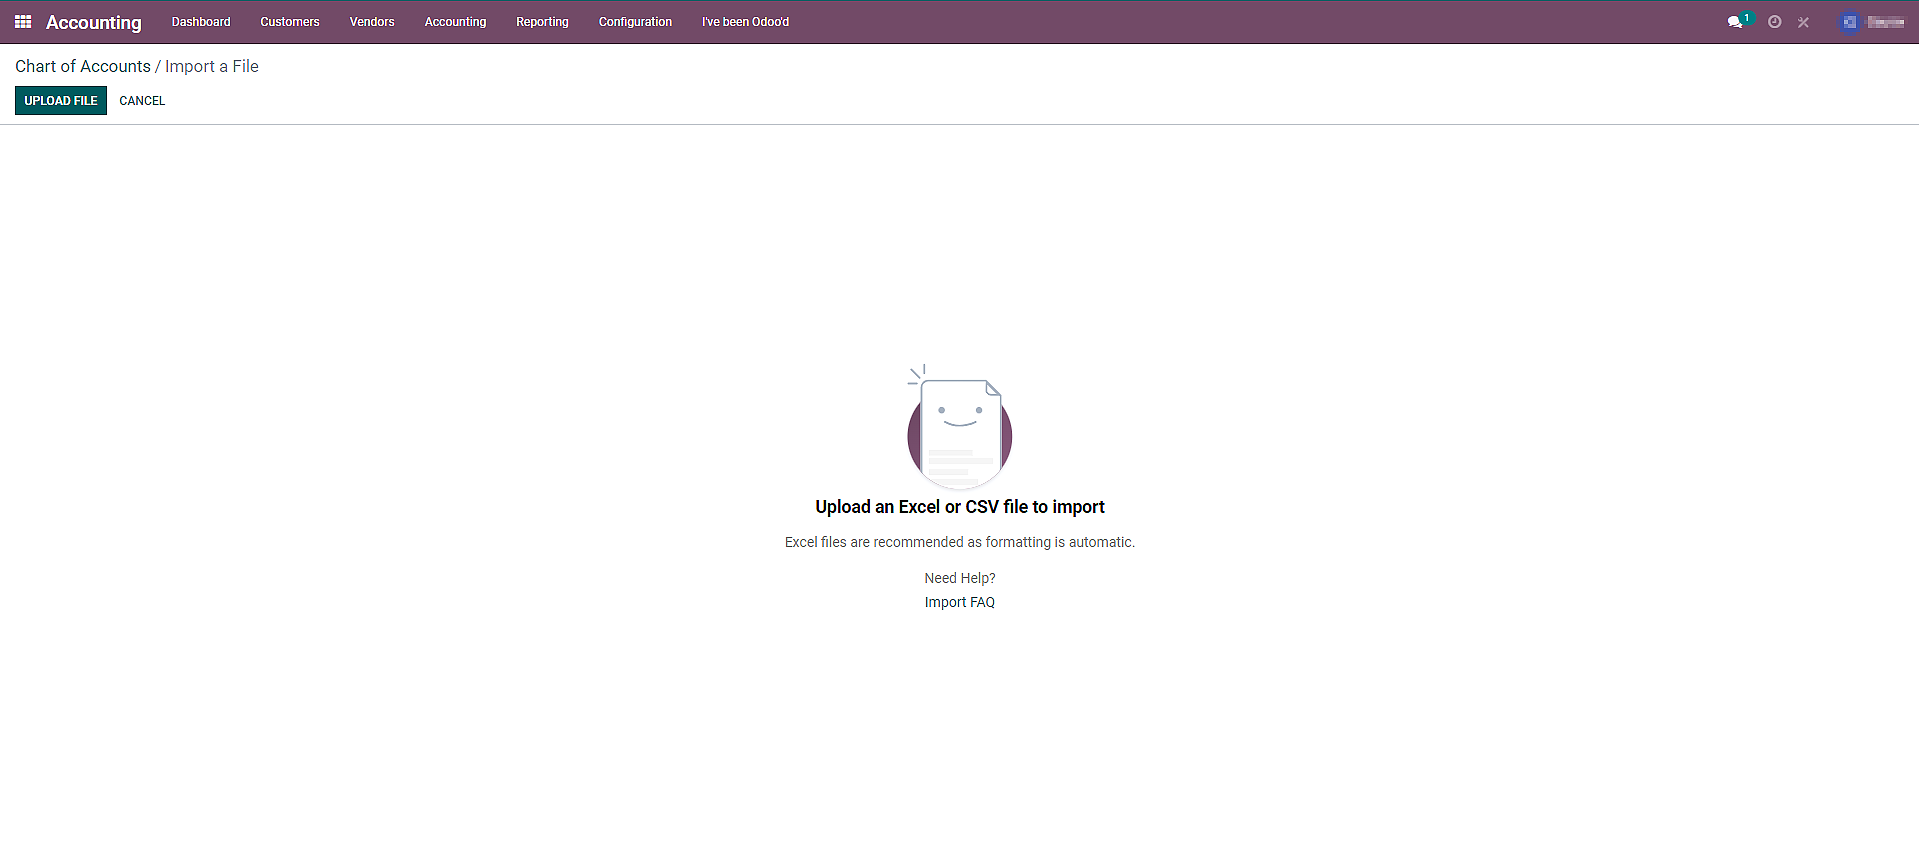
k) Choose the CSV file by clicking on “Upload File”.
l ) While importing the CSV file, Odoo will alert “Everything Seems valid” if all the fields match exactly as in Odoo database.
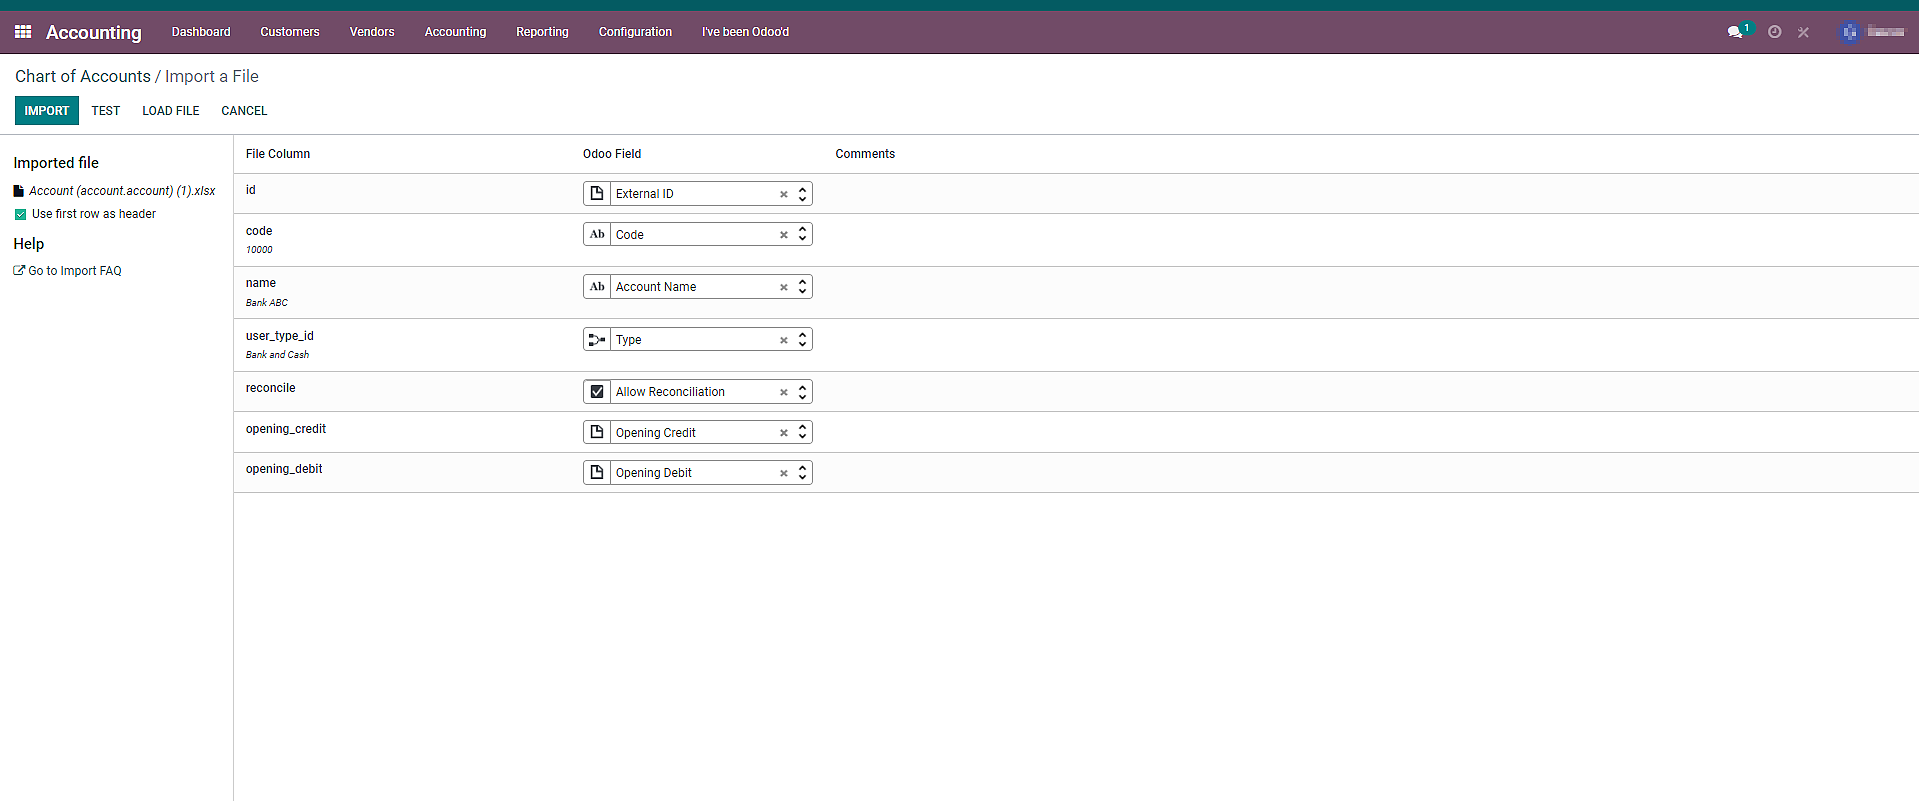
m) You can verify in the list of accounts whether the updated details are imported properly or not.

2. Creating Journal Entries in Odoo
To create journal entries in Odoo, you have to first:
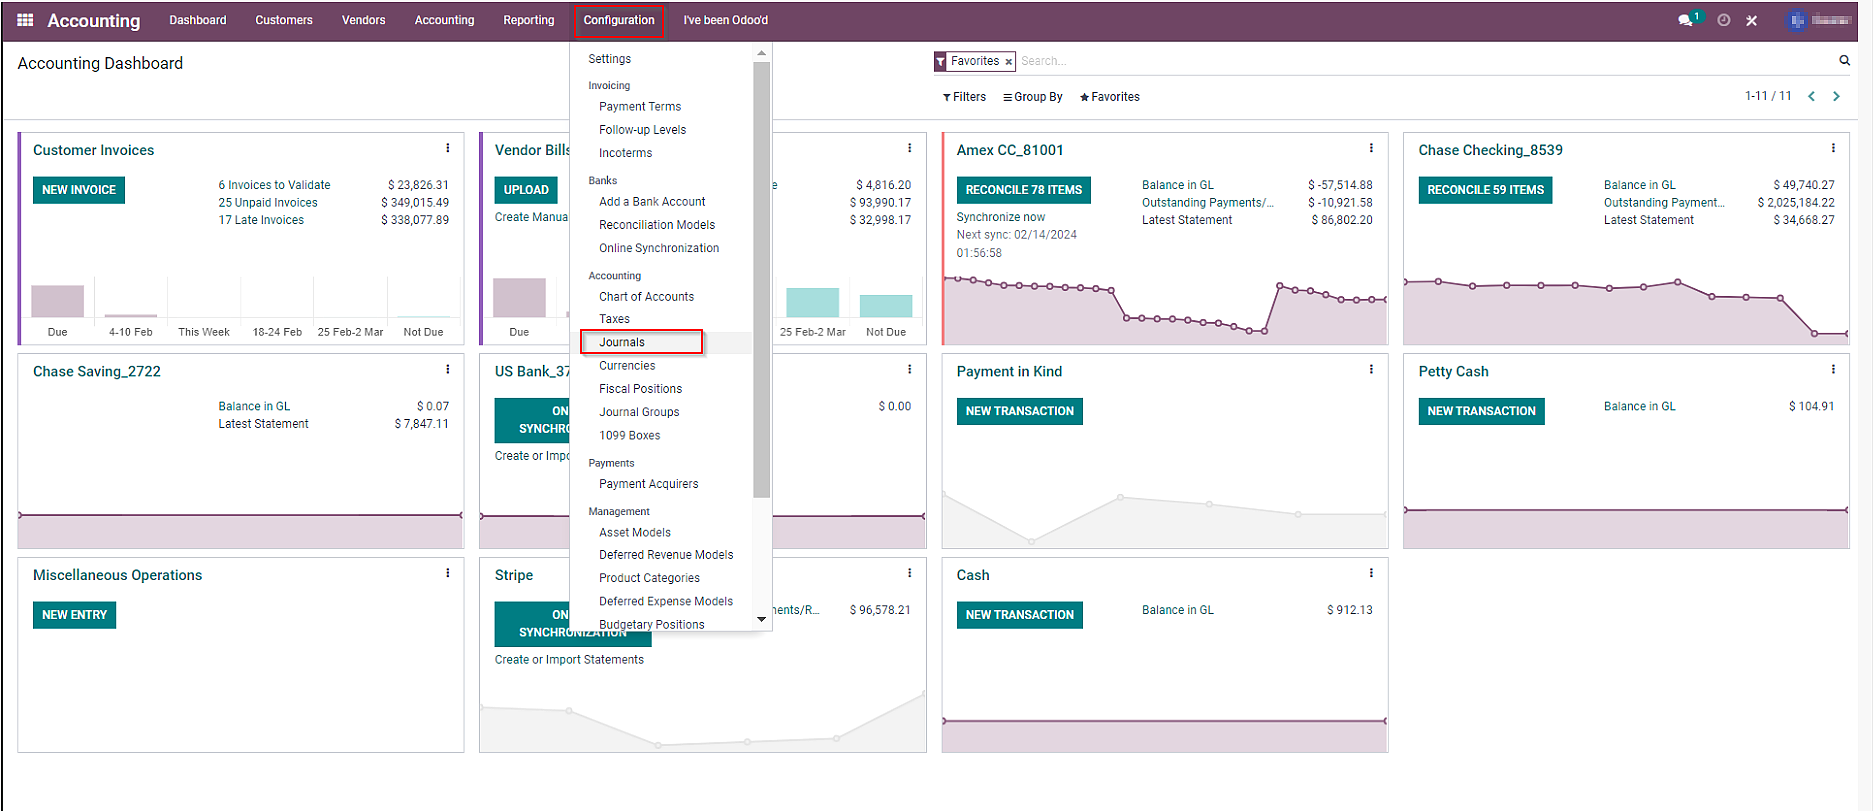
a) Navigate to “Journals” by selecting it from the drop-down menu of “Accounting”.
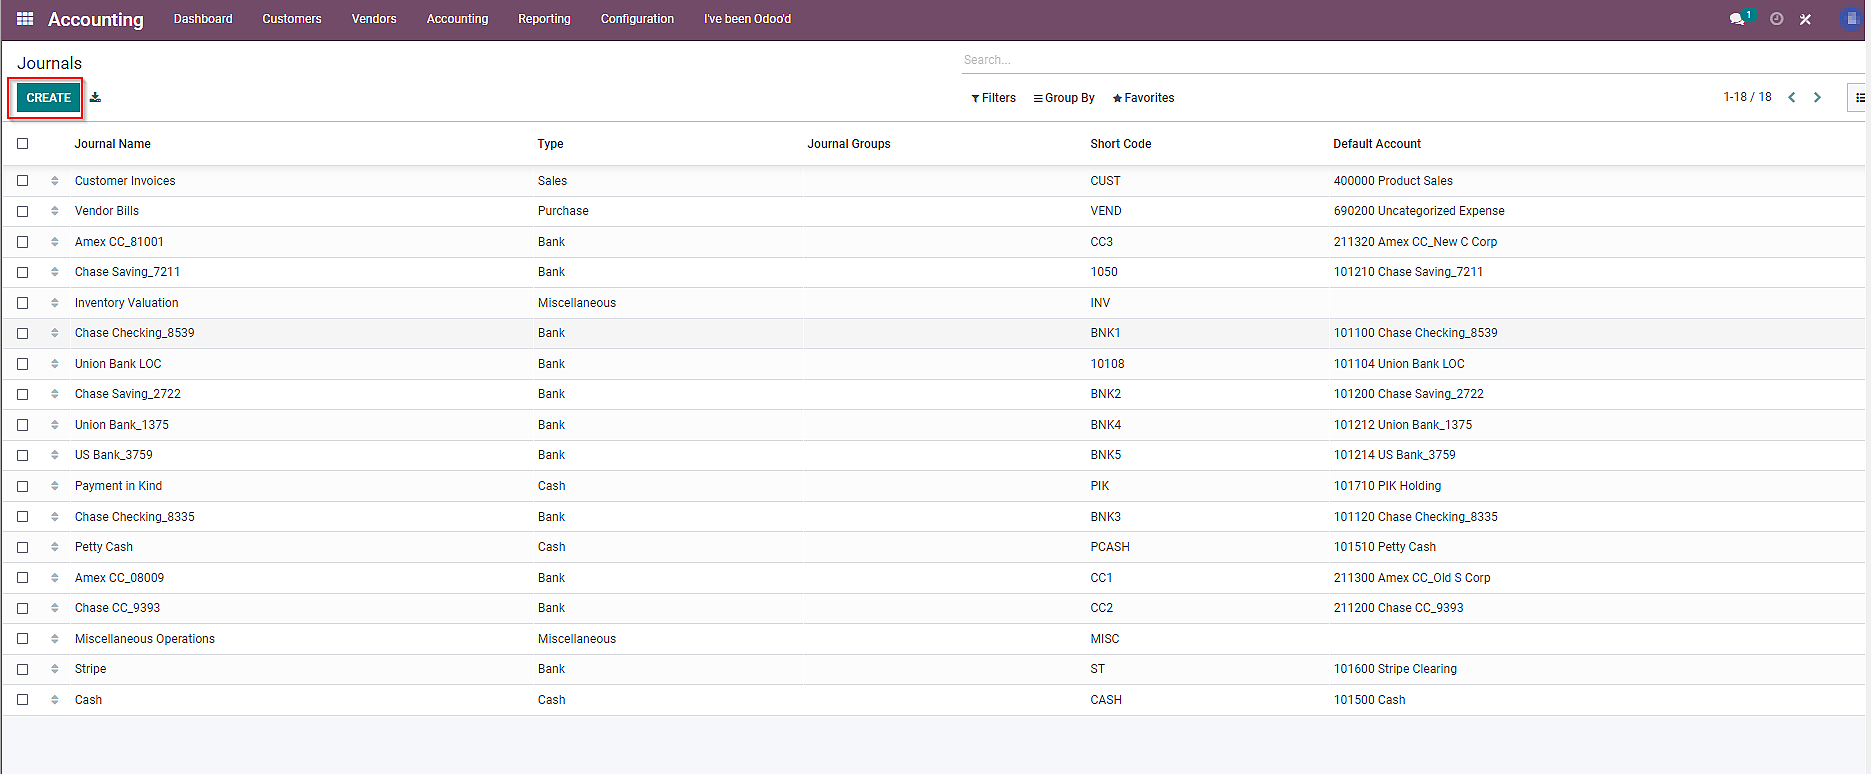
b) Click on “Create”.
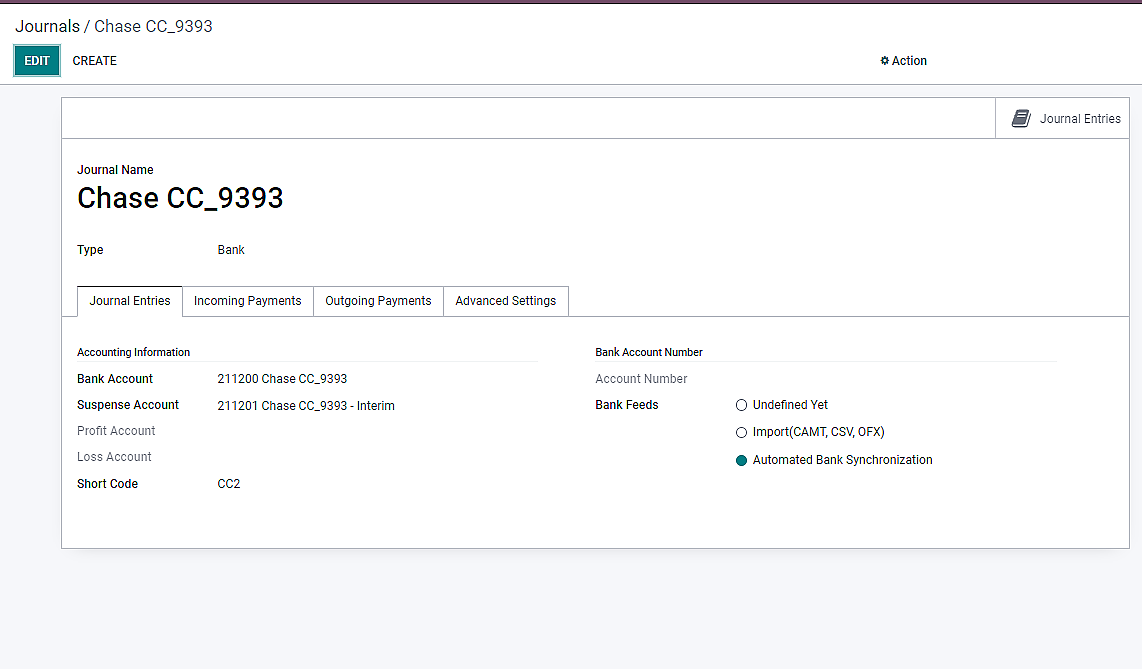
c) Add the details as required and Click on the “Create” button.
Modifying and Maintaining the Chart of Accounts
In Odoo, businesses also have the feasibility to modify the chart of accounts as per their requirements. Let’s see the steps involved in maintaining the Odoo chart of accounts efficiently.
1. Duplicating An Account
You can easily create a new account using an existing account that has set properties, tags, and configurations. This will help you to reduce the repetition of similar tasks and maintain accuracy throughout the financial records. To duplicate an account, you have to:
a) Click on “Setup” available on the right end of the account you want to duplicate.
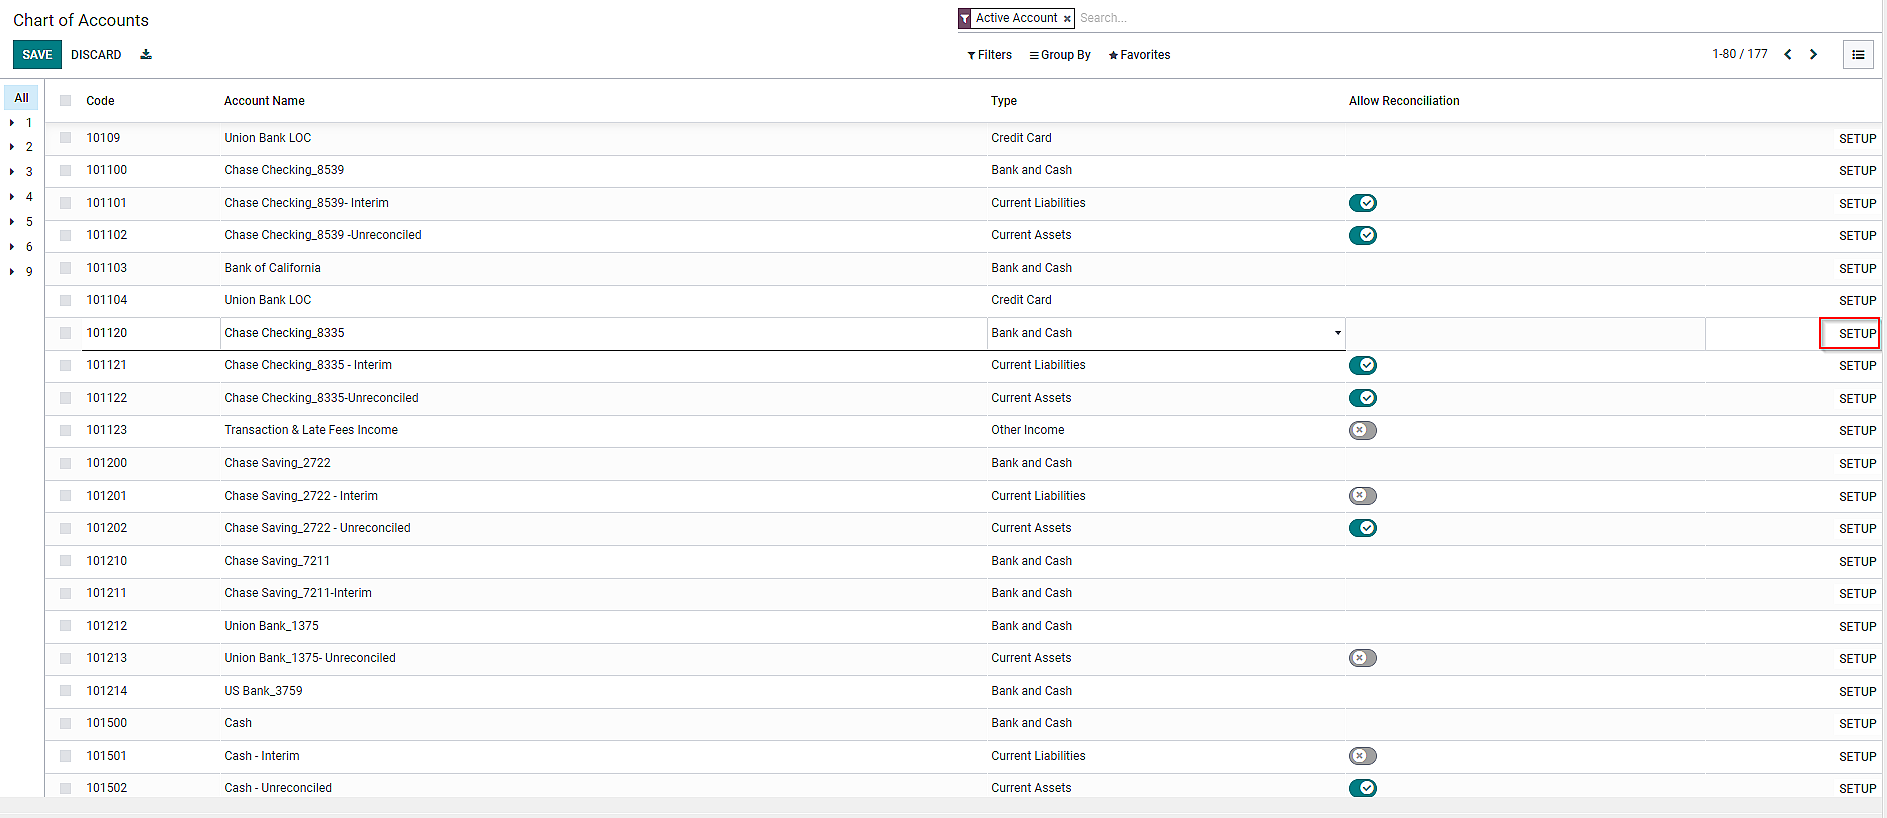
b) Then, click on “Action” and then “Duplicate”.

c) Automatically, Odoo will assign a unique code and a new account name.
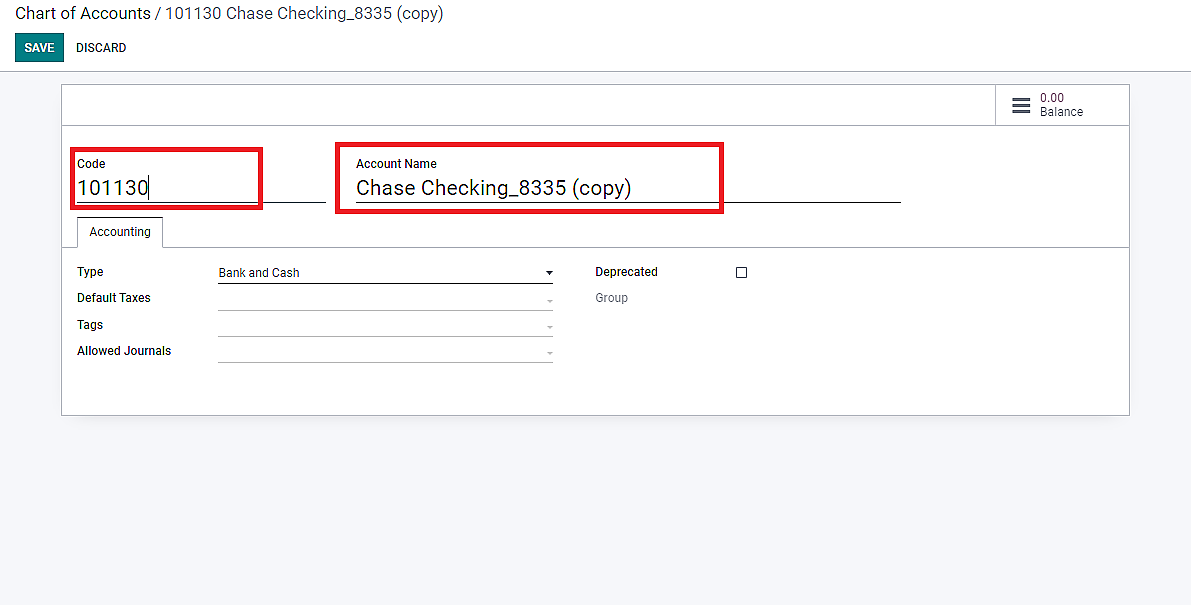
d) Change the account name or code as per the requirement.

e) Click on “Save” once the changes are done.

2.Deactivating or Archiving Accounts
Once a transaction has been recorded on an account in Odoo, you cannot delete it. It is because deleting an account is also not a best practice and this feature helps prevent accidental deletion of important accounting data. Instead, you can mark it as unusable by checking the “Deprecated” box in the account’s settings and saving the changes.
Troubleshooting Common Issues and Errors
Though managing the Odoo chart of accounts is quite easy, problems may arise while configuring it. Some of the most common issues that may occur while configuring chart of accounts in Odoo are as follows:
Account conflicts or incorrect mappings
Sometimes, transactions might end up in the wrong account, or there could be conflicts in how accounts are set up. To fix this:
- a) You’ll need to review the transactions and check if they’re going to the right accounts.
- b) If not, you can edit the transactions to assign them to the correct accounts.
- c) Additionally, ensure that the account mappings are set up correctly in Odoo to avoid future issues.
Balance discrepancies and issues in reconciling accounts
Balance discrepancies may occur when the reported balance in your accounts doesn’t match the actual balance. To resolve this:
- a) You’ll need to carefully review all transactions and compare them with your bank statements or other financial records.
- b) Look for any missing or duplicate transactions and rectify them.
- c) Reconcile your accounts regularly to ensure accuracy, which involves matching your records with external statements.
Got other issues with configuring CoA in Odoo?
Why not ask our Odoo experts!
Final Thought
A business can configure Chart of Accounts in Odoo in multiple other ways. However, in this blog, we’ve covered the essential ones that will benefit your business the most. Besides, this guide will help you understand the importance of effectively managing CoA and the ways to configure it properly.
In a nutshell, to successfully create and configure a CoA in Odoo, you have to:
- 1. Create accounts according to your business needs
- 2. Configure account types and properties accurately
- 3. Make use of features like analytic accounting and group by
- 4. Maintain Odoo CoA regularly by resolving any issues that arise
If you encounter any difficulties during the process, don’t hesitate to seek assistance from our Odoo experts at The Ledger Labs. We will be happy to help you and provide you with tips on efficient financial management.


