

If you are a business owner using QuickBooks Online, you may wonder if there’s a way to streamline your order management process. This may further lead you to search for how to create a sales order in QuickBooks Online. It’s a common inquiry and rightly so.
However, QuickBooks Online operates differently than QuickBooks Premier or Enterprise. Hence, the cloud-based QBO marketed by Intuit lacks the essential functionality to create a sales order.
But, fear not! There are workarounds within QuickBooks Online that you can utilize and achieve similar results as those offered by the sales order feature. One such functionality available in this cloud-based software is the “Estimate” feature. In this blog, we will be discussing how can you manage your customer orders using the QuickBooks Online Estimates.
But before that, let’s understand the difference between “Sales Order” and “Estimate” in QB.
What are the “Sales Order” and “Estimate” Features in QuickBooks?
Understanding the difference between sales order and estimate functionality in QuickBooks is crucial as it will only help you:
- To effectively manage customer orders and
- To keep accurate financial records
If we talk about QuickBooks sales order first, it is a type of record you can create when a customer orders a service or product from your business. This record can help you track the order before an actual sale or invoicing to the customer. With this, you can manage inventory and customer orders and even plan for future sales.
On the contrary, business owners use the QB Estimate feature to create a proposal, bid, or quote for a product or service offered to customers. Then, they convert this non-posting transaction to a purchase order or invoice as per their requirement. Most importantly, it doesn’t impact the inventory or financial record until the customer accepts the proposal.
For your convenience, we have curated this guide that contains the 5 steps for Office 365 NetSuite integration to help you understand the process easily.
From learning what NetSuite Office 365 integration is, to choosing the right integration partner, this blog article got you covered! But before jumping on the 5 steps to NetSuite Office 365 integration, let’s understand why you should opt for connecting them.
Why Opt for NetSuite Integration with Office 365?
As you know, Office 365 is a cloud-based productivity tool that can help in managing email, calendars, documents, etc. On the contrary, NetSuite is a cloud-based ERP solution that helps in business management. The various features of NetSuite can help manage finances and analyze sales data. As a result, you can optimise various business processes.
Simply put, some organizations prefer NetSuite to handle their ERP, CRM, and/or eCommerce needs but still rely on Office 365 for administrative purposes. However, they keep on juggling between the two platforms, making their operations slower.
Here, NetSuite Office 365 integration bridges the gap between productivity and operational needs. By combining these two software, your business can save time and effort to manage the necessary operations.
What are the Key Benefits of NetSuite Office 365 Integration?
Integrating Office 365 with NetSuite can benefit your business substantially by streamlining business operations and enhancing productivity. Listed below are some of its key advantages:
- Improved Efficiency: NetSuite Office 365 integration saves time and effort as you can perform your tasks without constantly switching between the two applications.
- Eliminate the Need for Manual Data Entry: Ensure real-time dates across both platforms by merging NetSuite and Office 365. Thus, promoting seamless data flow without errors.
- Enhanced Collaborations: Experience real-time data accessing and data sharing features with Office 365 NetSuite integration.
- Promote Seamless Experience for Customers: Engage with your customers more effectively by unifying customer data, sales processes, and communication by NetSuite integration with Office 365.
- Better Decision Making: Make better data-driven decisions by combining the robust analytics and reporting capabilities of NetSuite with the productivity tools of Office 365.
Common Challenges of NetSuite Office 365 Integration
Before proceeding to the steps for integrating NetSuite ERP with Office 365, it makes sense to acquaint yourself with some common challenges you might face during integration:
- Concurrency Governance: Limitations on several simultaneous connections per license. Multiple connections can lead to errors.
- Cost and Budgeting: The cost of NetSuite Office 365 integration can vary widely. An unexpected cost can arrive during the process.
- Limitations in SuiteScript API
- API Complexity: NetSuite’s API is robust but complex to understand.
- Data Transfer Rates: Large-scale data transfers can take longer than expected.
5 Steps for NetSuite Office 365 Integration
To be honest, you can easily overcome these challenges if you adhere to the following 5 steps for NetSuite integration with Office 365. Let’s understand them step by step.
Step 1: Assess Your Integration Needs and Goals
The first step to seamless NetSuite Office 365 integration is to assess your organization’s needs and goals before deciding on an effective integration strategy. This assessment will help you identify critical business processes and your integration objectives.
Furthermore, you can gain confidence that the integration will precisely align with your organizational requirements. Consequently, you can attain a more impactful and successful Office 365 NetSuite integration outcome.
Now, let’s understand how you can successfully assess your integration goals.
Identify the Key Business Processes You Want to Streamline
You know how some business operations take longer than anticipated and you are always on the lookout to simplify them? Many organizations like yours face the following problems and NetSuite Office 365 integration can streamline these processes:
- Manual data entry takes a considerable amount of time.
- Inconsistent data across multiple systems creates confusion.
- The discrepancies in data across various platforms lead to data accuracy.
- Struggle to get a 360-degree view of business operations.
- Time delay in decision-making because of waiting for manual data entry.
- Customer experience is suffering due to delayed information.
Determine the Data and Functionality Required for Integration
When you have identified the specific workflows that you want to target with Office 365 NetSuite integration, the next step involves a detailed analysis of the required data and functionalities.
By doing this, you can avoid needless complexities and ensure that NetSuite integration with Office 365 aligns with your business objectives.
Want to learn more about QuickBooks Online?
Let our QBO experts help.
The prominent difference between the two is that QB sales orders reflect sales and inventory counts that can be combined into one invoice. Conversely, an estimate will not reflect any changes in the inventory or financial statement because it is just a proposal.
From now on, we will be discussing the steps to create an estimate in QuickBooks online.
Accessing the Estimate Feature in QuickBooks Online
First, you need to turn on the estimates feature in QuickBooks to create a proposal for your customer. The activation steps are quite easy, simply follow the below-mentioned instructions:
- Login to QuickBooks Online as Admin.
- Navigate to the QuickBooks Edit menu and select “Company Preferences”.
- Within the Company Preferences menu, choose the “Jobs & Estimates” option located in the left pane.
- Once clicked, you will be asked a query, “Do you want to create estimates?”.
- Select “Yes” and then click on OK.
By doing this, you have activated the Estimate feature in QuickBooks online. If needed, you can also customize the estimate settings according to your business needs. For example, you can:
- Switch on the alert option as a warning to prevent creating duplicate estimate numbers.
- Choose to permit progress invoicing for providing the payments in stages during a project.
- Decide to include zero-amount items on progress invoices.
6 Steps to Creating an Estimate in QuickBooks Online
After configuring and finalizing the estimate settings, now you can conveniently create a proposal for your customers in QBO. For your convenience, we have mentioned the detailed steps for creating an estimate in both QuickBooks Online and Desktop.
First, acquaint yourself with the steps for creating an estimate in QB Desktop.
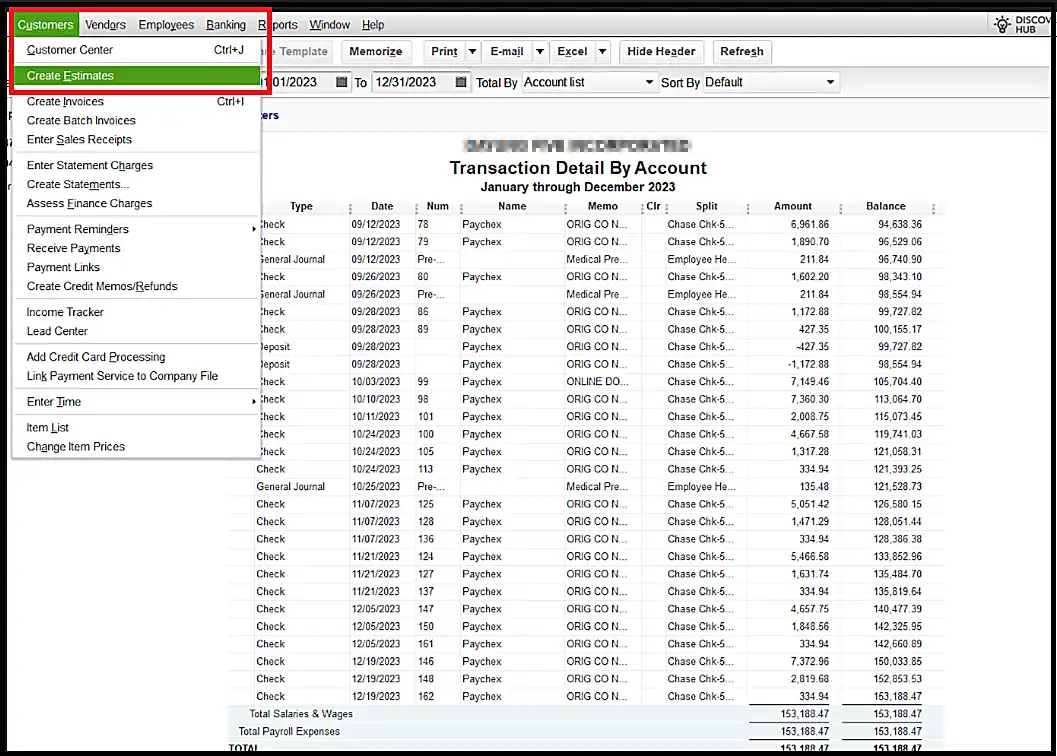
Step 1: Navigating to the Create Estimate Option
- Navigate to the “Customers” tab available on the left-hand upper corner of the QB Desktop dashboard.
- Select “Create Estimates” from the drop-down menu.
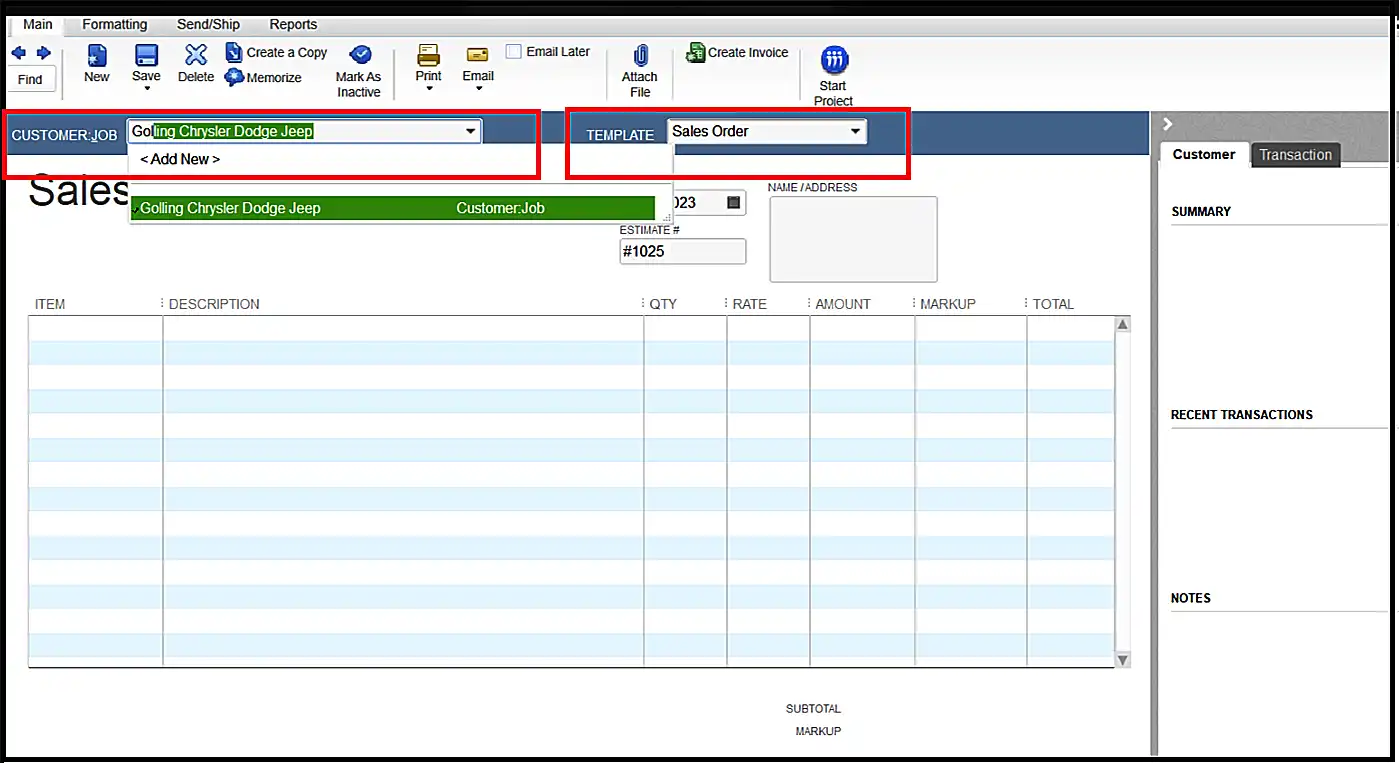
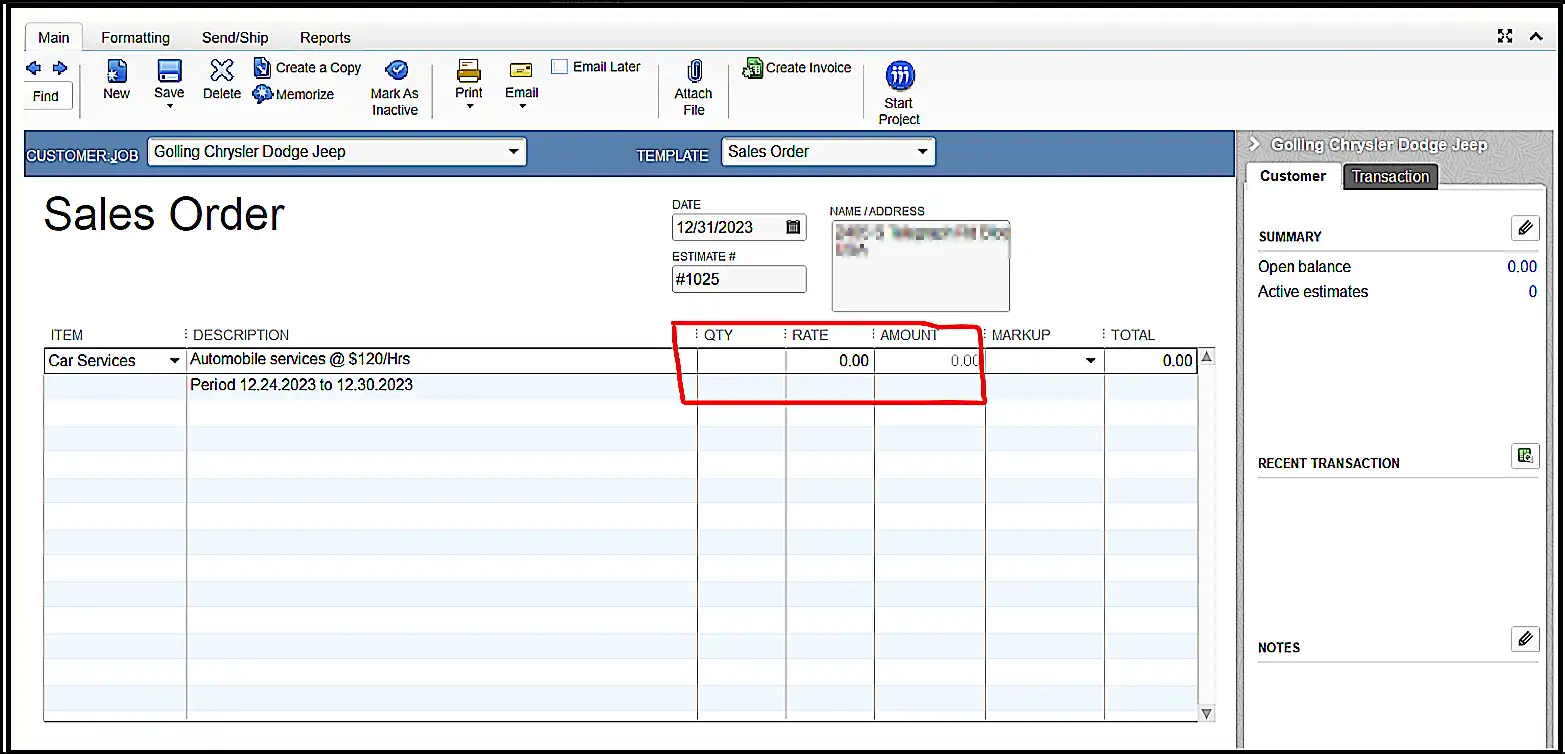
Step 2: Entering Customer Information and Selecting a Template
- Select the customer name for whom you want to create the estimate from the list of options in the “Customer Job” tab.
- After selecting the customer information, choose the template for the estimate. Here, you can select the “Sales Order” template.
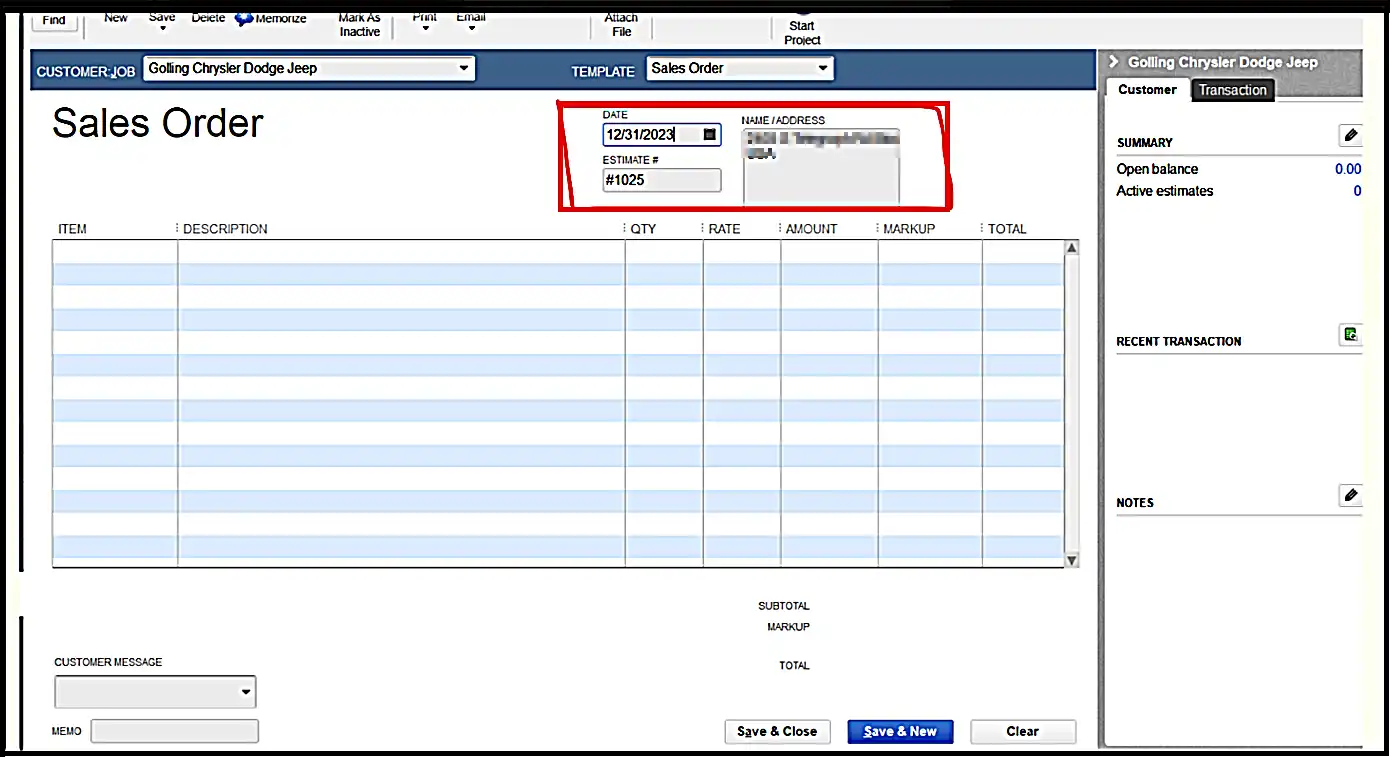
Step 3: Adding Date, Estimate Number, and Address
- Add the Estimate number, date of creating the form, and address of the customer in the provided section.
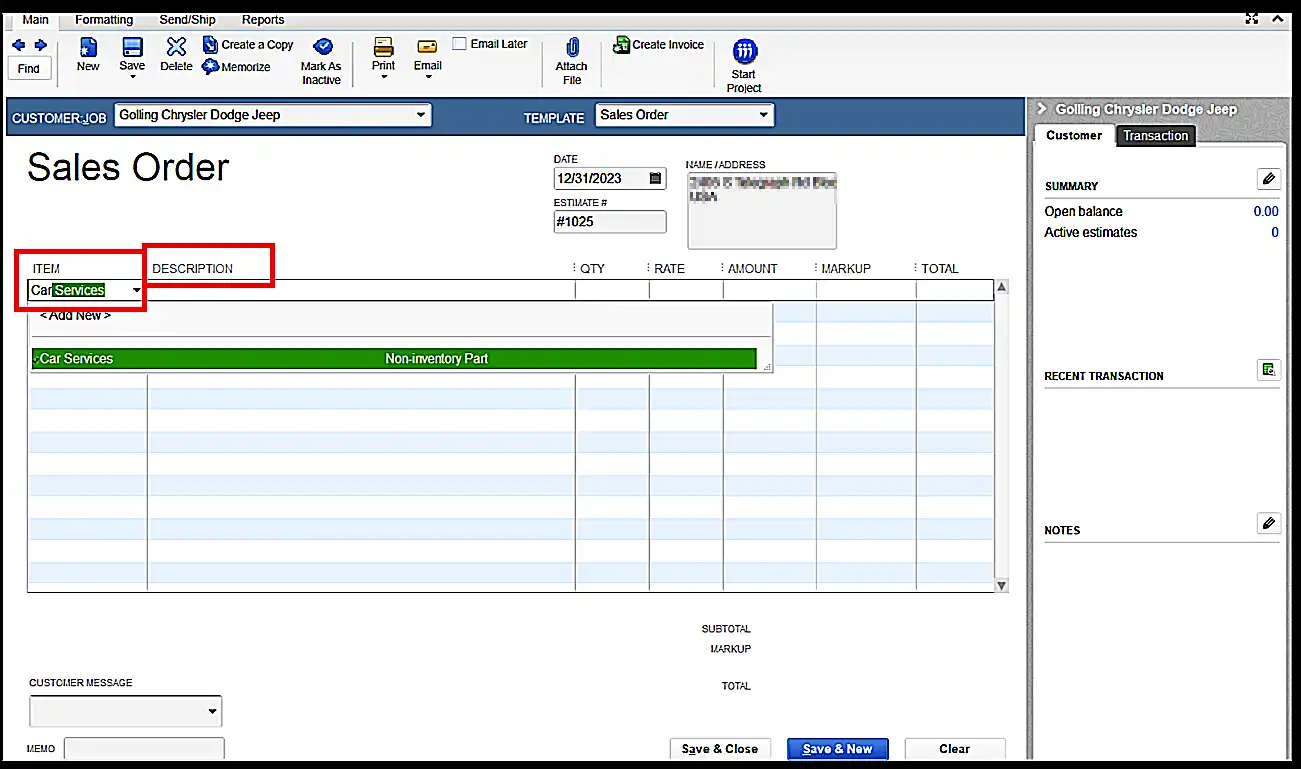
Step 4: Adding Products or Services to the Sales Order
- Now, select the item from the drop-down menu.
- Also, add a description of the goods or services for which you are creating the estimate.
Step 5: Specifying Quantities, Prices, and Discounts
- Specify the quantity and rate per quantity of the goods or services you are offering.
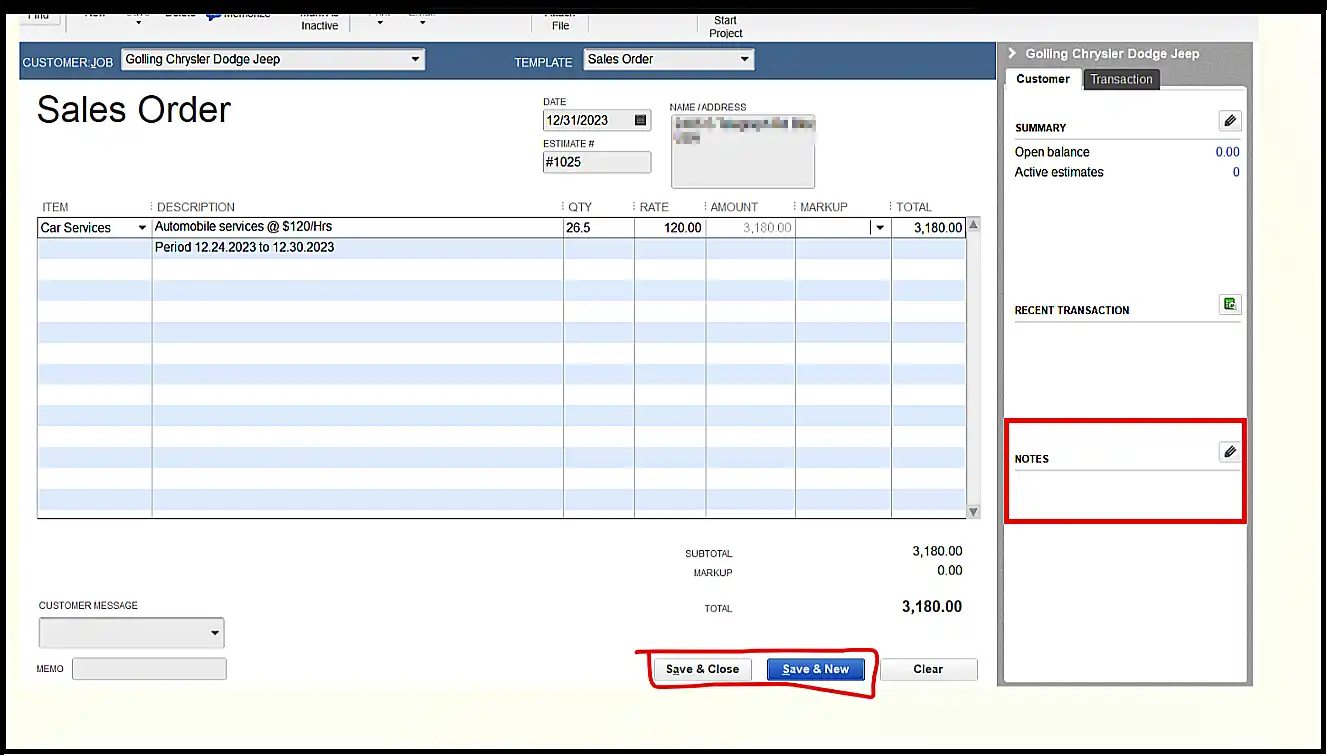
Step 6: Including Additional Notes (If Required) and Saving the Estimate
- Add notes or special instructions (if required) on the right-hand bottom corner of the template.
- Then, review all the filed details. Once done, click on “Save and Close” to save the estimate form.
- If you want to create a new estimate, click on “Save and New”. QBD will open a new empty form.
5 Steps to Creating an Estimate in QuickBooks Online
As we have mentioned earlier, we will be also providing detailed instructions for creating an estimate in QuickBooks Online. So, here are the steps for you to follow:
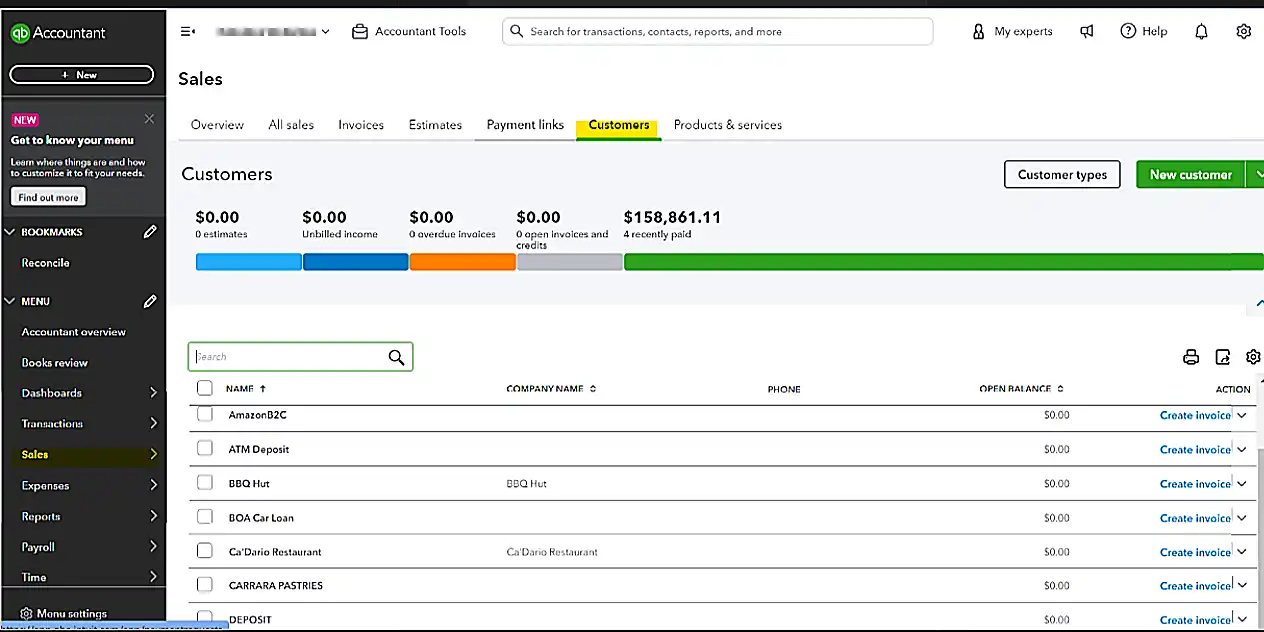
Step 1: Navigating to the Customers Tab in QBO
- Log in to QuickBooks Online using your credentials.
- Click on the “Sales” tab on the left panel and then select “customers”.
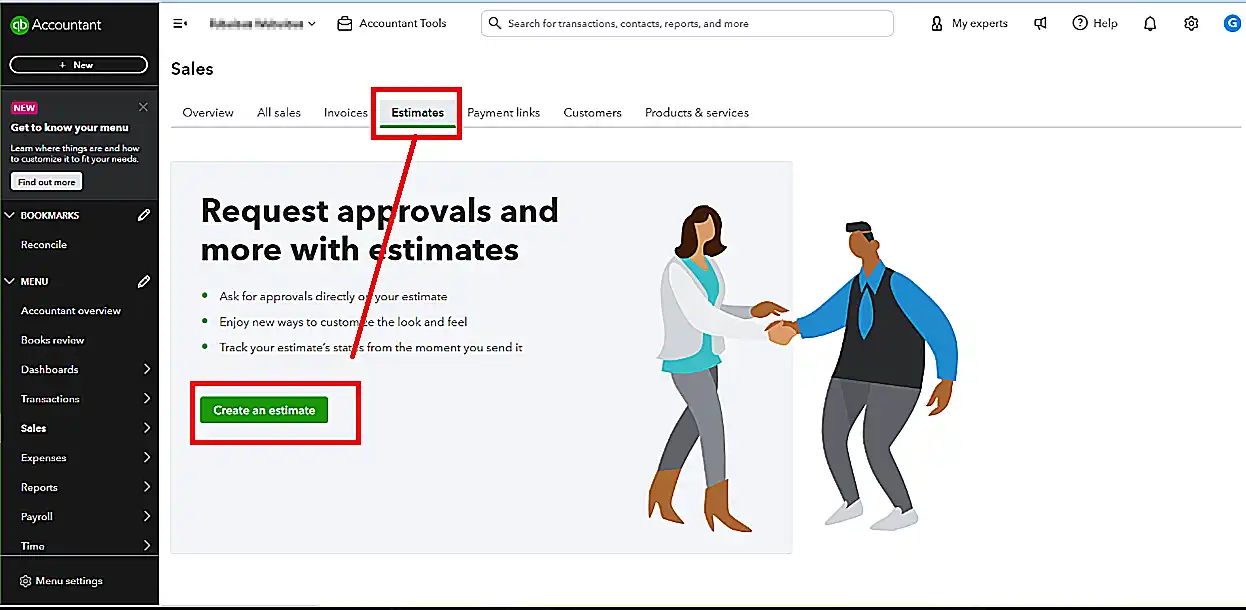
Step 2: Finding the “Create an Estimate” Button
- After this, select the “Estimates” option.
- Then, click on the “Create an Estimate” button.
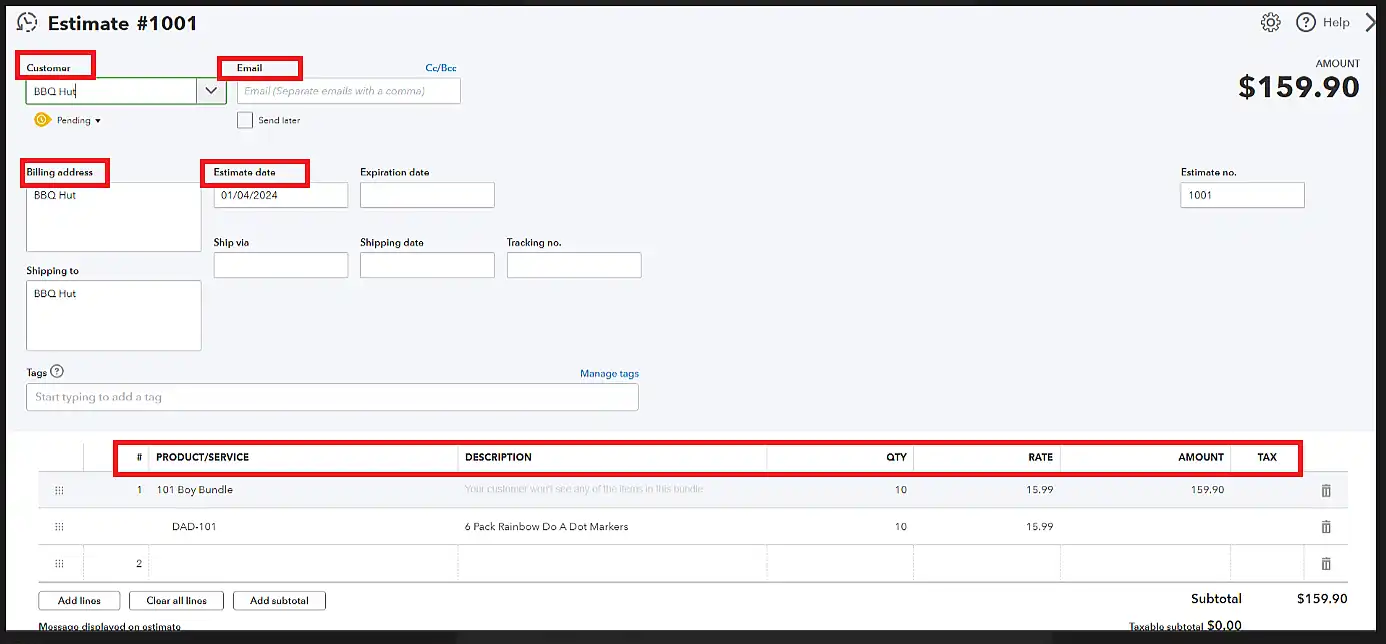
Step 3: Adding all the Necessary Details in the Estimate
- Now, add all the important information related to the customer such as name, billing address, email address, etc.
- Also, add the description, quantity, and cost for the product or service you are selling.
Step 4: Reviewing and Saving the Created Estimate
- Once you have entered all the necessary information, review it thoroughly to avoid any mistakes.
- When finished reviewing, click on the “Save and Close” button.
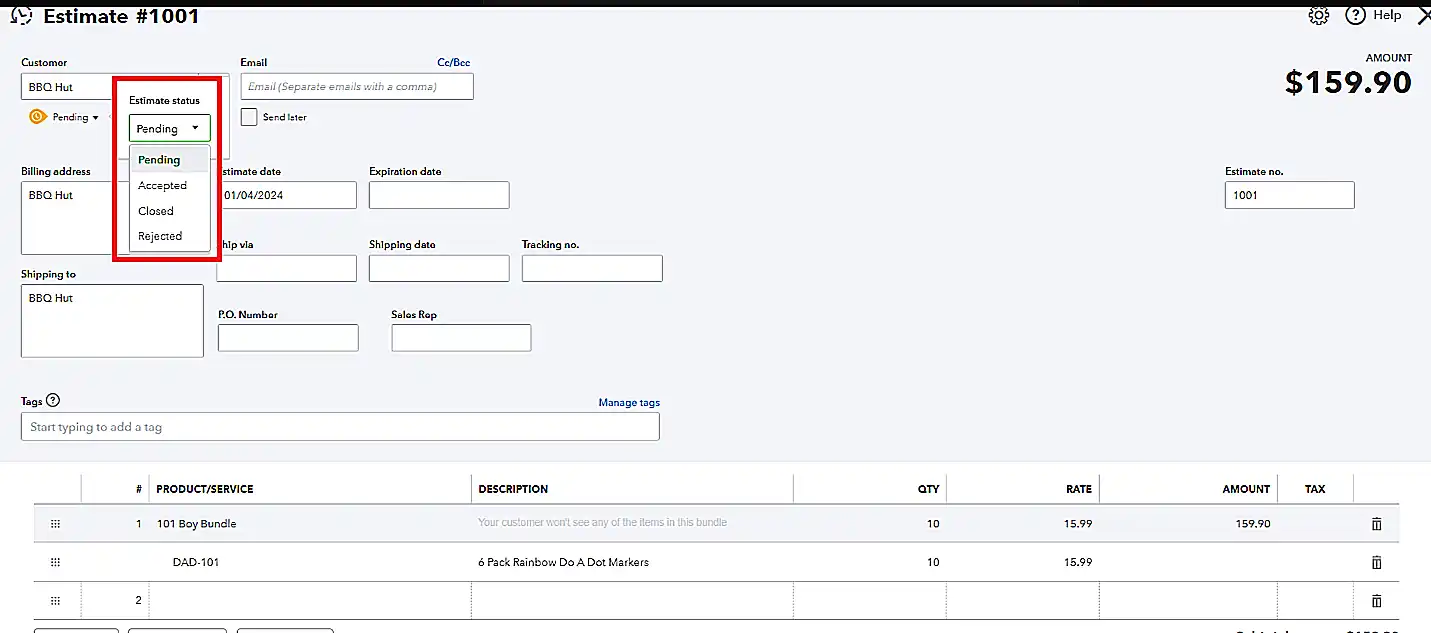
Step 5: Changing the Estimate Status
QuickBooks Online also has provisions to change the estimate status from pending approval to accepted, closed, or rejected.
- Once the customer has approved the proposal, you can choose the “Accepted” option from the drop-down menu (see below image). As a result, you can convert this estimate to an invoice.
Talk to our QuickBooks Online experts!
Stuck with any of the steps above?
Managing Estimates in QuickBooks Online
So far we have seen how to create an estimate in QuickBooks online. Here’s a quick walkthrough on how you can manage estimates in QBO that includes checking the estimate status, converting them into invoices, etc.
1. Tracking the Status of Estimates
If you wish to know the status of your estimates, then follow the below-mentioned steps that will make your search easier:
- i) Click on Sales > Customers > Estimates.
- ii) Each estimate will be listed with its current status on the dashboard. The statuses can be:
- a) Pending: Awaiting approval from the customer.
- b) Accepted: The proposal is approved by the customer.
- c) Closed: The status can automatically change to Closed when you convert the estimate to invoice and save it.
- d) Rejected: The customer has declined the proposal.
- iii) You can use the filter option to quickly identify pending estimates.
- iv) The estimate dashboard can also help you view those estimates that are already accepted. This will help you to process and deliver the order within the stipulated time frame.
2. Converting Estimates into Invoices or Purchase Orders
To convert the accepted estimates into invoices, perform the following steps:
- i) Choose and click on the estimate you wish to process from the list of estimates on the dashboard.
- ii) Select “Convert to Invoice” from the Action column.
- iii) Make changes or updates to the invoice, if required.
- iv) Then click on the “Save” button.
3. Editing or Deleting Estimates if Necessary
You can also modify the estimates if needed. For this, you have to:
- i) Look for the estimate you want to edit from the estimates dashboard.
- ii) Once the estimate form is opened, click on the edit button and make the necessary changes. You can add items, update quantities, etc.
- iii) After editing is done, click on “Save”.
If deleting the estimate in QuickBooks Online is necessary, then:
- i) Find and open the estimate you want to delete.
- ii) Click on “More” on the estimate form.
- iii) Select Deleted and confirm by clicking on “Yes”.
Customizing Estimates to Suit Your Business Needs
Customizing estimates can help improve the efficiency of your business as you can tailor the record according to your requirements.
For example, you run a service-oriented business and you want to add information related to the estimated duration for completing a service. In this case, you can opt for customizing the estimate template by adding a custom field and naming it “Service Duration”.
Just imagine how detailed information you will be providing to your customers by choosing to customize estimates. It will help them to make decisions faster and accept the estimate quickly. Let’s look at the benefits of customizing Estimates in QuickBooks Online.
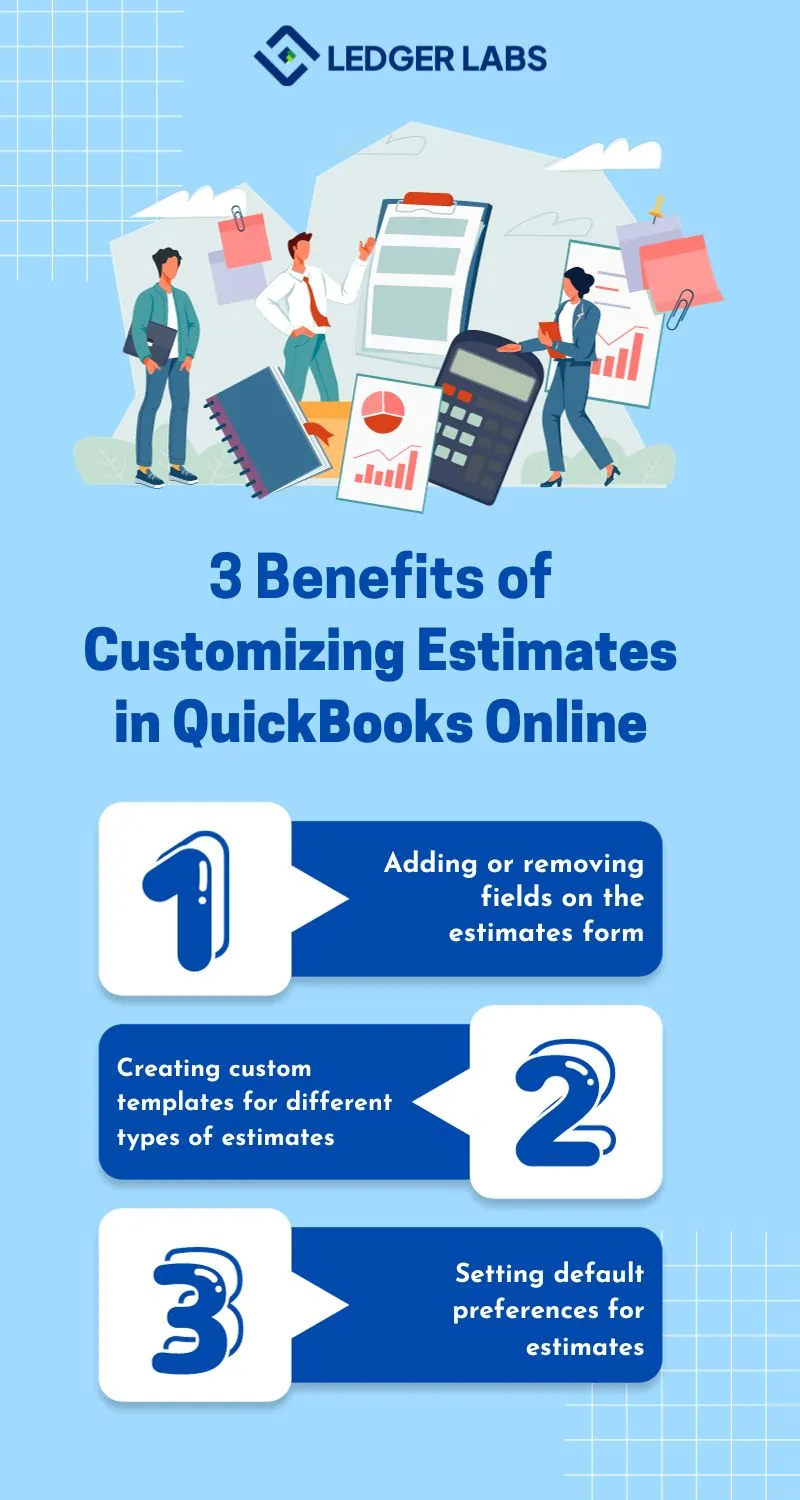
- Adding or Removing Fields on the Estimates Form: You can choose to add or remove fields to provide specific information related to your industry or offerings. For instance, if you are in an e-commerce business, you can add a section to specify the color choices as per the customer preference.
With this, you can reduce the need for additional follow-up and it allows your customers to communicate their preferences beforehand. - Creating Custom Templates for Different Types of Estimates: Your business can appear more professional if you can custom-design templates to suit different types of estimates.
For example, your e-commerce business specializes in various products like home decor items and garden decor items. You can choose to create separate templates for “Home Decor Estimates” and “Garden Decor Estimates”.
The estimate customization feature can help you display relevant information based on each product category. Which in turn can improve clarity for your customers. - Setting Default Preferences for Estimates: Default preferences can help your business maintain consistent standards across all estimates. As a result, you can reduce errors and manual adjustments. Let’s understand this feature with an example.
Suppose, your e-commerce business has standard payment terms and shipping policies. To ensure uniformity in payment terms, you can set default preferences for the same. Such as setting the payment method to 50% upfront. With this, you can convey clear instructions to your customers and avoid confusion in the future. Read more ecommerce business tips here.
Troubleshooting Common Issues When Creating Estimates in QuickBooks Online
You might indeed face some challenges when creating estimates in QuickBooks Online. That being the case, understanding how to troubleshoot those issues can simplify the order management process further.
- Error Messages or Issues with Data Entry: Sometimes manual data entry can lead to errors. Hence, you need to identify such errors and quickly resolve them to ensure accurate estimate information.
- Syncing Issues Between Quickbooks Online and Other Platforms: Since you can seamlessly integrate QuickBooks Online with other platforms, it becomes essential to resolve syncing issues as soon as they occur. By doing so, you can ensure estimate data will be consistent and up-to-date across all the platforms.
Importance of Estimates in Managing a Business
Even though we have discussed the necessary steps to create estimates in QuickBooks online it is paramount to understand why your business needs it.
Creating an estimate in QuickBooks is a part of your usual Accounts Receivable (A/R) workflows. Estimates can help you forecast income, allocate resources, and strategize project timelines. This important feature in QuickBooks online can also contribute substantially to accurate financial reporting by tracking project profitability.
The benefits of using QuickBooks estimates include:
- Offers Transparency to Customers: Provide your customers with detailed information about expected costs with the help of QBO Estimates. This can help them decide how to proceed further with the purchase.
- Improves Financial Reporting Accuracy: Attain accurate financial reporting with the Estimate feature in QuickBooks by forecasting expenses and expected revenues.
- Builds Strong Client Relationships: Set clear expectations regarding the cost, scope, and timeline of the project. QBO Estimates can act as a strong foundation of trust among your potential customers.
- Streamlines Invoicing Process: Convert estimates into invoices easily once the client has approved the proposal. As a result, you can simplify the complete billing procedure which can lead to fewer errors while generating accurate invoices. This means you can save a lot of time.
- Helps in Resource Planning: Use the Estimate feature in QuickBooks online to schedule and allocate resources effectively.
Summing Up
We hope that our blog has helped address your question How to create a sales order in QuickBooks Online. Due to the absence of the Sales Order feature in the online version, we have introduced its best alternative QBO Estimate, which can help you streamline your order management process.
By using the estimates feature in QuickBooks Online, you can provide your customers with detailed proposals and convert them into invoices effortlessly.
Still, if you face any issues while creating estimates in QBO, you can contact our QuickBooks experts and they will instantly answer your queries.


